

This Is a Drill: Win10 Blue Screen, Summon at Will
The blue screen seems to be something many IT Home users don't want to see. Although in Win10 you can still scan the QR code at the bottom of the screen to participate in Microsoft interactions and win a big... well, the benefit of the blue screen is that it provides problem information for professionals, such as the current memory dump, which helps with troubleshooting and solving problems. Of course, the information given by the default blue screen alone may not be enough; in that case you can enable Win10 blue screen detailed information display. ▲ This QR code actually “moved up”... VM12 virtual machine test results Microsoft has arranged a way to manually “summon” the blue screen in Windows10, which is **hold the right
The blue screen seems to be something many IT Home users don't want to see. Although in Win10 you can still scan the QR code at the bottom of the screen to participate in Microsoft interactions and win a big... well, the benefit of the blue screen is that it provides problem information for professionals, such as the current memory dump, which helps with troubleshooting and solving problems. Of course, the information given by the default blue screen alone may not be enough; in that case you can enable Win10 blue screen detailed information display.
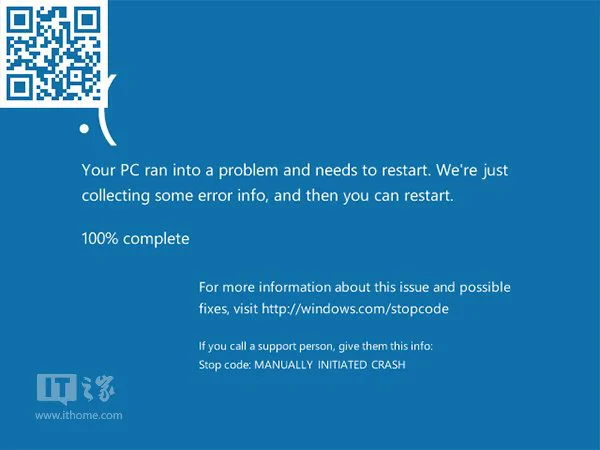
▲ This QR code actually “moved up”... VM12 virtual machine test results
Microsoft has arranged a way to manually “summon” the blue screen in Windows10, which is **hold the right Ctrl key, then press Scroll Lock twice in a row ↓ **. However, this feature is locked by default, presumably out of fear that accidental operations by ordinary users would cause trouble. But for professionals and users who like to tinker, you can manually unlock this skill.
The specific method is as follows:
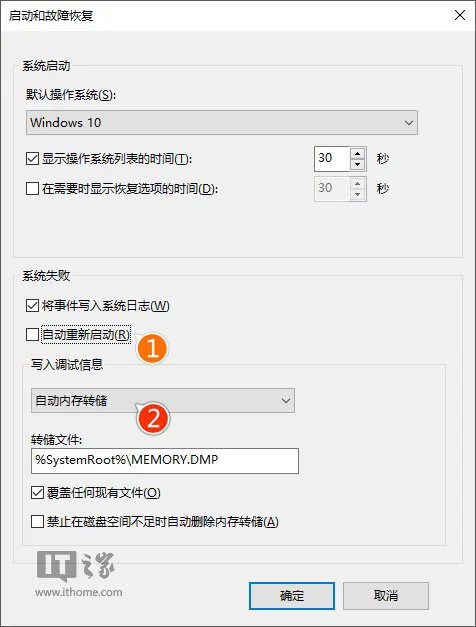
- Go to Computer Properties → Advanced system settings → Advanced → Startup and Recovery → Settings, as shown below ——
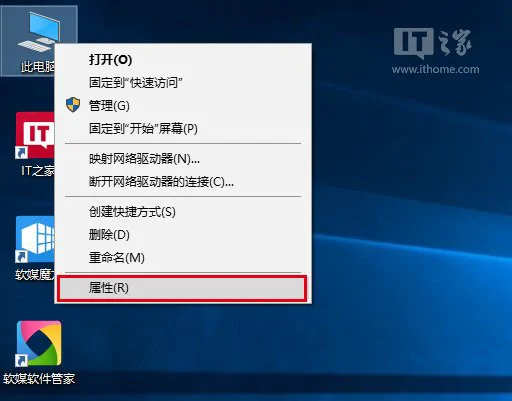
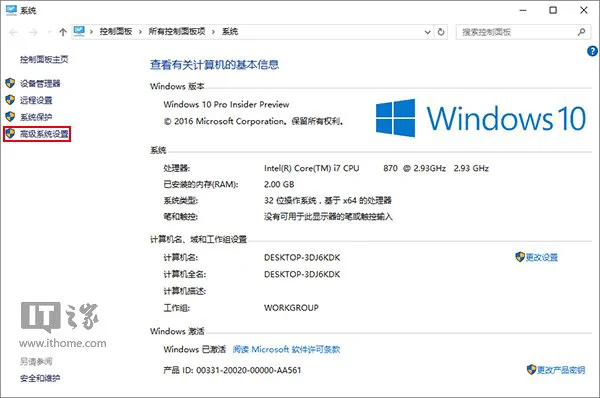
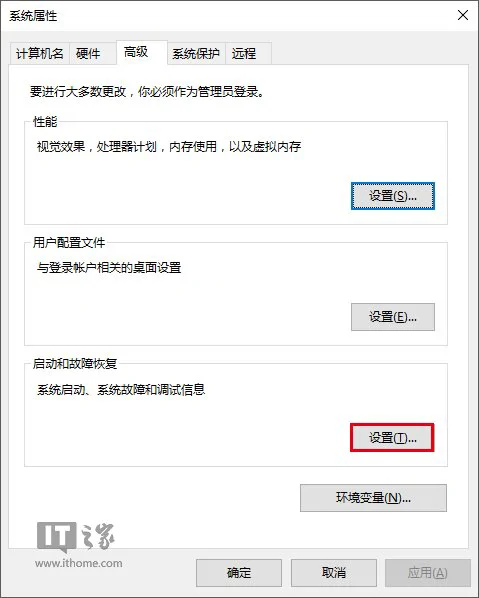
- In “System failure”, uncheck “Automatically restart”, and in “Write debugging information” select “Automatic memory dump” (the default), then click “OK”, as shown below ——
-
In the Cortana search bar, type regedit, and press Enter to open Registry Editor
-
USB keyboard users navigate to (suitable for most users)
HKEY_LOCAL_MACHINE\System\CurrentControlSet\Services\kbdhid\Parameters
PS/2 keyboard users navigate to (now less common, mostly seen on old machines from over a decade ago)
HKEY_LOCAL_MACHINE\System\CurrentControlSet\Services\i8042prt\Parameters
- Create a new DWORD (32-bit) Value (as shown below), named CrashOnCtrlScroll. Note that there may be a bug here that, when the default value is 0, has a certain chance of causing the keyboard to temporarily fail (the chance isn't that high, but mistaken operations such as USB keyboard users modifying the PS/2 registry or vice versa have a higher chance of causing temporary keyboard failure). You can change 0 to 1 via copy-paste or similar methods, or via the On-Screen Keyboard's handwriting feature; anyway you have to change 0 to 1, and after “OK” the keyboard will recover; you can also use the mouse to delete the value directly, and the keyboard will recover immediately as well
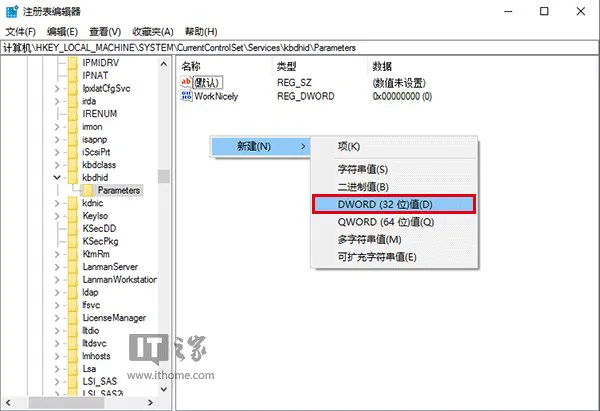
▲ USB keyboard
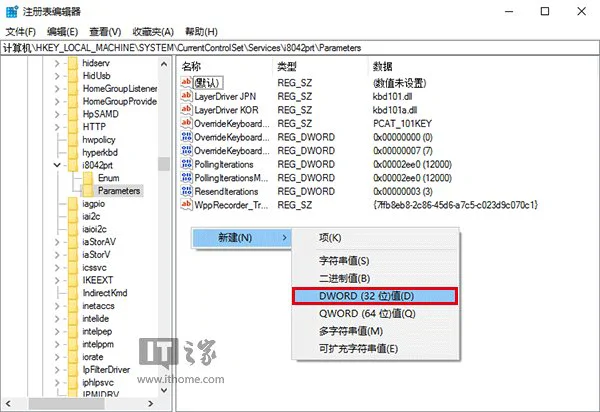
▲ PS/2 keyboard
- Change the value data to 1, click “OK”, then restart the system to apply the configuration, as shown below ——
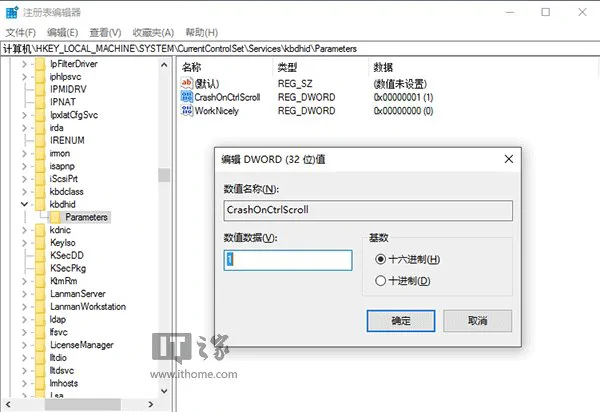
▲ USB keyboard
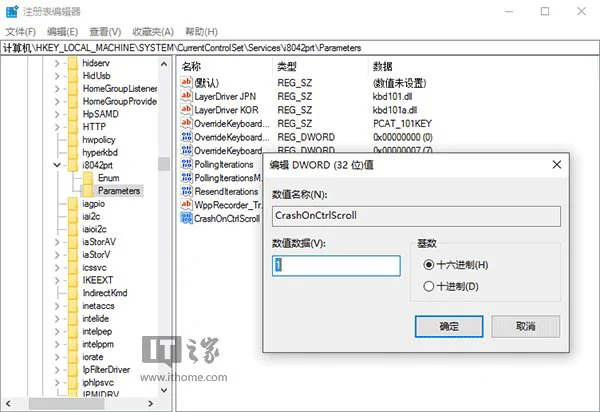
▲ PS/2 keyboard
At this point, hold the right Ctrl key and press Scroll Lock twice in a row, and the exciting blue screen summon succeeds. Note that this is a real blue screen, not just a picture appearing; you need to restart the computer to resume use. So how this summoning technique should be used appropriately is something everyone still needs to think twice about. Also, if you want to use the blue screen for some ulterior purpose, you'd better hope the other party doesn't understand computers or English, because the final “Stop code:MANUALLY INITIATED CRASH” (stop code: manually initiated crash) has already given you away...
_EOF_
This Is a Drill: Win10 Blue Screen, Summon at Will
- 本文作者:
- 程序设计实验室
- 版权声明:
- 本博客所有文章除特别声明外,均采用 BY-NC-SA 许可协议。转载请注明出处!
相关文章
从SSH远程到Git Push:在Windows上一步到位实现免密码登录
我一直希望在Windows上能像在Linux系统中那样,通过SSH密钥实现免密码远程连接。每次远程连接到服务器时,手动输入密码既麻烦又不太安全,尤其是在我需要频繁操作的情况下。
2025-02-10 · Windows · 约 1 分钟
忘记WSL的root密码怎么办
解决方法 首先,打开WSL是不需要输入密码的,如果你打开WSL时的默认用户不是root,请按照一下方式修改。 修改默认登录WSL用户 以管理员权限启动Powershell lxrun /setdefaultuser root 此时重新打开WSL就是root用户了,并且不需要密码。 然后输入以下命令修改密码。 passwd root About 了解更多有趣的操作请关注我的微信公众号:DealiA
2021-12-18 · Windows · 约 1 分钟
Win10的Linux子系统也能运行图形程序
前言 之前写了一篇在Win10中安装Linux子系统的文章,虽然Linux子系统既实用又方便,不过有些同学可能会觉得只有命令行挺无聊的,所以今天分享一个运行图形程序的方法,经过试用效果还是不错的。 本文将带领你一步一步在Win10的子系统里安装运行Gimp(PS:Gimp是Linux上的PS,功能还是灰常强大滴),还有其他一些Linux的图形化软件。 准备工作 Linux子系统必备的哈,这个不用多
2021-12-18 · Windows · 约 1 分钟
Windows的Linux子系统上配置SSH服务器
安装openssh 这个不用啰嗦太多,首先需要安装openssh-server和openssh-client。 修改sshd-config配置 需要关注的就是这三行。 UsePrivilegeSeparation no #因为wsl没有实现chroot PasswordAuthentication yes ListenAddress 0.0.0.0
2021-12-18 · Windows · 约 1 分钟
讨论
共 0 条加载评论中…