StarBlog Blog Development Notes: Frontend Development (6) - Login Page
Prerequisites The preparation for frontend development has been completed earlier, and now it's time to start the page writing (Copy/Paste) process~ Writing pages with ElementUI is straightforward—just refer to the official documentation and copy-paste the code. Writing Code No need to say more, here's the code directly: Layout template el-form :model=loginForm :rules=fieldRules ref=loginForm label-position=left label-wi
目录6 个章节
Preface
The preparation work for frontend development has been completed earlier. Now it's time to start building pages (Copy/Paste)~
Writing pages with ElementUI is straightforward—just follow the official documentation and copy/paste the code to get things done.
Writing Code
Nothing much to say, just code.
Layout
<template>
  <el-form :model="loginForm" :rules="fieldRules" ref="loginForm" label-position="left" label-width="0px"
           class="demo-ruleForm login-container">
    <span class="tool-bar">
    </span>
    <h2 class="title">System Login</h2>
    <el-form-item prop="account">
      <el-input type="text" v-model="loginForm.account" auto-complete="off" placeholder="Account"></el-input>
    </el-form-item>
    <el-form-item prop="password">
      <el-input type="password" v-model="loginForm.password" auto-complete="off" placeholder="Password"></el-input>
    </el-form-item>
    <el-form-item style="width:100%;">
      <el-button type="primary" style="width:48%;" @click.native.prevent="reset">Reset</el-button>
      <el-button type="primary" style="width:48%;" @click.native.prevent="login" :loading="loading">Login</el-button>
    </el-form-item>
  </el-form>
</template>
js
import Cookies from "js-cookie"

export default {
  name: "Login",
  data() {
    return {
      loading: false,
      loginForm: {
        account: 'admin',
        password: 'admin',
        src: ''
      },
      fieldRules: {
        account: [
          {required: true, message: 'Please enter your account', trigger: 'blur'}
        ],
        password: [
          {required: true, message: 'Please enter your password', trigger: 'blur'}
        ]
      },
      checked: true
    }
  },
  methods: {
    login() {
      this.loading = true
      let userInfo = {
        account: this.loginForm.account,
        password: this.loginForm.password,
      }
      this.$api.login.login(userInfo).then((res) => {  // Call the login API
        if (res.msg != null) {
          this.$message({message: res.msg, type: 'error'})
        } else {
          Cookies.set('token', res.data.token) // Place token in Cookie
          sessionStorage.setItem('user', userInfo.account) // Save user to local session
          this.$router.push('/')  // Login successful, redirect to homepage
        }
        this.loading = false
      }).catch((res) => {
        this.$message({message: res.message, type: 'error'})
      })
    },
    reset() {
      this.$refs.loginForm.resetFields()
    }
  },
}
Style
.login-container {
  -webkit-border-radius: 5px;
  border-radius: 5px;
  -moz-border-radius: 5px;
  background-clip: padding-box;
  margin: 100px auto;
  width: 350px;
  padding: 35px 35px 15px 35px;
  background: #fff;
  border: 1px solid #eaeaea;
  box-shadow: 0 0 25px #cac6c6;

  .title {
    margin: 0px auto 30px auto;
    text-align: center;
    color: #505458;
  }
}
Effect
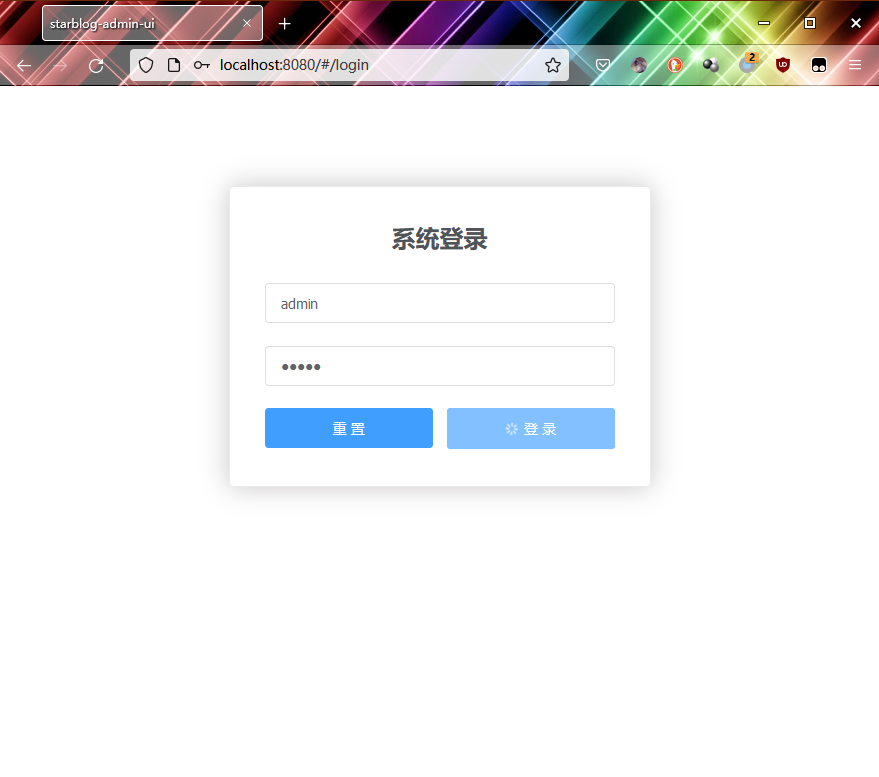
See the image
_EOF_
StarBlog Blog Development Notes: Frontend Development (6) - Login Page
- 本文作者:
- 程序设计实验室
- 版权声明:
- 本博客所有文章除特别声明外,均采用 BY-NC-SA 许可协议。转载请注明出处!
相关文章
StarBlog博客开发笔记:前端开发(2)之页面路由
前言 Vue.js使用虚拟DOM处理单页面,然后使用Webpack打包。通过第5章的示例,读者也许已经发现,无论语法和写法如何不同,Vue.js程序打包后都是一个单一的HTML文件,同时会引入一个标准的JavaScript文件。 Vue.js中编写的所有代码都被Webpack自动打包成可以被浏览器解析的HTML和JavaScript代码,并且项目本身就只有一个页面。这意味着所有的用户对服务器发出进
2024-12-11 · StarBlog前端开发-Vue · 约 1 分钟
StarBlog博客开发笔记:前端开发(7)之主页面
界面设计 按照ElementUI提供的布局来 左边是导航栏,右边上方是标签页,然后是主内容区 如图 二级类目 开始写代码 主页面的内容已经比较复杂了,全部写在一个文件内不现实 我们来分解一下 根据这个布局,页面可以分为头部、主体、左侧导航栏三部分 所以我来新建三个vue页面 HeaderBar.vue Navbar.vue MainContent.vue 完成之后目录结构如下 views ├──
2023-07-14 · StarBlog前端开发-Vue · 约 1 分钟
StarBlog博客开发笔记:前端开发之瀑布流图片列表
用到的组件:vue-waterfall 项目地址:https://github.com/MopTym/vue-waterfall 参考资料 Vue<瀑布流加载效果>:https://www.jianshu.com/p/97b89597ab5c
2023-07-14 · StarBlog前端开发-Vue · 约 1 分钟
StarBlog博客开发笔记:前端开发之文件上传
参考资料 前端通过axios和FormData实现文件上传功能遇到的坑:https://segmentfault.com/a/1190000016927601 Element el-upload上传组件详解:https://segmentfault.com/a/1190000013796215
2023-07-14 · StarBlog前端开发-Vue · 约 1 分钟
讨论
共 0 条加载评论中…