

Nginx configuration for HTTP to HTTPS redirect - force HTTPS access
Preface Several projects have recently gone live, and I have applied for the corresponding SSL certificates. However, I discovered an issue: when users directly enter a domain name in the browser, the browser defaults to accessing the HTTP site, but our website only supports HTTPS access, so they cannot access it. Actually, in the global Nginx configuration, all visits can be redirected to HTTPS. But since some sites on the server provide HTTP services, the configuration must be done separately for each site. Based on information found through search engines, this article summarizes three configuration methods. Those in need can choose the one they prefer.
目录13 个章节
Preface
Recently, several projects went live, and corresponding SSL certificates were applied for. However, I discovered an issue: when users type the domain directly in the browser, the browser defaults to the HTTP site, but our website only supports HTTPS access, so it becomes inaccessible.
You can actually redirect all access to HTTPS in the global nginx configuration, but some sites on the server provide HTTP services, so each site needs to be configured separately.
Based on the information found through search engines, this article summarizes three configuration methods. If needed, you can choose the one that suits you best.
nginx's Rewrite Method
Description
This should be the most straightforward method everyone thinks of: simply redirect all HTTP requests to HTTPS using rewrite rules.
Configuration
server {
	listen	192.168.1.111:80;
	server_name	test.com;

	rewrite ^(.*)$	https://$host$1	permanent;
}
Once this virtual host is set up, all requests to http://test.com will be rewritten to https://test.com.
nginx's 497 Status Code
Error Code 497
497 - normal request was sent to HTTPS
Explanation: This error code occurs when a virtual site only allows HTTPS access, but an attempt is made to access it via HTTP. In this case, Nginx returns the 497 error code.
Instructions
Use the error_page directive to redirect links with a 497 status code to the domain https://test.com.
Configuration
server {
	listen       192.168.1.11:443;	# SSL port
	listen       192.168.1.11:80;	# Users are accustomed to accessing via http, so port 80 is added. Later, through the 497 status code, it automatically redirects to port 443.
	server_name  test.com;
	# Enable SSL support for a server block {......}
	ssl                  on;
	# Specify the certificate file in PEM format
	ssl_certificate      /etc/nginx/test.pem;
	# Specify the private key file in PEM format
	ssl_certificate_key  /etc/nginx/test.key;

	# Redirect http requests to https requests
	error_page 497	https://$host$uri?$args;
}
index.html Refresh Method
Explanation
Both of the above methods require server-side computation and will consume server resources. The page refresh method was learned from Baidu.
Let's use curl to access baidu.com to see how Baidu implements the redirect from baidu.com to www.baidu.com.
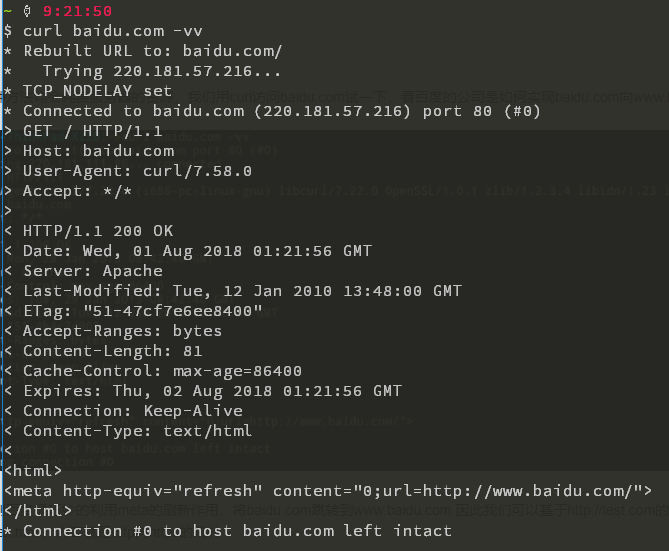
As you can see, Baidu cleverly uses the meta refresh to redirect baidu.com to www.baidu.com. Therefore, we can also create an index.html file in the virtual host path for http://test.com, with content that redirects from http to https.
index.html Web Content
<html>
<meta http-equiv="refresh" content="0;url=https://test.com/">
</html>
Site Configuration
Add an HTTP site configuration in the server configuration to provide access to the index.html file mentioned earlier.
server {
	listen 80;
	server_name	test.com;

	location / {
                #index.html is placed in the root directory listened by the virtual host
		root /srv/www/http.test.com/;
	}
        #Redirect 404 page to the https homepage
	error_page	404	https://test.com/;
}
References
_EOF_
Nginx configuration for HTTP to HTTPS redirect - force HTTPS access
- 本文作者:
- 程序设计实验室
- 版权声明:
- 本博客所有文章除特别声明外,均采用 BY-NC-SA 许可协议。转载请注明出处!
相关文章
关闭CentOS-6-防火墙,关闭Linux系统防火墙
前言 最近部署服务的时候需要临时关闭一下防火墙,所以记个笔记,如何关闭CentOS防火墙。 查看系统版本 输入:cat /etc/issue 查看版本 通过service关闭 service命令开启以及关闭防火墙为即时生效,下次重启机器的时候会自动复原。 查看防火墙状态: service iptables status 记得在CentOS6.9中是输入iptables,网上有些教程使用serv
2025-10-27 · 系统配置 · 约 1 分钟
配置MariaDB数据库服务端远程访问
操作步骤 开启远程访问权限 连接MariaDB数据库,执行以下命令开启远程访问。 grant all privileges on *.* to 'root'@'192.168.248.248' identified by 'password'; flush privileges; 如果需要任意IP地址访问,就把IP地址换成%。 修改配置文件 在网络上能搜索到的资料都只说了第一点,然而亲测之后并没有
2025-10-27 · 系统配置 · 约 1 分钟
Debian配置默认不开启图形界面
前言 Linux的图形界面实在是太耗资源了,同时开几个虚拟机感觉已经hold不住了,赶紧把这些Linux服务器的图形界面都关掉。 CLI:command Line Interface,命令行界面。 现在的Linux发行版默认登陆界面几乎都是默认为GUI界面,如果按照旧版本的修改inittab文件,在一些比较新的版本是没有这个文件的(Linux的启动服务机制发生改变) 修改Grub配置文件 打开gr
2025-10-27 · 系统配置 · 约 1 分钟
Ubuntu-18-04-修改登录界面背景图
前言 Ubuntu 18.04用了一段时间了,在Gnome桌面的加持下,兔子 18.04 的颜值还不错,加上自己搭配了几套GTK主题,简直美滋滋,唯一美中不足的就是,Ubuntu的登录管理器换成GDM之后,登录界面背景没办法修改了,这怎么行呢,于是经过一番折腾,有了本文。 首先,准备一张图片 图片的尺寸呢,根据你的屏幕分辨率确定咯。 然后把图片放到/usr/share/backgrounds/目录
2025-10-27 · 系统配置 · 约 1 分钟
讨论
共 0 条加载评论中…