

Implementing WeCom Login in a Django+Taro Project
Preface Still a small project I've been working on recently. The backend uses Django with RestFramework for the APIs, and for the frontend this is my first attempt at using JD's open-source Taro framework for multi-end development (currently we need to support the H5 end for WeCom and WeChat Mini Program) This article records the WeCom login flow. Last week reading the docs made me dizzy, but it's actually quite simple—once wrapped up, it's just a few lines of code~ Two approaches One is to first assemble the login URL authorize_url, set the callback URL to the H5 app's web entry, then set authori
目录7 个章节
Preface
Still a small project I've been working on recently. The backend uses Django with RestFramework for the APIs, and for the frontend this is my first attempt at using JD's open-source Taro framework for multi-end development (currently we need to support the H5 end for WeCom and WeChat Mini Program)
This article records the WeCom login flow. Last week reading the docs made me dizzy, but it's actually quite simple—once wrapped up, it's just a few lines of code~
Two Approaches
- One is to first assemble the login URL
authorize_url, set the callback URL to the H5 app's web entry, then setauthorize_urlas the app homepage in WeCom, and then simply extract the code from the URL - The other is to assemble the
authorize_urlinside the app, with the callback URL likewise set to the H5 app's web entry, then requestauthorize_urlfrom within the app, and extract the code from the URL to log in
They're called two approaches, but the flow is actually the same. The first one just skips the frontend assembling authorize_url and the initial request. For convenience, this article recommends the first approach
The Idea
Assume the frontend URL is http://xxx.com. Then in the WeCom login URL generated by the backend, the frontend URL will be passed in as the callback URL. After visiting the login URL in WeCom, it redirects back to our frontend URL, appending the code parameter in the path, in the following form:
http://xxx.com?code=dkwawen123j13bk1
So all the frontend needs to do is get this code and submit it to the backend, so the backend can take the code to the WeChat server to exchange for user info. That's it~
Backend Code
The WeCom login API is already integrated into my DjangoStarter project template, ready to use~
The backend uses the wechatpy library, which is really handy and wraps common WeChat development features~
Below are the two key methods
from django.conf import settings
from django.contrib.auth import login
from django.contrib.auth.models import User
from rest_framework.authtoken.models import Token
from drf_yasg2.utils import swagger_auto_schema
from drf_yasg2 import openapi
from rest_framework.exceptions import APIException
from rest_framework import viewsets
from rest_framework.response import Response
from rest_framework.request import HttpRequest
from rest_framework.decorators import action
from wechatpy.enterprise import WeChatClient
from apps.core.serializers import UserSerializer

class WechatWork(viewsets.ViewSet):
    """微信企业号相关认证服务"""
    client = WeChatClient(
        settings.WECHAT_WORK_CONFIG['CORP_ID'],
        settings.WECHAT_WORK_CONFIG['SECRET'],
    )

    @swagger_auto_schema(operation_summary='获取微信企业号登录链接')
    @action(detail=False)
    def get_authorize_url(self, request):
        return Response({
            # todo 这里要写上前端应用入口地址
            'url': self.client.oauth.authorize_url('http://xxx.com')
        })

    @swagger_auto_schema(
        operation_summary='通过code登录',
        manual_parameters=[
            openapi.Parameter(
                name='code', in_=openapi.IN_QUERY,
                description='从微信企业号服务器获取到的code',
                type=openapi.TYPE_STRING)
        ])
    @action(detail=False, methods=['POST'])
    def login_by_code(self, request: HttpRequest):
        code = request.GET.get('code', None)
        try:
            user_info = self.client.oauth.get_user_info(code)
        except Exception as e:
            raise APIException(detail=e)

        phone = user_info['UserId']
        is_created_user = False

        if User.objects.filter(username=phone).exists():
            user_obj: User = User.objects.get(username=phone)
        else:
            is_created_user = True
            user_obj: User = User.objects.create_user(username=phone, password=phone)

        # 记录Django登录状态
        login(request, user_obj)
        # 生成drf token
        token, created = Token.objects.get_or_create(user=user_obj)

        return Response({
            'user': UserSerializer(user_obj).data,
            'user_info': user_info,
            'successful': True,
            'is_created_user': is_created_user,
            'token': token.key,
            'message': '企业微信登录成功',
        })
After writing the APIs, configure the routes (won't repeat that here)
Then request this get_authorize_url endpoint, and you'll get a URL
{
  "message": "请求成功",
  "code": 200,
  "data": {
    "url": "https://open.weixin.qq.com/connect/oauth2/authorize?appid=wx386...&redirect_uri=http%3A%2F%2Fxxx.com&response_type=code&scope=snsapi_base#wechat_redirect"
  }
}
For example, the app entry URL I wrote above is http://xxx.com, so the WeCom login URL you get is
https://open.weixin.qq.com/connect/oauth2/authorize?appid=wx386...&redirect_uri=http%3A%2F%2Fxxx.com&response_type=code&scope=snsapi_base#wechat_redirect
For the meaning of each parameter, just check the official WeCom docs; we don't need to go into details
WeCom App Configuration
Next, we set this URL as the homepage of the WeCom app
As shown
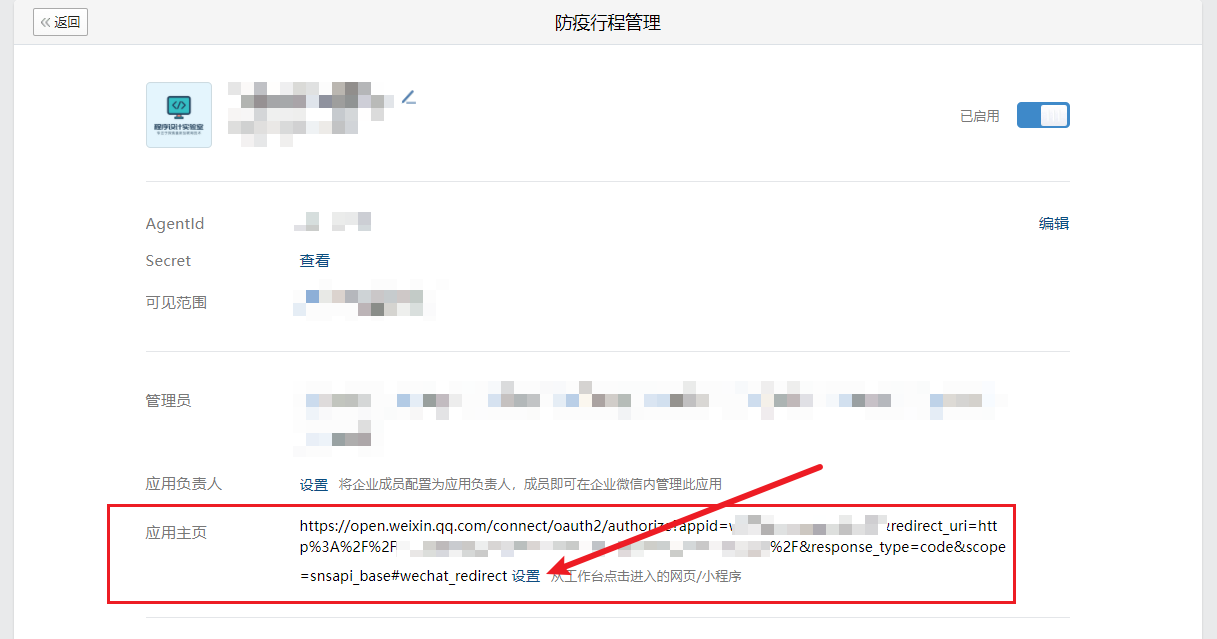
We also need to set the "Trusted Domain". At the very bottom of the same page under "Developer API", fill in the domain and port of the server where the frontend app is deployed (no need for port 80)~
That's the app configuration done
Frontend Code
The frontend uses JD's open-source Taro framework. In my previous article I mentioned I finally got to use React, referring to using React+TypeScript in Taro development. The development experience is really good (except this framework has some speechless pitfalls)
What the frontend needs to do is extract the code from the path parameters
As we can see, the official Taro docs already cover handling route parameters
So we can write it like this to get the code (functional component style)
import { getCurrentInstance } from '@tarojs/taro'
let code getCurrentInstance().router?.params['code']
However! This works for ordinary page navigation
For example this form
http://xxx.com/#/pages/index/index?code=abc
But the URL form that the WeChat login callback redirects to is like this
http://xxx.com?code=abc&state=#/pages/index/index
There's simply no way to get the code like this o(´^`)o
So we have to wrap one ourselves with JS
Here's the code
// 解析微信redirect_uri地址中的code
export const getCodeFromUrl = (url: string) => {
  let code = ''
  let index = url.indexOf('?')
  let paramStr = url.substring(index + 1, url.length);
  let params = paramStr.split('&')
  params.forEach(element => {
    if (element.indexOf('code') >= 0) {
      code = element.substring(element.indexOf('=') + 1, element.length)
    }
  });
  return code
}
When using it
let code = getCodeFromUrl(window.location.href)
and you can get the code
Once you have the code, no need to say more about the rest~
References
- wechatpy library docs: http://docs.wechatpy.org/zh_CN/stable/oauth.html#id4
- WeCom docs: https://developer.work.weixin.qq.com/document/path/91335
- Taro framework docs: https://taro-docs.jd.com/taro/docs/router
- Taro H5 WeChat authorization link getting code; callback page cannot get params via this.$router.params - Jianshu (jianshu.com)
_EOF_
Implementing WeCom Login in a Django+Taro Project
- 本文作者:
- 程序设计实验室
- 版权声明:
- 本博客所有文章除特别声明外,均采用 BY-NC-SA 许可协议。转载请注明出处!
相关文章
Django项目引入NPM和gulp管理前端资源
前言 之前写了一篇《Asp-Net-Core开发笔记:使用NPM和gulp管理前端静态文件》,现在又来用Django开发项目了,之前我搞了一个Django的快速开发脚手架「DjangoStarter」,正好给升级一下~ 关于npm和gulp我就不多重复了,之前那篇文章都写了,直接上操作 安装依赖 安装依赖的操作跟上一篇文章是一样的,不过我这里直接提供package.json文件,复制到项目根目录里
2022-04-02 · Django · 约 1 分钟
告别单调,Django后台主页改造
前言 之前我做了个Django的项目,为了让管理后台更加美观,我对Django(应该说是SimpleUI的)默认的Admin后台主页进行改造,具体可以看这篇文章:项目完成 - 基于Django3.x版本 - 开发部署小结 之前的两篇关于Django3.x开发部署小结的文章介绍的都是数据库、接口、性能方面的,看到有朋友留言对后台主页的改造表示有兴趣,所以就写一篇来介绍一下~ 分析 改造基于我定制的
2022-06-28 · Django · 约 1 分钟
Django-Import-Export插件控制数据导入流程
前言 之前写过两篇跟这个插件有关的文章,可以回顾一下: Django数据导入导出神器django-import-export使用 Django-Import-Export插件关于外键的处理 最近有个朋友留言问我一个关于django-import-export插件的问题 为了形象表达这个问题,我举个书籍管理的例子来描述一下 数据库表 | id | name | price | | ---- |
2022-09-02 · Django · 约 1 分钟
实测 Django 6.0:模版片段、后台任务、CSP 安全,三大特性体验报告
呵,连WebSocket都没塞进去就敢叫大版本更新?不过模版片段和内置后台任务总算让Django像个现代框架了,至少写HTMX时不用再到处塞碎片文件。原生CSP?早该有了。至于抛弃Python 3.11——跟不上时代的版本留着也是累赘。
2026-01-20 · Django · 约 1 分钟
讨论
共 0 条加载评论中…