

Using django-import-export, Django's Super Tool for Data Import and Export
Introduction Django is known for rapid development, but if you still have to write your own scripts to handle data import and export, that would go against the “Zen of Python”... And data import/export usually requires different formats—Excel, CSV, JSON, and so on. Writing a script for each format is too much trouble. That's when you bring out django-import-export, this super tool. The official one-liner: django-import-export is a Django application and libra
目录12 个章节
Introduction
Django is known for rapid development, but if you still have to write your own scripts to handle data import and export, that would go against the “Zen of Python”...
And data import/export usually requires different formats—Excel, CSV, JSON, and so on. Writing a script for each format is too much trouble. That's when you bring out django-import-export, this super tool. The official one-liner: django-import-export is a Django application and library for importing and exporting data with included admin integration.
Features:
- support multiple formats (Excel, CSV, JSON, ... and everything else that tablib support)
- admin integration for importing
- preview import changes
- admin integration for exporting
- export data respecting admin filters
Anyway, it's great to use and that's that. Below I'll start the usage introduction.
First, Install
pip install django-import-export
Then you need to add it to INSTALLED_APPS
# settings.py
INSTALLED_APPS = (
    ...
    'import_export',
)
Write a Resource
Have to say, this is very Django.
The way you write a Resource is similar to Model and Form—you define the data format you want to import or export.
I'll borrow the official example here. First, the Model code:
class Author(models.Model):
    name = models.CharField(max_length=100)

    def __str__(self):
        return self.name

class Category(models.Model):
    name = models.CharField(max_length=100)

    def __str__(self):
        return self.name

class Book(models.Model):
    name = models.CharField('Book name', max_length=100)
    author = models.ForeignKey(Author, blank=True, null=True)
    author_email = models.EmailField('Author email', max_length=75, blank=True)
    imported = models.BooleanField(default=False)
    published = models.DateField('Published', blank=True, null=True)
    price = models.DecimalField(max_digits=10, decimal_places=2, null=True, blank=True)
    categories = models.ManyToManyField(Category, blank=True)

    def __str__(self):
        return self.name
Now we want to import data into the Book table, so let's start writing our Resource. I create a resource.py in the app directory to hold the Resource definition code:
from import_export import resources
from core.models import Book

class BookResource(resources.ModelResource):

    class Meta:
        model = Book
That's the simplest Resource defined. You can use code to export data, but I don't want to do that now, because I want to put the export functionality in the Django Admin backend.
Configure Admin
Modify admin.py. The change is to have our defined Admin class inherit from ImportExportModelAdmin instead of the original admin.ModelAdmin. The code is as follows:
from .models import Book
from import_export.admin import ImportExportModelAdmin

class BookAdmin(ImportExportModelAdmin):
    resource_class = BookResource

admin.site.register(Book, BookAdmin)
This way you can see the export and import buttons in the admin.
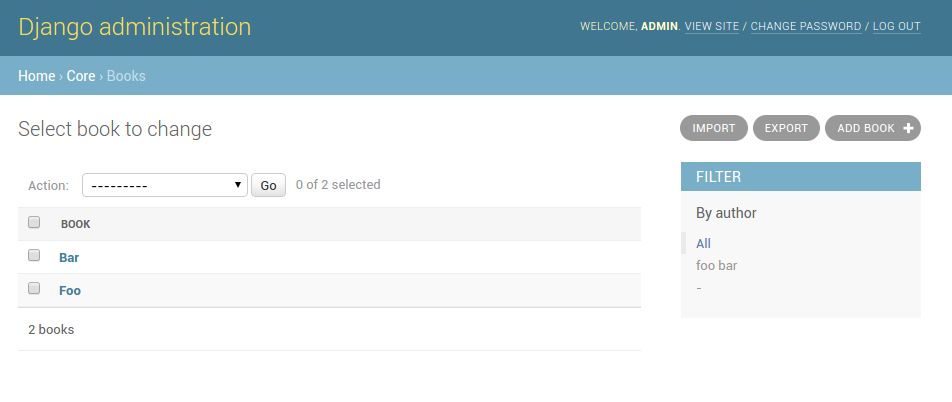
What if you only want export and not import? Change it like this:
from .models import Book
from django.contrib import admin
from import_export.admin import ExportMixin

class BookAdmin(ExportMixin, admin.ModelAdmin):
    resource_class = BookResource

admin.site.register(Book, BookAdmin)
Import only without export works too—just replace ExportMixin with ImportMixin.
Of course these are just the simplest usages. Real requirements are more complex. Next I'll list a few that I've used.
Adjust Field Order
The data to import (Excel, CSV, etc.) may have a different field order from the Model definition. In that case you need to adjust it manually in the Resource.
Since my own code involves company business, I'll continue borrowing the official site's code example:
class BookResource(resources.ModelResource):

    class Meta:
        model = Book
        fields = ('id', 'name', 'author', 'price',)
        export_order = ('id', 'price', 'author', 'name')
Here export_order is the field order for export, and fields specifies which fields need to be imported. Import is based on the column names in the data file, so the field names in the Excel, CSV, or JSON file need to match those in fields or in the Model in order to import.
Exclude Fields
As the name suggests. Take the Book model for example: the Model definition doesn't specify a primary key, so Django will assign a default primary key field id, but the Excel we're importing data from probably doesn't have this id, so import wouldn't work. Thus we need to exclude this id field. It's simple—this line of code in Meta:
exclude = ['id']
Set the Primary Key Field
Also as the name suggests. Suppose our database already has many books, and now we need to update this batch of books by importing an Excel file. Then I need to pick a field to set as the primary key field, otherwise import would become insert. As mentioned earlier, Excel generally won't have the database primary key id, so here I chose the book name (assuming this is a small bookstore where book names aren't duplicated).
Code:
import_id_fields = ['name']
Custom Column Names
With the previous configuration, the exported Excel has column names that are all field names, i.e. in English. But I want Chinese column names. That's possible too—it just takes a bit of code (I won't borrow the official code here; I'll write it myself):
from import_export.fields import Field

class BookResource(resources.ModelResource):
    id = Field(attribute='id', column_name='编号')
    name = Field(attribute='name', column_name='书籍名称')

    class Meta:
        model = Book
        export_order = ('id', 'name', 'author', 'price',)
That's it, so easy. In Field, attribute refers to the corresponding attribute in the Model, i.e. the field name, and column_name as the name suggests is the column name.
Then some of you might ask: the Model already has verbose_name set for each field, so isn't writing it again in column_name redundant?
Don't worry, it's also simple. Since there's verbose_name, just use it directly~
name = Field(attribute='name', column_name=Book.name.field.verbose_name)
And that's it, nice and easy~
Add Custom Columns
Last one: if you want to add a field that doesn't exist in the Model to the exported data, can you?
Of course you can, and it's also simple. Here's the code:
from import_export.fields import Field

class BookResource(resources.ModelResource):
    id = Field(attribute='id', column_name='编号')
    name = Field(attribute='name', column_name='书籍名称')
    new_field = Field(column_name='一个新的字段')

    class Meta:
        model = Book
        export_order = ('id', 'name', 'author', 'price', 'new_field')

    @staticmethod
    def dehydrate_new_field(instance: Book):
        return '新字段内容'
As you can see, first add this field in export_order , then add this line new_field = Field(column_name='一个新的字段'), then add a class method below to generate this field's value. This method is named in the format dehydrate_字段名. You can write the specifics based on your needs.
Summary
The django-import-export plugin has many other features, but at this stage it already meets my work needs, so I haven't gone deeper. If you need other features, you can just look up the docs.
Currently I mainly use it for export. For import it's just updates and inserts, nothing fancy. If I run into other new requirements later, I'll write another article to introduce more of this plugin's features~
References
- Project homepage: https://github.com/django-import-export/django-import-export
- Official documentation: https://django-import-export.readthedocs.io/en/latest/installation.html
Welcome to Discuss
Programming Lab focuses on exploring popular new internet technologies and team agile development practices. Reply with linux, flutter, c#, netcore, android, kotlin, java, python, etc. in the backend of the WeChat official account “程序设计实验室” to get related technical articles and materials. If you have any questions, you can also leave a message in the official account backend~
_EOF_
Using django-import-export, Django's Super Tool for Data Import and Export
- 本文作者:
- 程序设计实验室
- 版权声明:
- 本博客所有文章除特别声明外,均采用 BY-NC-SA 许可协议。转载请注明出处!
相关文章
Django应用部署:uwsgi+Nginx方式
环境准备 nginx+uwsgi方式部署顾名思义,需要nginx和uwsgi两个软件包。 nginx不用说,是必备的,关于nginx的安装本文不再赘述,详情可以自行搜索或者参考我以前的文章: Debian8搭建LEMP环境 安装uwsgi pip install uwsgi 上传项目代码 & 测试 # 进入项目目录,具体目录请自行选择 cd /path/to/project # 建立虚拟环境 v
2022-04-02 · Django · 约 1 分钟
DjangoAdmin使用合集
DjangoAdmin DjangoAdmin本身就是一套大而全的系统,官方文档中介绍了很多配置方法,但仍然有大量的骚操作是文档中没有的,所以遇到特殊需求的时候,求助文档不一定有用。 在我看来 DjangoAdmin 虽然能快速生成一套管理后台,但如果要做大量特殊需求的定制,其成本不亚于用 Vue/React 重新开发一套,简单的使用成本不高,但深入定制的话需要对 DjangoAdmin 的工作流
2023-04-09 · Django · 约 1 分钟
Django项目引入NPM和gulp管理前端资源
前言 之前写了一篇《Asp-Net-Core开发笔记:使用NPM和gulp管理前端静态文件》,现在又来用Django开发项目了,之前我搞了一个Django的快速开发脚手架「DjangoStarter」,正好给升级一下~ 关于npm和gulp我就不多重复了,之前那篇文章都写了,直接上操作 安装依赖 安装依赖的操作跟上一篇文章是一样的,不过我这里直接提供package.json文件,复制到项目根目录里
2022-04-02 · Django · 约 1 分钟
Django-Import-Export插件控制数据导入流程
前言 之前写过两篇跟这个插件有关的文章,可以回顾一下: Django数据导入导出神器django-import-export使用 Django-Import-Export插件关于外键的处理 最近有个朋友留言问我一个关于django-import-export插件的问题 为了形象表达这个问题,我举个书籍管理的例子来描述一下 数据库表 | id | name | price | | ---- |
2022-09-02 · Django · 约 1 分钟
讨论
共 0 条加载评论中…