A New Experience in PC Software Development! Build Simple and Efficient Video Processing Tools with Blazor Hybrid
There were many activities during the National Day holiday, and I only had time to update the article after returning to work~ However, I did create a small tool (Clipify) over the past couple of days. The idea originated from wanting to add a feature to the simple video editing tool QuickCutSharp that I previously developed for personal use. But since that software was built on WinForms, designing the interface required dragging and dropping controls, which felt cumbersome and inflexible. So I decided to just create a new one from scratch.
目录28 个章节
Preface
During the National Day holiday, there were so many activities that I only found time to update articles after returning to work~
However, I did manage to build a small project (Clipify) over the past two days. The idea came from wanting to add a feature to my previously developed simple video editing tool, QuickCutSharp. But since that software was built with WinForms, creating the interface involved dragging and dropping controls, which felt cumbersome and inflexible. So, I decided to build a new one from scratch.
Since the original code was in C#, I continued exploring development options within that ecosystem. Avalonia, MAUI, and others are all good choices. I had used Avalonia before to create a simple image management tool. As for MAUI, I heard it's Microsoft's new cross-platform development solution, and I tried it this time too. However, just setting up the environment was quite complicated, which immediately discouraged me.
Next, I turned my attention to wrapper-based development like Electron. Since frontend technologies are used to build the software interface, Blazor in the C# ecosystem came to mind. I had previously used Blazor to develop a few projects and felt that combining Blazor with TailwindCSS could provide a good development experience.
I put the idea into action and chose the Blazor Hybrid approach. For the host container, I still opted for WinForms because there's no immediate need for cross-platform support, and there isn't a particularly good cross-platform solution for Blazor Hybrid yet. Although MAUI exists, it's too heavy and doesn't support Linux...
The project is now open source on GitHub: https://github.com/Deali-Axy/clipify
Some Screenshots
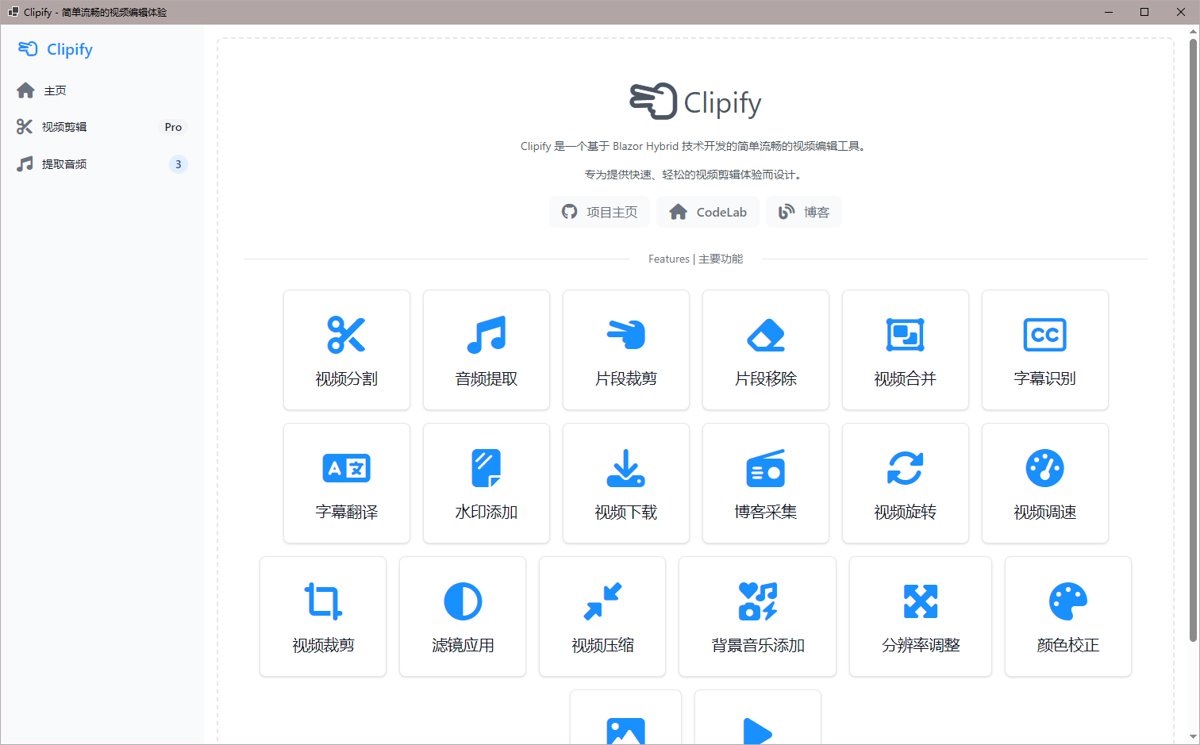
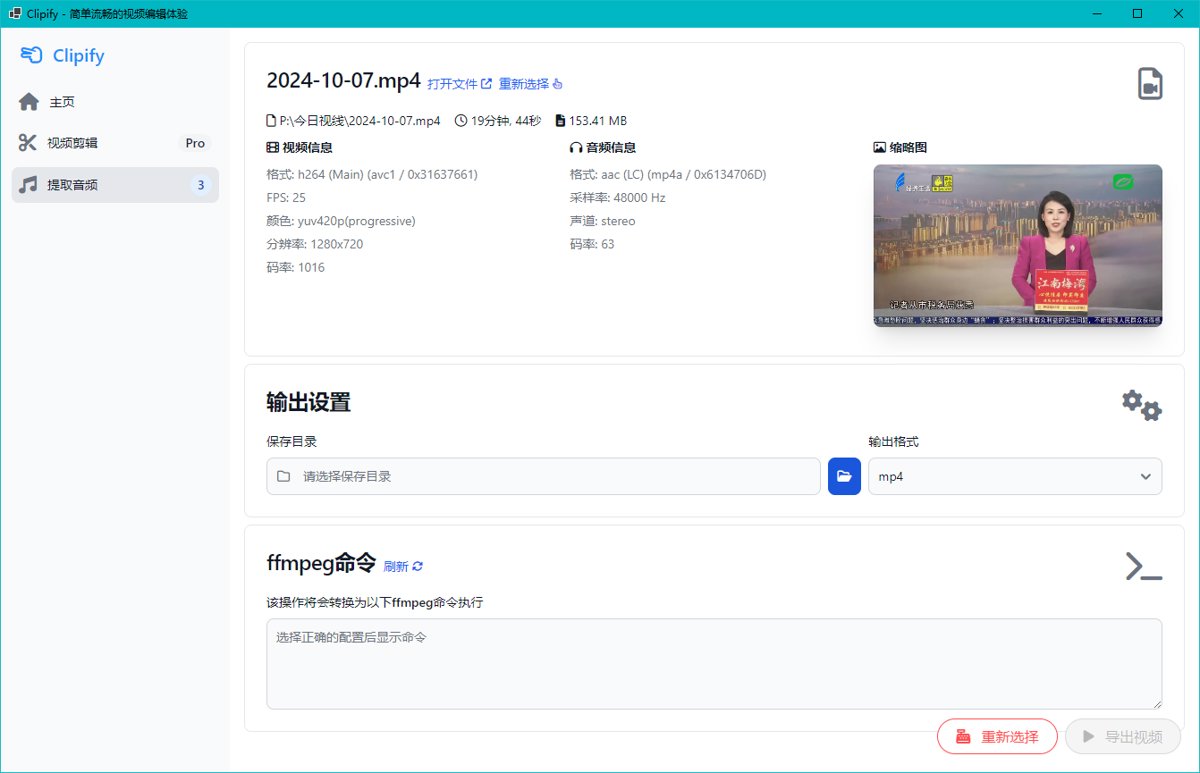
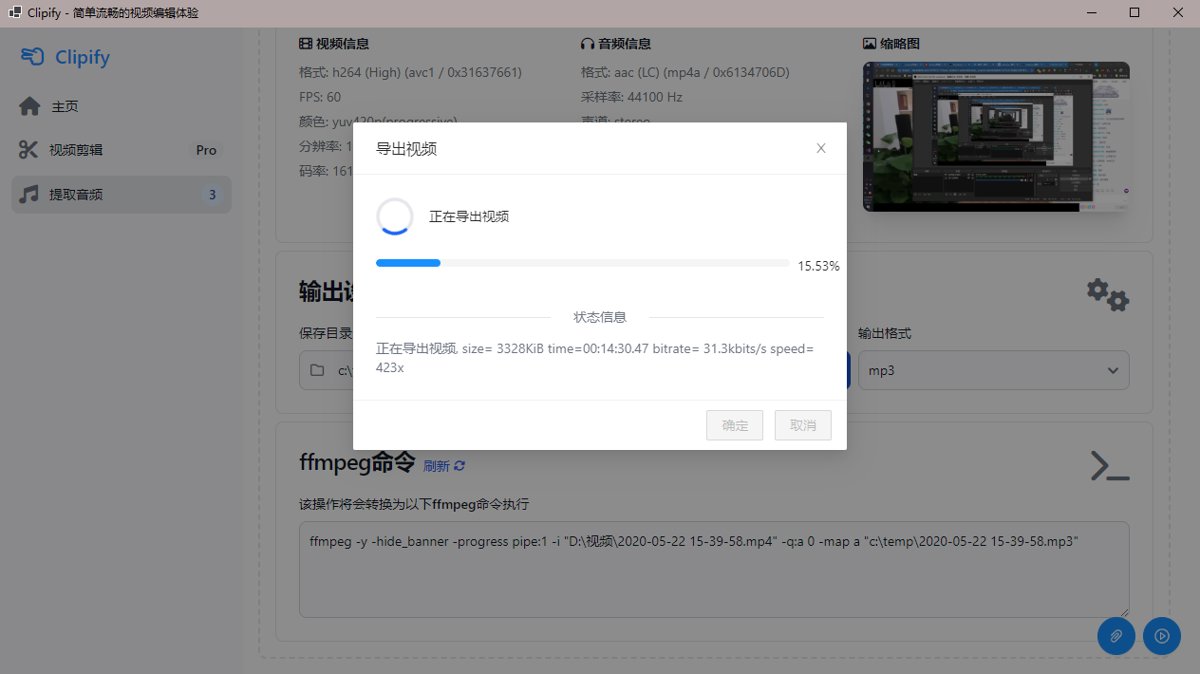
As usual, I'll start with some screenshots. You can understand the software's functionality just by looking at the images.
Software Main Page
Audio Extraction Interface
Video Export Interface
PS: Currently, only some features have been implemented.
Core Technologies
As mentioned in the preface, the application is developed using Blazor Hybrid. This means the UI is implemented with Blazor and runs inside a BlazorWebView within a WinForms application.
Video-related features rely on ffmpeg (in fact, before this software, I would manually enter commands to operate it...)
- Microsoft.AspNetCore.Components.WebView.WindowsForms - Microsoft's official Blazor Hybrid solution, enabling Blazor to run within WinForms.
- MediatR - C# version of EventBus, used to facilitate communication between the browser and WinForms.
- xFFmpeg.NET - Used to simplify calling ffmpeg (in fact, this library has been inactive for two or three years; many features must be implemented manually, and I'm even considering forking it to adapt to the latest version of ffmpeg).
- Microsoft.Extensions.Logging - A logging component. Nothing much to say—it's a common guest in AspNetCore projects.
- AntDesign - Used for components I didn't want to encapsulate myself (such as modals and messages).
For the frontend, the stack still includes pnpm, gulp, tailwindcss, flowbite, and fontawesome.
About Blazor Hybrid
Everyone is familiar with Electron technology—now even QQ has been rebuilt with Electron. After developing this project, I understand this approach: using front-end technologies to build interfaces is really smooth. By slightly sacrificing performance, you can achieve excellent results, and nowadays computer performance is more than sufficient, which provides the perfect opportunity for web technologies to move to the desktop.
For C# developers, the advantage of Blazor is that you can develop interactive web applications without learning various JavaScript frameworks. Although I've worked on many front-end projects and am quite proficient with React, Blazor Hybrid has another benefit: it allows you to directly use C# to call system functions. Blazor Hybrid runs within a browser but also directly at the operating system level. C# code is not limited by the browser sandbox and can directly access system files, devices, etc. (Although this project still uses Blazor's communication with WinForms, that's not a limitation of C#'s capabilities but rather a necessity to leverage WinForms features).
Creating a Blazor Hybrid Project
Creating a Blazor Hybrid project based on WinForms is simple. The first step is to create a .NetCore (.Net8) WinForms project, and then add the Microsoft.AspNetCore.Components.WebView.WindowsForms dependency.
Next, add the BlazorWebView component to the Form.
Then, start writing the code for initialization.
public partial class FormMain : Form {
  public FormMain() {
    InitializeComponent();

    var services = new ServiceCollection();
    services.AddLogging(c => {
      c.AddDebug();
      c.AddFilter("Microsoft.AspNetCore.Components.WebView", LogLevel.Trace);
    });

    services.AddAntDesign();
    services.AddMediatR(cfg => { cfg.RegisterServicesFromAssemblyContaining<FormMain>(); });
    services.AddWindowsFormsBlazorWebView();
    #if DEBUG
    services.AddBlazorWebViewDeveloperTools();
    #endif

    services.AddSingleton(this);
    services.AddScoped<IHostingEnvironment, HostingEnvironment>();
    services.AddScoped<DialogService>();
    services.AddScoped<VideoService>();

    blazorWebView1.HostPage = "wwwroot\\index.html";
    blazorWebView1.Services = services.BuildServiceProvider();
    blazorWebView1.RootComponents.Add<App>("#app");
  }
}
The key lies in the three lines of code at the bottom: setting the main page, binding the service container to the Blazor control, and setting the root component.
After that, everything else is the same as in a regular Blazor project.
Setting Up Project Infrastructure
Due to space limitations, this article can only provide a brief introduction.
Those who wish to learn more can refer to the official website's guide documentation and example projects.
However, the documentation on this topic from the Microsoft official website is not very detailed—it only scratches the surface, and much of the content requires you to explore and experiment on your own.
index.html
Various CSS and JS references added on demand
<!DOCTYPE html>
<html lang="en">
  <head>
    <meta charset="utf-8"/>
    <meta name="viewport" content="width=device-width, initial-scale=1.0"/>
    <title>Clipify</title>
    <base href="/"/>
    <link href="css/app.css" rel="stylesheet"/>
    <link href="css/tailwind.min.css" rel="stylesheet"/>
    <link href="lib/font-awesome/css/all.min.css" rel="stylesheet">
    <link href="_content/AntDesign/css/ant-design-blazor.css" rel="stylesheet" />
    <link href="Clipify.Forms.styles.css" rel="stylesheet"/>
  </head>

  <body>

    <div id="app">Loading...</div>

    <div id="blazor-error-ui" data-nosnippet>
      An unhandled error has occurred.
      <a href="" class="reload">Reload</a>
      <a class="dismiss">🗙</a>
    </div>

    <script src="_framework/blazor.webview.js"></script>
    <script src="lib/flowbite/flowbite.min.js"></script>
    <script src="_content/AntDesign/js/ant-design-blazor.js"></script>
    <script>
      window.initializeFlowbite = () => {
        initFlowbite();
      }
    </script>
  </body>
</html>
App.razor
This is the root component.
<Router AppAssembly="@typeof(App).Assembly">
    <Found Context="routeData">
        <RouteView RouteData="@routeData" DefaultLayout="@typeof(MainLayout)"/>
        <FocusOnNavigate RouteData="@routeData" Selector="h1"/>
    </Found>
    <NotFound>
        <PageTitle>Not found</PageTitle>
        <LayoutView Layout="@typeof(MainLayout)">
            <p role="alert">Sorry, there's nothing at this address.</p>
        </LayoutView>
    </NotFound>
</Router>

<AntContainer />
MainLayout.razor
Layout component.
@inherits LayoutComponentBase

@inject IJSRuntime Js

<PageTitle>Clipify</PageTitle>

<button data-drawer-target="logo-sidebar" data-drawer-toggle="logo-sidebar" aria-controls="logo-sidebar" type="button" class="inline-flex items-center p-2 mt-2 ms-3 text-sm text-gray-500 rounded-lg sm:hidden hover:bg-gray-100 focus:outline-none focus:ring-2 focus:ring-gray-200 dark:text-gray-400 dark:hover:bg-gray-700 dark:focus:ring-gray-600">
    <span class="sr-only">Open sidebar</span>
    <svg class="w-6 h-6" aria-hidden="true" fill="currentColor" viewBox="0 0 20 20" xmlns="http://www.w3.org/2000/svg">
        <path clip-rule="evenodd" fill-rule="evenodd" d="M2 4.75A.75.75 0 012.75 4h14.5a.75.75 0 010 1.5H2.75A.75.75 0 012 4.75zm0 10.5a.75.75 0 01.75-.75h7.5a.75.75 0 010 1.5h-7.5a.75.75 0 01-.75-.75zM2 10a.75.75 0 01.75-.75h14.5a.75.75 0 010 1.5H2.75A.75.75 0 012 10z"></path>
    </svg>
</button>

<aside id="logo-sidebar" class="fixed top-0 left-0 z-40 w-64 h-screen transition-transform -translate-x-full sm:translate-x-0" aria-label="Sidebar">
    <Navbar/>
</aside>

<div class="p-4 sm:ml-64">
    @Body
</div>

@code {
    protected override async Task OnAfterRenderAsync(bool isFirstRender) {
#if DEBUG
        await Js.InvokeVoidAsync("window.initializeFlowbite");
#endif
        if (isFirstRender) {
            await Js.InvokeVoidAsync("window.initializeFlowbite");
        }
    }
}
The basic functionality is now complete.
I usually like to add a RouterMap to my projects, which makes route navigation more convenient (方便进行路由跳转).
namespace Clipify.Forms;

public static class RouterMap {
    public const string Index = "/";
    public const string VideoSplit = "/video-split";
    public const string ExtractAudio = "/extract-audio";
}
Navigation Bar
The complete code for the navigation bar is omitted here. If you're interested, you can view the full code on GitHub.
Here, I'll note a common question: how to highlight the current menu?
There are two ways:
- Use the
NavigationManagerto get the current path - Use the
NavLinkcomponent
In this article, I'm using the NavLink component, similar to this:
When the path matches the menu's href, the element automatically gets the class specified in ActiveClass, thus achieving the effect of highlighting the current menu.
<NavLink href="@RouterMap.ExtractAudio" ActiveClass="bg-gray-200">
  <i class="fa-solid fa-music"></i>
  <span>Extract Audio</span>
</NavLink>
For brevity, the TailwindCSS classes have been omitted.
Using MediatR for Internal Communication
Currently, MediatR is being used for data interaction in dialog boxes.
Since I need to process videos, I require a dialog box to open files and another to select the output directory.
Blazor components run in the browser, and the browser can naturally open files. However, when a file is opened, the program can only obtain the file's stream. I need to get the file's storage path on the computer to call the ffmpeg command for processing.
In this case, I can only use the WinForms dialog box control. Blazor components and WinForms are in the same process, making in-process message queues like MediatR very suitable for this scenario.
MediatR supports two types of messages:
- Request/response messages, dispatched to a single handler
- Notification messages, dispatched to multiple handlers
One is one-to-one, and the other is one-to-many.
My usage is as follows:
- A Blazor component requests to open a dialog box, using the request/response one-to-one pattern.
- After the dialog box completes selection, it notifies the Blazor component using the one-to-many Notification pattern.
Encapsulating Service
To abstract away details and achieve decoupling, I encapsulated a DialogService. The benefits of this approach include further simplifying communication between components and MediatR, ensuring all file dialog-related logic is centralized in one place, making the code more maintainable and consistent.
public class DialogService {
  private readonly IMediator _mediator;

  public event Func<string, Task>? OnFileSelected;
  public event Func<string, Task>? OnDirSelected;

  public DialogService(IMediator mediator) {
    _mediator = mediator;
  }

  public async Task<string> OpenFileAsync() {
    return await _mediator.Send(new OpenFileRequest());
  }

  public async Task<string> OpenDirAsync() {
    return await _mediator.Send(new OpenDirRequest());
  }

  public void NotifyFileSelected(string path) {
    OnFileSelected?.Invoke(path);
  }

  public void NotifyDirSelected(string path) {
    OnDirSelected?.Invoke(path);
  }
}
This design includes two events: one for opening files and another for selecting directories. There are several advantages to this approach:
- Centralized Management:All logic related to file dialogs is encapsulated within
DialogService, including MediatR requests and handling. This allows for easy code maintenance in one place, improving readability and maintainability. - Loose Coupling:Blazor components don't need to know the details of MediatR; they only need to interact with the service through simple methods, adhering to the Single Responsibility Principle. The MediatR invocation logic is hidden within the service, avoiding pollution of other code sections.
- Ease of Testing:By encapsulating MediatR calls into the service, it becomes easier to test both the service logic and the interaction with MediatR without the need for complex testing within Blazor components.
Taking opening a file as an example.
One-to-One Request
Code Clipify.Forms/EventBus/Request/OpenFileRequest.cs
using Clipify.Forms.EventBus.Notification;
using MediatR;

namespace Clipify.Forms.EventBus.Request;

public class OpenFileRequest : IRequest<string> { }

public class OpenFileHandler : IRequestHandler<OpenFileRequest, string> {
  private readonly IMediator _mediator;
  private readonly FormMain _formMain;

  public OpenFileHandler(FormMain formMain, IMediator mediator) {
    _formMain = formMain;
    _mediator = mediator;
  }

  public Task<string> Handle(OpenFileRequest request, CancellationToken cancellationToken) {
    var result = _formMain.openFileDialog.ShowDialog();

    if (result == DialogResult.OK) {
      var path = _formMain.openFileDialog.FileName;
      _mediator.Publish(new FileSelectedNoti {
        SelectedPath = path
      }, cancellationToken);
      return Task.FromResult(path);
    }

    return Task.FromResult("");
  }
}
After receiving the Request, the RequestHandler obtains an instance of MainForm through dependency injection, then calls the dialog to get the file path, and finally sends a notification.
One-to-Many Notification
Code: Clipify.Forms/EventBus/Notification/FileSelectedNoti.cs
PS: You could actually use the return value of a Request to get the file path, but I still chose to "go the extra mile" and use a Notification.
using Clipify.Forms.Services;
using MediatR;

namespace Clipify.Forms.EventBus.Notification;

public class FileSelectedNoti : INotification {
  public string SelectedPath { get; set; }
}

public class FileSelectedHandler : INotificationHandler<FileSelectedNoti> {
  private readonly DialogService _dialogService;

  public FileSelectedHandler(DialogService dialogService) {
    _dialogService = dialogService;
  }

  public Task Handle(FileSelectedNoti notification, CancellationToken cancellationToken) {
    _dialogService.NotifyFileSelected(notification.SelectedPath);
    return Task.CompletedTask;
  }
}
This code is straightforward—it simply calls the event handler of the DialogService.
Interacting with FFmpeg
When developing the Clipify tool, video processing relies heavily on FFmpeg, a powerful multimedia processing tool. To implement features such as video trimming and audio extraction, I explored various ways to interact with FFmpeg, including using existing C# libraries and directly invoking FFmpeg through system processes.
After research, the following approaches can be used:
- FFmpeg.NET - Previously used to implement QuickCutSharp
- FFMpegCore - Has more stars on GitHub
- Direct Process invocation
The first two are third-party libraries, so I won't go into much detail here. If you're interested, feel free to check their official documentation. One thing worth mentioning is that the C# ecosystem is still a bit lacking — even FFMpegCore with over 1k stars has virtually no documentation, just a project README. FFmpeg.NET is even worse; it's no longer maintained, and some of the documented code doesn't match actual usage.
That said, since these are all just wrappers around FFmpeg invocations, implementing it yourself is perfectly fine. Here's a simple example:
Process ffmpegProcess = new Process();
ffmpegProcess.StartInfo.FileName = "ffmpeg";
ffmpegProcess.StartInfo.Arguments = "-i input.mp4 -progress pipe:1 -f mp4 output.mp4";
ffmpegProcess.StartInfo.RedirectStandardOutput = true;
ffmpegProcess.StartInfo.UseShellExecute = false;
ffmpegProcess.StartInfo.CreateNoWindow = true;

ffmpegProcess.OutputDataReceived += (sender, e) => {
  if (!string.IsNullOrEmpty(e.Data)) {
    // Process progress information from standard output
    Console.WriteLine(e.Data);
    // You can parse e.Data here to extract progress
  }
};

ffmpegProcess.Start();
ffmpegProcess.BeginOutputReadLine();
ffmpegProcess.WaitForExit();
Parameter explanation:
-progress pipe:1: Directs progress information to standard output (stdout, i.e., the console). FFmpeg will output a series of structured key-value pairs representing the current progress status.pipe:1: This is FFmpeg's way of referring to the standard output stream.pipe:0represents standard input (stdin),pipe:1represents standard output (stdout), andpipe:2represents standard error (stderr).
By adding -progress pipe:1 to FFmpeg's arguments, FFmpeg will output progress information similar to the following:
frame=1000
fps=24.0
stream_0_0_q=28.0
bitrate=456.8kbits/s
total_size=1024000
out_time_us=42000000
out_time_ms=42000
out_time=00:00:42.000000
dup_frames=0
drop_frames=0
speed=2.00x
progress=continue
This way, you can easily obtain more detailed video processing progress information.
However, FFmpeg.NET's onData event cannot capture this information. It typically retrieves output like this:
size= 16522KiB time=00:21:19.01 bitrate= 105.8kbits/s speed=68.9x
Even with the additional parameters added, you can only capture this single line of information. So if you need detailed information, you have to invoke the Process directly yourself.
Furthermore, FFmpeg.NET's OnProgress event is problematic — it can only retrieve the ProcessedDuration information, and nothing else. I'm not sure if this is because the version is too old and doesn't match the newer versions of FFmpeg. If needed, you can write your own regex to parse the output.
// Use regular expressions to extract various pieces of information
string sizePattern = @"size=\s*(\d+)(\w+)";
string timePattern = @"time=(\d{2}:\d{2}:\d{2}\.\d{2})";
string bitratePattern = @"bitrate=\s*(\d+\.\d+|\d+)(\w+)";
string speedPattern = @"speed=\s*(\d+\.\d+|\d+)x";
Thumbnails
In Clipify, video thumbnails are an important feature that helps users quickly preview videos.
During the development of this project, I explored several different thumbnail strategies:
- MD5 of the video file - If the video file is large and hashing is performed frequently, it might cause certain performance overhead.
- MD5 of the file path - If the file path changes (e.g., due to moving or renaming), even if the file content remains unchanged, the MD5 will still differ, leading to the generation of new thumbnails. This could result in unnecessary duplicate thumbnail generation.
- MD5 calculation combining other file attributes (such as filename, modification time, etc.) - This approach strikes a balance between handling path changes and maintaining file uniqueness, further reducing the generation of duplicate thumbnails.
To avoid duplicate thumbnail generation, I adopted a strategy based on MD5 hashing to generate a unique thumbnail filename for each video. This ensures that the same video can still use the cached thumbnail even when accessed at different times, thereby improving performance.
This part of the code is integrated within the VideoService.
Code for Generating Thumbnails
The thumbnail generation functionality provided by FFmpeg.NET is used (which actually calls FFmpeg to take screenshots of videos), generating filenames according to rules, and then saving the thumbnail files to the wwwroot/temp/thumbnails directory.
public async Task<string> GenerateThumbnailAsync(string videoPath, CancellationToken? cancellationToken = null) {
  var inputFile = new InputFile(videoPath);
  var tempThumbnailDir = Path.Combine(_environment.WebRootPath, "temp", "thumbnails");
  if (!Directory.Exists(tempThumbnailDir)) {
    Directory.CreateDirectory(tempThumbnailDir);
  }

  var filename = $"{GetFileMetadataMd5(videoPath)}.jpeg";
  var outputPath = Path.Combine(tempThumbnailDir, filename);
  var outputFile = new OutputFile(outputPath);

  var opt = new ConversionOptions {
    HideBanner = true,
    HWAccelOutputFormatCopy = true,
    MapMetadata = true,
  };

  if (!File.Exists(outputPath)) {
    await FFmpeg.GetThumbnailAsync(inputFile, outputFile, cancellationToken ?? CancellationToken.None);
  }

  return $"temp/thumbnails/{filename}";
}
MD5 Hash of Video File
The most straightforward approach is to perform an MD5 hash on the entire video file and use the generated hash value as the thumbnail's filename. However, if the video file is large, frequent hash calculations may introduce significant performance overhead.
public static string GetFileMd5(string filePath) {
  using var md5 = MD5.Create();
  using var stream = File.OpenRead(filePath);
  var hash = md5.ComputeHash(stream);
  return BitConverter.ToString(hash).Replace("-", "").ToLowerInvariant();
}
Advantages: High uniqueness of file content ensures that videos with different content will not generate identical thumbnails.
Disadvantages: For large files, MD5 calculations take a long time, impacting performance. In practice, videos of several gigabytes can take multiple seconds to compute.
MD5 Hashing of File Paths
To improve performance, it is also possible to compute the MD5 only on the file path. This approach significantly reduces computational overhead and is suitable for scenarios where the file content remains unchanged but thumbnails need to be generated frequently. However, if the file is moved or renamed, the resulting MD5 hash will differ even if the video content hasn't changed, potentially leading to unnecessary regeneration of thumbnails.
string filePathHash;
using (var md5 = MD5.Create()) {
  var pathBytes = Encoding.UTF8.GetBytes(videoFilePath);
  var hash = md5.ComputeHash(pathBytes);
  filePathHash = BitConverter.ToString(hash).Replace("-", "").ToLower();
}
Advantages: Highly efficient, with extremely fast MD5 computation, making it suitable for frequent use.
Disadvantages: Changes to the file path, even if the file content remains unchanged, will still result in new thumbnails, potentially leading to redundant thumbnail generation.
MD5 Calculation Combined with File Attributes
To strike a balance between path variation and file content uniqueness, Clipify can also perform MD5 calculation by combining other file attributes, such as the file name, modification time, etc. This way, even if the file path changes, as long as the file content and its attributes remain unchanged, the MD5 will not change, avoiding unnecessary redundant generation.
public static string GetFileMetadataMd5(string filePath) {
  var fileName = Path.GetFileName(filePath);
  var fileInfo = new FileInfo(filePath);
  var metaData = fileName + fileInfo.LastWriteTimeUtc.ToString();

  using var md5 = MD5.Create();
  var metaBytes = System.Text.Encoding.UTF8.GetBytes(metaData);
  var hash = md5.ComputeHash(metaBytes);
  return BitConverter.ToString(hash).Replace("-", "").ToLowerInvariant();
}
Advantages:
- Balances file content uniqueness and path variation.
- Reduces redundant thumbnail generation.
Disadvantages: Requires combining multiple file attributes, making the calculation slightly more complex, but it can still effectively improve performance.
Summary
In Clipify, the choice of how to generate a hash for video thumbnails involves a trade-off between performance and uniqueness.
For larger video files, calculating the MD5 hash directly from the file content ensures content uniqueness but significantly impacts performance.
By generating the hash based on a combination of file path and file attributes, it is possible to reduce performance overhead and avoid redundant thumbnail generation.
In future versions, a consideration could be to use file content to generate the MD5 hash for small files, while continuing to use the combined approach of path and attributes for generating the MD5 hash for larger files.
Displaying Video Export Progress
Currently, it uses FFmpeg.Net's OnProgress event, rounding to two decimal places.
private async void OnProgress(object? sender, ConversionProgressEventArgs e) {
  Status.Status = StatusEnum.Running;
  Status.Progress = Math.Round(e.ProcessedDuration.TotalSeconds / MetaData.Duration.TotalSeconds * 100, 2);
  await InvokeAsync(StateHasChanged);
}
For a more detailed display of other information during processing, you can refer to the earlier section on FFmpeg interaction.
Details
During the design process of Clipify, I paid close attention to the details in user experience, especially how to make video file properties more intuitive and easier to understand. Therefore, in addition to basic video editing functions, I also optimized the display of file size and video length on the interface.
This article selects these two points to introduce:
- Displaying a more user-friendly file size
- Displaying a more user-friendly video length
Displaying More User-Friendly File Sizes
Video files are typically large, and displaying their size directly in bytes may not be intuitive. To improve user experience, I chose to convert file sizes to more common units like KB, MB, or GB, rounding them for a simpler display.
For example, if a video file is 3,304,582 bytes, it will be displayed as 3.30 MB. This way, users don't need to perform unit conversions and can immediately see the approximate file size.
Here's an extension method I wrote to implement this.
public static class FileInfoExtensions {
  public static string GetFriendlySize(this FileInfo fileInfo) {
    string[] sizeUnits = { "Bytes", "KB", "MB", "GB", "TB" };
    double fileSize = fileInfo.Length;
    int unitIndex = 0;

    while (fileSize >= 1024 && unitIndex < sizeUnits.Length - 1) {
      fileSize /= 1024;
      unitIndex++;
    }

    return $"{fileSize:F2} {sizeUnits[unitIndex]}";
  }
}
Result:
- Large files are displayed in MB or GB, while smaller files are shown in KB, ensuring a more accurate and intuitive sense of file size for users.
- The user interface becomes cleaner and more organized, avoiding unnecessary visual clutter.
Display Video Length in a More User-Friendly Format
Displaying video length directly in seconds or milliseconds is not intuitive. To provide a more user-friendly experience, I chose to convert the video duration into a formatted time display like HH:mm:ss, allowing users to quickly understand the video's length.
For example, a video that is 5 minutes and 44 seconds long will be displayed as 00:05:44 instead of showing the raw number of seconds (like 344 seconds). This format aligns with users' everyday cognitive habits, making it easier for them to estimate the time span of the video content.
This is still implemented using an extension method (I even wrote an English version).
public static class TimeSpanExtensions {
  public static string ToFriendlyString(this TimeSpan timeSpan, string locale = "zh-cn") {
    var parts = new List<string>();

    switch (locale) {
      case "zh-cn":
        if (timeSpan.Days > 0)
          parts.Add($"{timeSpan.Days}天");

        if (timeSpan.Hours > 0)
          parts.Add($"{timeSpan.Hours}小时");

        if (timeSpan.Minutes > 0)
          parts.Add($"{timeSpan.Minutes}分钟");

        if (timeSpan.Seconds > 0)
          parts.Add($"{timeSpan.Seconds}秒");

        // 如果没有天、小时、分钟或秒的部分,显示为 0 秒
        if (parts.Count == 0)
          return "0 秒";

        break;
      default:
        if (timeSpan.Days > 0)
          parts.Add($"{timeSpan.Days} day{(timeSpan.Days > 1 ? "s" : "")}");

        if (timeSpan.Hours > 0)
          parts.Add($"{timeSpan.Hours} hour{(timeSpan.Hours > 1 ? "s" : "")}");

        if (timeSpan.Minutes > 0)
          parts.Add($"{timeSpan.Minutes} minute{(timeSpan.Minutes > 1 ? "s" : "")}");

        if (timeSpan.Seconds > 0)
          parts.Add($"{timeSpan.Seconds} second{(timeSpan.Seconds > 1 ? "s" : "")}");

        // 如果没有天、小时、分钟或秒的部分,显示为 0 秒
        if (parts.Count == 0)
          return "0 seconds";
        break;
    }

    return string.Join(", ", parts);
  }
}
However, if a fixed format is required, you can use a more concise piece of code directly:
public static string FormatVideoDuration(TimeSpan duration)
{
  return string.Format(
    "{0:D2}:{1:D2}:{2:D2}",
    duration.Hours,
    duration.Minutes,
    duration.Seconds);
}
Summary
Details make the difference. In the design of Clipify, displaying more user-friendly file sizes (文件大小) and video lengths (视频长度) is a key step to enhancing user experience. By transforming technical logic into intuitive interface elements, users can operate video files more effortlessly, reducing frustration caused by non-intuitive information. Optimizing these small details helps improve the overall usability and user satisfaction of the tool.
Article Summary
Compared to the previous QuickCutSharp, this new tool offers greater flexibility in the development experience and interface design, and it is better suited to my needs. Although I initially tried some other development approaches, such as Avalonia and MAUI, I ultimately abandoned them due to their complex environments or lack of platform support.
Building the interface with Blazor and TailwindCSS allowed me to maintain a familiar C# development ecosystem while bringing a modern front-end experience, making the entire project development much smoother. Although Clipify currently only implements some of its features, I am full of expectations for its future development. The project is already open-sourced, and I hope it can provide some assistance to developers with similar needs.
References
- https://learn.microsoft.com/en-us/aspnet/core/blazor/hybrid/tutorials/windows-forms?view=aspnetcore-8.0
- https://github.com/jbogard/MediatR/wiki
- https://github.com/cmxl/FFmpeg.NET
- https://github.com/dotnet/maui/tree/main/src/BlazorWebView/samples/BlazorWinFormsApp
- https://github.com/rosenbjerg/FFMpegCore
- https://antblazor.com/zh-CN/components/overview
_EOF_
A New Experience in PC Software Development! Build Simple and Efficient Video Processing Tools with Blazor Hybrid
- 本文作者:
- 程序设计实验室
- 版权声明:
- 本博客所有文章除特别声明外,均采用 BY-NC-SA 许可协议。转载请注明出处!
相关文章
提升Avalonia UI质感,跨平台图标库选型实践
本文介绍了在Avalonia框架下使用两种图标库(Icon.Avalonia和IconPacks.Avalonia)的详细方法。作者通过对比不同设备间emoji显示不一致的问题,引出使用FontAwesome图标的优势。文章重点讲解了两种库的安装步骤、XAML配置方法及实际应用场景,包括独立图标显示、控件附加、动画效果实现等。其中IconPacks.Avalonia支持35种图标集,功能更为丰富,还提供了图标浏览器工具。全文通过具体代码示例,为开发者提供了实用的技术参考。
2025-06-12 · Desktop · 约 1 分钟
Blazor Hybrid 实战体验:那些你可能没预料到的坑
接下来我会找时间试一下 Electron 和 wails 的开发体验,进一步探索 Blazor Hybrid 在桌面软件开发中的优势。
2025-03-27 · Desktop · 约 1 分钟
AOT编译Avalonia应用:StarBlog Publisher项目实践与挑战
本文介绍了作者使用Avalonia框架开发的跨平台文章发布工具StarBlog Publisher,并详细记录了使用AOT(Ahead-Of-Time)技术发布Avalonia应用的过程及遇到的问题。文章讨论了AOT的优缺点、配置方法,并针对JSON序列化、类型注册等问题提供了解决方案。作者分享了使用Newtonsoft.Json库和rd.xml文件等技巧,以优化AOT发布的性能和兼容性。
2025-04-27 · Desktop · 约 1 分钟
聊聊几个相见恨晚的WinForm界面库
前阵子在逛知乎的时候看到了Gitee发的文章,里面介绍了一些WinForm开源项目,其中就有涉及到界面库,我一下子就来了兴趣,然后顺瓜摸藤又找到了几个类似的界面库,看着熟悉的界面和代码,有一种「爷的青春回来了」的感觉~ 可惜属于WinForm的短暂时代早已结束,当今Web统治一切,怕是WinForm以后只能用来追忆往事了吧…… SunnyUI 看看作者的截图: 对话框: 看这界面颇有年代感,很惊讶
2025-03-27 · Desktop · 约 1 分钟
讨论
共 0 条加载评论中…