

StarBlog Development Notes (26): Integrating Swagger API Documentation
Preface This is the first update of the StarBlog series in 2023 😃~ In previous articles, we've already completed development of some APIs. Next we need to test these APIs using tools like curl and Postman, but with more and more endpoints, filling in the URL and corresponding parameters one by one for every test gets tedious… We need an intuitive way to collect all the APIs in the project, and it would be even better if we could debug them right there. Swagger: Hehe, isn't that exactly me? 😎 Introduction to Swagger Here's a bit
目录13 个章节
Preface
This is the first update of the StarBlog series in 2023 😃~
In previous articles, we've already completed development of some APIs. Next we need to test these APIs using tools like curl and Postman, but with more and more endpoints, filling in the URL and corresponding parameters one by one for every test gets tedious…
We need an intuitive way to collect all the APIs in the project, and it would be even better if we could debug them right there.
Swagger: Hehe, isn't that exactly me? 😎
Introduction to Swagger
Here's a bit of introduction from the official website
Simplify API development for users, teams, and enterprises with the Swagger open source and professional toolset.
Translation: Swagger is an open source and professional toolset that simplifies API development for users, teams, and enterprises.
Generally speaking, using Swagger involves two parts: one is OpenAPI and the other is SwaggerUI
On the Swagger official website, OpenAPI is described in glowing terms 🙂
The OpenAPI Specification, formerly known as the Swagger Specification, is the world’s standard for defining RESTful interfaces. The OAS enables developers to design a technology-agnostic API interface that forms the basis of their API development and consumption.
Translation: The OpenAPI Specification, formerly known as the Swagger Specification, is the world’s standard for defining RESTful interfaces. The OAS enables developers to design a technology-agnostic API interface that forms the basis of their API development and consumption.
Simply put, OpenAPI is a standard. Each language and framework needs to implement its own tool to collect all the APIs in a project and generate a swagger.json file
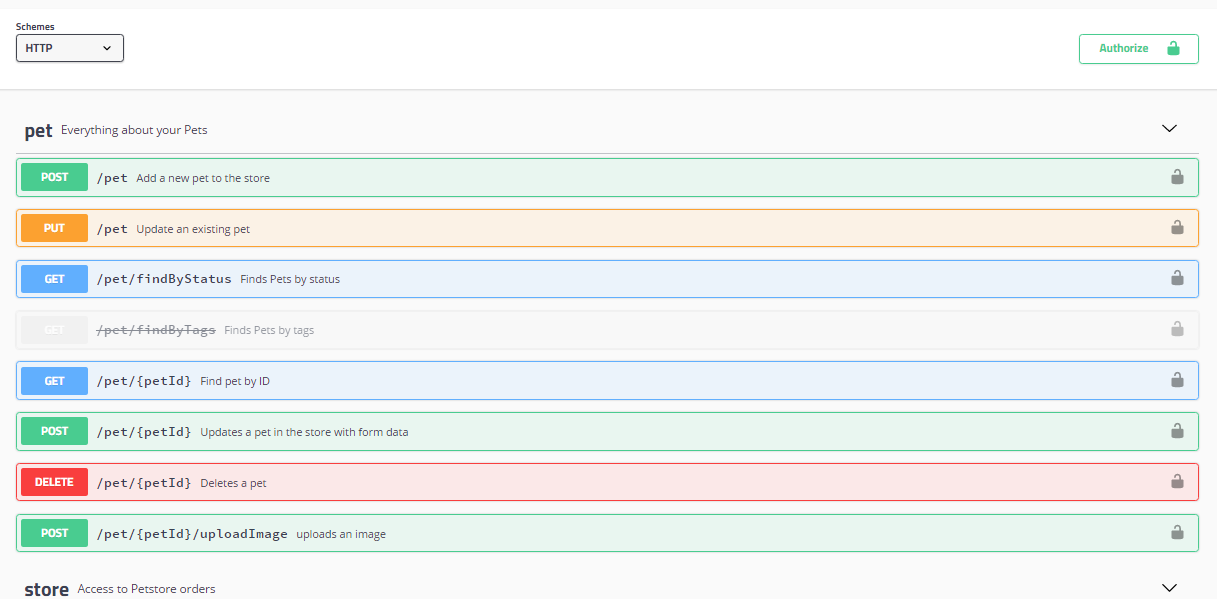
Then SwaggerUI is a web page that reads this swagger.json to display all APIs and their parameters, and also makes debugging convenient. The result looks like this.
Swashbuckle.AspNetCore
As mentioned earlier, each framework needs to implement its own tool to generate swagger.json. Swashbuckle.AspNetCore is the implementation for the .NetCore platform—just use it and you're done.
Project homepage: https://github.com/domaindrivendev/Swashbuckle.AspNetCore
Tips: If you create a WebApi project, Swagger is already included in the code template by default, so you don't need to add it manually.
The StarBlog project started with the MVC template, so it doesn't come with Swagger and needs to be added manually.
Just add the Swashbuckle.AspNetCore package via nuget and you're done.
This package has many features. It includes the official SwaggerUI interface, as well as a purely static API documentation page called ReDoc (ReDoc can only view APIs, not debug them).
Other options?
Besides this, there's also NSwag with similar functionality. I haven't used it much; interested readers can also give it a try~
Project URL: https://github.com/RicoSuter/NSwag
Getting started
To keep the Program.cs code clean, we create a ConfigureSwagger class in StarBlog.Web/Extensions
public static class ConfigureSwagger {
  public static void AddSwagger(this IServiceCollection services) {
    services.AddSwaggerGen(options => {
      options.SwaggerDoc("v1", new OpenApiInfo { Version = "v1", Title = "APIs"});

      // 在接口文档上显示 XML 注释
      var filePath = Path.Combine(System.AppContext.BaseDirectory, $"{typeof(Program).Assembly.GetName().Name}.xml");
      options.IncludeXmlComments(filePath, true);
    });
  }

  public static void UseSwaggerPkg(this IApplicationBuilder app) {
    app.UseSwagger();
    app.UseSwaggerUI(options => {
      options.RoutePrefix = "api-docs/swagger";
      options.SwaggerEndpoint("/swagger/v1/swagger.json", "APIs");
    });
    app.UseReDoc(options => {
      options.RoutePrefix = "api-docs/redoc";
      options.SpecUrl = "/swagger/v1/swagger.json";
    });
  }
}
As you can see from the code above, there are three steps
AddSwaggerGen- corresponds to generatingswagger.jsonas mentioned earlierUseSwagger- lets the browser access paths like/swagger/v1/swagger.jsonUseSwaggerUI- provides web access to SwaggerUI
Then go back to Program.cs and register the services and add the middleware respectively.
// 注册服务
builder.Services.AddSwagger();
// 添加中间件
app.UseSwaggerPkg();
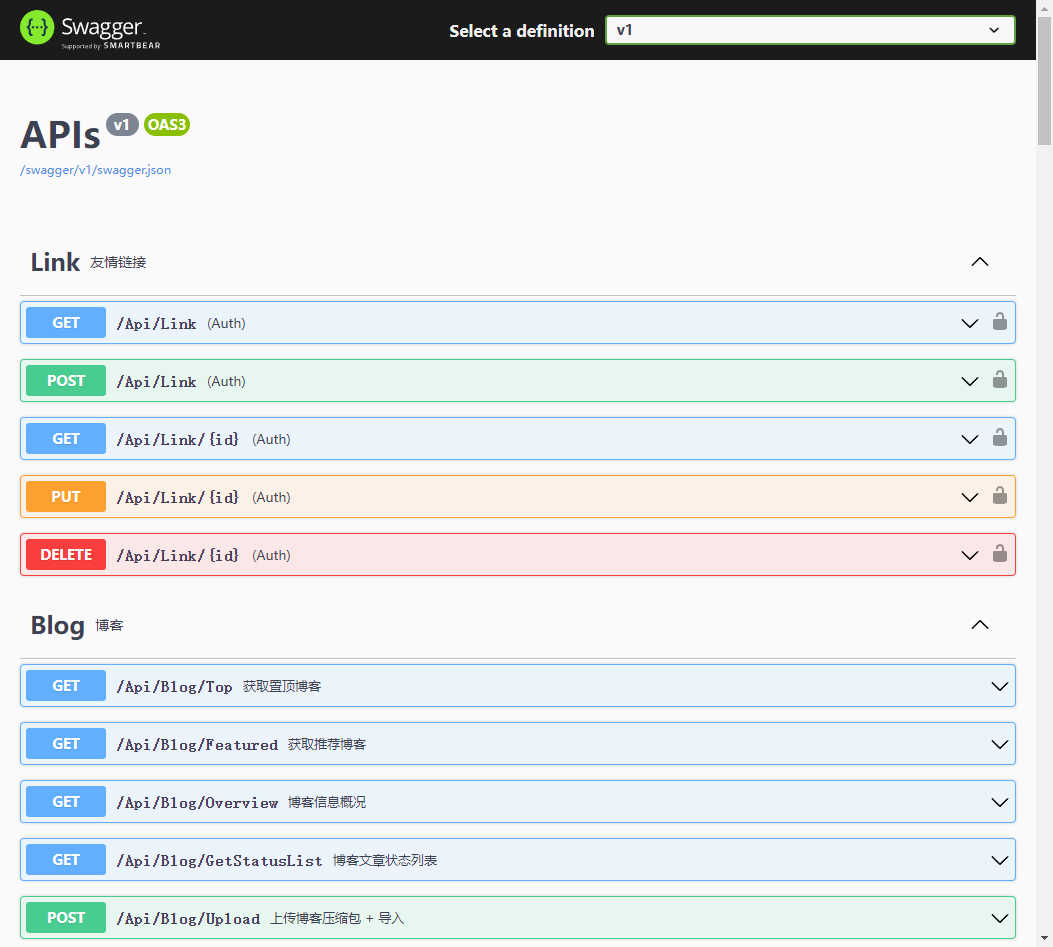
Now start the project and visit http://[本地地址]/api-docs/swagger to see the API documentation
It looks roughly like this
Extra: About XML comments
C# code comments can be exported as XML and then displayed in the Swagger documentation
Note that you need to enable this manually in the .csproj project configuration for the XML documentation to be output
<!--  输出XML  -->
<PropertyGroup>
  <GenerateDocumentationFile>true</GenerateDocumentationFile>
  <NoWarn>$(NoWarn);1591</NoWarn>
</PropertyGroup>
But after enabling XML, the IDE stupidly requires us to write comments for all public members, which is annoying. Adding the <NoWarn>$(NoWarn);1591</NoWarn> line will turn off this warning.
To load XML documentation in Swagger, you can use the approach written earlier in this article
var filePath = Path.Combine(System.AppContext.BaseDirectory, $"{typeof(Program).Assembly.GetName().Name}.xml");
options.IncludeXmlComments(filePath, true);
You can also use a second approach: load all XML files in the directory
var xmlFiles = Directory.GetFiles(AppContext.BaseDirectory, "*.xml");
foreach (var file in xmlFiles) {
  options.IncludeXmlComments(file, true);
}
As for which one to use, either is fine, whatever you feel like~
Extra: About AddEndpointsApiExplorer
Some of you may have questions about the AddSwagger extension method here
Why, after creating a .Net6 project, does the default look like these two lines of code
builder.Services.AddEndpointsApiExplorer();
builder.Services.AddSwaggerGen();
While I only have one line of code here
services.AddSwaggerGen();
First, the conclusion: AddEndpointsApiExplorer is for supporting Minimal Api.
Because the StarBlog project uses the MVC template, at the very beginning of Program.cs you can see this line of code, which adds controllers and views
builder.Services.AddControllersWithViews();
Looking through the framework source code, you can see this method's nesting is like this
AddControllersWithViews() -> AddControllersWithViewsCore() -> AddControllersCore()
And inside AddControllersCore, it in turn calls AddApiExplorer
private static IMvcCoreBuilder AddControllersCore(IServiceCollection services) {
  // This method excludes all of the view-related services by default.
  var builder = services
    .AddMvcCore()
    .AddApiExplorer()
    .AddAuthorization()
    .AddCors()
    .AddDataAnnotations()
    .AddFormatterMappings();

  if (MetadataUpdater.IsSupported) {
    services.TryAddEnumerable(
      ServiceDescriptor.Singleton<IActionDescriptorChangeProvider, HotReloadService>());
  }

  return builder;
}
That is to say, a regular project already has ApiExplorer, but a Minimal Api project does not, so this project doesn't need the builder.Services.AddEndpointsApiExplorer(); line.
For details, you can read the first link in the references.
API grouping
We have the API documentation now, but there are too many APIs in the project. Dozens of endpoints all crammed onto one page—looking through them makes your eyes glaze over 😑
This is when we can group the APIs
First, let's classify the APIs in the StarBlog project. Based on different purposes, they roughly fall into these five categories:
- admin - admin-related APIs
- common - common public APIs
- auth - authorization APIs
- blog - blog management APIs
- test - test APIs
Still in that ConfigureSwagger.cs file above
Modify the AddSwagger method to add these groups
services.AddSwaggerGen(options => {
  options.SwaggerDoc("admin", new OpenApiInfo {
    Version = "v1",
    Title = "Admin APIs",
    Description = "管理员相关接口"
  });
  options.SwaggerDoc("common", new OpenApiInfo {
    Version = "v1",
    Title = "Common APIs",
    Description = "通用公共接口"
  });
  options.SwaggerDoc("auth", new OpenApiInfo {
    Version = "v1",
    Title = "Auth APIs",
    Description = "授权接口"
  });
  options.SwaggerDoc("blog", new OpenApiInfo {
    Version = "v1",
    Title = "Blog APIs",
    Description = "博客管理接口"
  });
  options.SwaggerDoc("test", new OpenApiInfo {
    Version = "v1",
    Title = "Test APIs",
    Description = "测试接口"
  });
});
This will generate five swagger.json files, with paths respectively:
/swagger/admin/swagger.json/swagger/common/swagger.json/swagger/auth/swagger.json/swagger/blog/swagger.json/swagger/test/swagger.json
So the UseSwaggerPkg method below also needs to be modified accordingly
public static void UseSwaggerPkg(this IApplicationBuilder app) {
  app.UseSwagger();
  app.UseSwaggerUI(options => {
    options.RoutePrefix = "api-docs/swagger";
    options.SwaggerEndpoint("/swagger/admin/swagger.json", "Admin");
    options.SwaggerEndpoint("/swagger/blog/swagger.json", "Blog");
    options.SwaggerEndpoint("/swagger/auth/swagger.json", "Auth");
    options.SwaggerEndpoint("/swagger/common/swagger.json", "Common");
    options.SwaggerEndpoint("/swagger/test/swagger.json", "Test");
  });
}
Next, we need to let Swagger know which group each API belongs to.
The way to do this is to add the ApiExplorerSettings attribute on the Controller.
For example, BlogController belongs to the blog group. Add a line of code before the class definition
[ApiExplorerSettings(GroupName = "blog")]
public class BlogController : ControllerBase {
  // ...
}
The other Controllers follow similar operations. The specific grouping matches the directory structure under StarBlog.Web/Apis, so I won't go into details here.
Results
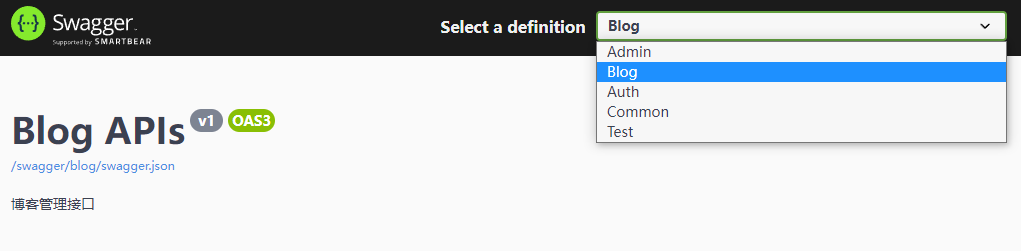
Once that's done, open the Swagger API documentation page
You can see that API groups can now be selected in the upper-right corner
Done.
Optimizing Groups
The previous implementation of Swagger grouping is actually hard-coded. Controllers in different groups need the [ApiExplorerSettings(GroupName = "blog")] attribute, and group names are all copy-pasted. That's fine when the project is small, but if there are many groups and hundreds of APIs, you'd probably go numb 😂
Q: “Why didn't you say this earlier 😑”
A: “Gotta take it step by step 😛”
A: “The StarBlog project also only switched to the new grouping recently 😎”
Add a new class SwaggerGroup in StarBlog.Web/Models
public class SwaggerGroup {
    /// <summary>
    /// 组名称(同时用于做URL前缀)
    /// </summary>
    public string Name { get; set; }

    public string? Title { get; set; }
    public string? Description { get; set; }

    public SwaggerGroup(string name, string? title = null, string? description = null) {
        Name = name;
        Title = title;
        Description = description;
    }

    /// <summary>
    /// 生成 <see cref="Microsoft.OpenApi.Models.OpenApiInfo"/>
    /// </summary>
    public OpenApiInfo ToOpenApiInfo(string version = "1.0") {
        var item = new OpenApiInfo();
        Title ??= Name;
        Description ??= Name;
        return new OpenApiInfo { Title = Title, Description = Description, Version = version };
    }
}
Then refactor StarBlog.Web/Extensions/ConfigureSwagger.cs
Add a new class in this file so there's no more hard-coding 😃
public static class ApiGroups {
  public const string Admin = "admin";
  public const string Auth = "auth";
  public const string Common = "common";
  public const string Blog = "blog";
  public const string Test = "test";
}
Add some code in ConfigureSwagger to create a SwaggerGroup list
public static class ConfigureSwagger {
  public static readonly List<SwaggerGroup> Groups = new() {
    new SwaggerGroup(ApiGroups.Admin, "Admin APIs", "管理员相关接口"),
    new SwaggerGroup(ApiGroups.Auth, "Auth APIs", "授权接口"),
    new SwaggerGroup(ApiGroups.Common, "Common APIs", "通用公共接口"),
    new SwaggerGroup(ApiGroups.Blog, "Blog APIs", "博客管理接口"),
    new SwaggerGroup(ApiGroups.Test, "Test APIs", "测试接口")
  };
}
Then change the AddSwagger method that follows to this. That whole chunk of stuff is now replaced by a single line of code 😀
public static void AddSwagger(this IServiceCollection services) {
  services.AddSwaggerGen(options => {
    Groups.ForEach(group => options.SwaggerDoc(group.Name, group.ToOpenApiInfo()));

    // XML注释
    var filePath = Path.Combine(AppContext.BaseDirectory, $"{typeof(Program).Assembly.GetName().Name}.xml");
    options.IncludeXmlComments(filePath, true);
  });
}
Next up is the UseSwaggerPkg method. Simple 😎
public static void UseSwaggerPkg(this IApplicationBuilder app) {
  app.UseSwagger();
  app.UseSwaggerUI(opt => {
    opt.RoutePrefix = "api-docs/swagger";
    // 分组
    Groups.ForEach(group => opt.SwaggerEndpoint($"/swagger/{group.Name}/swagger.json", group.Name));
  });
}
Update the Controllers accordingly like this
[ApiExplorerSettings(GroupName = ApiGroups.Blog)]
public class BlogController : ControllerBase {
}
Perfect 🆒🥳
Recap
“Swagger is too vast to stew in one pot”
There are other ways to use Swagger, but they require some prerequisite knowledge, so this article won't cover all of the Swagger-related parts in the StarBlog project
Once I've written up the related prerequisite knowledge, I'll come back to flesh out the corresponding usage~
This also matches how StarBlog was developed 😀
References
Series Articles
- Developing a Blog Project with .NetCore: StarBlog - (1) Why Write Your Own Blog?
- Developing a Blog Project with .NetCore: StarBlog - (2) Environment Setup and Creating the Project
- Developing a Blog Project with .NetCore: StarBlog - (3) Model Design
- Developing a Blog Project with .NetCore: StarBlog - (4) Batch Importing Markdown Blog Posts
- Developing a Blog Project with .NetCore: StarBlog - (5) Starting to Build the Web Project
- Developing a Blog Project with .NetCore: StarBlog - (6) Page Development: Blog Post List
- Developing a Blog Project with .NetCore: StarBlog - (7) Page Development: Post Detail Page
- Developing a Blog Project with .NetCore: StarBlog - (8) Displaying Category Hierarchy
- Developing a Blog Project with .NetCore: StarBlog - (9) Batch Importing Images
- Developing a Blog Project with .NetCore: StarBlog - (10) Image Waterfall Layout
- Developing a Blog Project with .NetCore: StarBlog - (11) Implementing Visit Statistics
- Developing a Blog Project with .NetCore: StarBlog - (12) Dynamic Compilation of Razor Pages
- Developing a Blog Project with .NetCore: StarBlog - (13) Adding Friend Links
- Developing a Blog Project with .NetCore: StarBlog - (14) Implementing Theme Switching
- Developing a Blog Project with .NetCore: StarBlog - (15) Generating Random-Sized Images
- Developing a Blog Project with .NetCore: StarBlog - (16) Some New Features (Monitoring/Statistics/Configuration/Initialization)
- Developing a Blog Project with .NetCore: StarBlog - (17) Automatically Downloading External Images in Posts
- Developing a Blog Project with .NetCore: StarBlog - (18) Packaging and Uploading Local Typora Posts
- Developing a Blog Project with .NetCore: StarBlog - (19) Exploring Markdown Rendering Solutions
- Developing a Blog Project with .NetCore: StarBlog - (20) Image Display Optimization
- Developing a Blog Project with .NetCore: StarBlog - (21) Starting RESTFul API Development
- Developing a Blog Project with .NetCore: StarBlog - (22) Developing Blog Post APIs
- Developing a Blog Project with .NetCore: StarBlog - (23) Post List API: Pagination, Filtering, Search, and Sorting
- Developing a Blog Project with .NetCore: StarBlog - (24) Unified API Response Format
- Developing a Blog Project with .NetCore: StarBlog - (25) Image APIs and File Upload
- Developing a Blog Project with .NetCore: StarBlog - (26) Integrating Swagger API Documentation
_EOF_
StarBlog Development Notes (26): Integrating Swagger API Documentation
- 本文作者:
- 程序设计实验室
- 版权声明:
- 本博客所有文章除特别声明外,均采用 BY-NC-SA 许可协议。转载请注明出处!
相关文章
StarBlog开源博客项目 - 2023年底更新内容一览
前台UI勉强能看,后台总算不那么辣眼睛了。数据库分页改对了,不然性能差得离谱。新增slug检查?哦,终于知道避免重复了。
2023-12-16 · StarBlog博客开发笔记 · 约 1 分钟
StarBlog博客开发笔记(6):页面开发之博客文章列表
系列文章 基于.NetCore开发博客项目 StarBlog - (1) 为什么需要自己写一个博客? 基于.NetCore开发博客项目 StarBlog - (2) 环境准备和创建项目 基于.NetCore开发博客项目 StarBlog - (3) 模型设计 基于.NetCore开发博客项目 StarBlog - (4) markdown博客批量导入 基于.NetCore开发博客项目 StarBl
2023-05-07 · StarBlog博客开发笔记 · 约 1 分钟
StarBlog博客开发笔记(17):自动下载文章里的外部图片
系列文章 基于.NetCore开发博客项目 StarBlog - (1) 为什么需要自己写一个博客? 基于.NetCore开发博客项目 StarBlog - (2) 环境准备和创建项目 基于.NetCore开发博客项目 StarBlog - (3) 模型设计 基于.NetCore开发博客项目 StarBlog - (4) markdown博客批量导入 基于.NetCore开发博客项目 StarBl
2022-08-14 · StarBlog博客开发笔记 · 约 1 分钟
StarBlog博客开发笔记(1):项目介绍
前言 OK,我也来造轮子了 博客系统从一开始用WordPress,再到后来用hexo、hugo之类的静态博客生成放github托管,一直在折腾 折腾是为了更好解决问题,最终还是打算自己花时间搞一个好了 本系列文章将记录博客的开发过程~ 后端基于最新的.Net6和Asp.Net Core框架,遵循RESTFul接口规范,前端基于Vue+ElementUI开发,可作为 .Net Core 入门项目学习
2022-04-05 · StarBlog博客开发笔记 · 约 1 分钟
讨论
共 0 条加载评论中…