StarBlog Blog Development Notes (6): Blog Post List Page Development
Series Articles Developing a Blog Project Based on .NetCore StarBlog - (1) Why Write Your Own Blog? Developing a Blog Project Based on .NetCore StarBlog - (2) Environment Preparation and Project Creation Developing a Blog Project Based on .NetCore StarBlog - (3) Model Design Developing a Blog Project Based on .NetCore StarBlog - (4) Batch Importing Markdown Blog Posts Developing a Blog Project Based on .NetCore StarBlog - (5) Designing the Blog Module and Implementing the Article API
目录15 个章节
Series Articles
- Developing a Blog Project with .NetCore StarBlog - (1) Why Write Your Own Blog?
- Developing a Blog Project with .NetCore StarBlog - (2) Environment Setup and Project Creation
- Developing a Blog Project with .NetCore StarBlog - (3) Model Design
- Developing a Blog Project with .NetCore StarBlog - (4) Batch Import of Markdown Blogs
- Developing a Blog Project with .NetCore StarBlog - (5) Starting to Build the Web Project
- Developing a Blog Project with .NetCore StarBlog - (6) Page Development - Blog Post List
- ...
Preface
The previous article got the web project set up, and now it's time to start writing pages~
This article documents the development of the blog article list, covering topics such as parameters, category filtering, pagination, searching, and sorting.
ORM
The ORM in this project uses FreeSQL, which was briefly mentioned in the previous article on "Blog Batch Import," but not covered in much detail. Here, we'll discuss a few key points.
Unlike the more common EF Core, FreeSQL does not require migration operations after designing the model. In development mode, enabling automatic structure synchronization (AutoSyncStructure) allows it to automatically create and modify database tables.
Another convenient aspect is that FreeSQL comes with a simple repository pattern, eliminating the need to implement your own, thus reducing the amount of code during development~
However, there are limitations. Without encapsulating a repository layer, it means the service layer code is coupled with the ORM. If you switch ORMs later, it will bring additional refactoring costs.
Open the StarBlog.Data project. Let's write an extension method by creating a new Extensions directory and adding a ConfigureFreeSql.cs file inside it.
using FreeSql;
using Microsoft.Extensions.Configuration;
using Microsoft.Extensions.DependencyInjection;

namespace StarBlog.Data.Extensions;

public static class ConfigureFreeSql {
    public static void AddFreeSql(this IServiceCollection services, IConfiguration configuration) {
        var freeSql = new FreeSqlBuilder()
            .UseConnectionString(DataType.Sqlite, configuration.GetConnectionString("SQLite"))
            .UseAutoSyncStructure(true)
            .Build();

        services.AddSingleton(freeSql);

        // Repository pattern support
        services.AddFreeRepository();
    }
}
Next, edit the Program.cs file in the StarBlog.Web project to register the FreeSQL service using the extension method we just wrote.
using StarBlog.Data.Extensions;

builder.Services.AddFreeSql(builder.Configuration);
Then, simply inject it where needed, for example:
IBaseRepository<Post> _postRepo;

// Retrieve all articles
_postRepo.Select.ToList()
It's very convenient and ready to use out of the box~
Service
Because our backend needs to both render pages and provide RESTful interfaces, we should abstract the business logic and place it in the service layer to avoid duplication in the Controller.
In the Services directory of the StarBlog.Web project, add a new PostService.cs file. Here, we will encapsulate the logic related to posts.
First, use dependency injection to bring in the required services.
public class PostService {
    private readonly IBaseRepository<Post> _postRepo;
    private readonly IBaseRepository<Category> _categoryRepo;

    public PostService(IBaseRepository<Post> postRepo,
        IBaseRepository<Category> categoryRepo) {
        _postRepo = postRepo;
        _categoryRepo = categoryRepo;
    }
}
Write a method to retrieve all posts.
public List<Post> GetAll() {
    return _postRepo.Select.ToList();
}
This completes the initial setup. Next, we will proceed to write the Controller.
Controller
Create a new BlogController.cs in the Controllers directory of the StarBlog.Web project to implement APIs related to the blog.
Inject the PostService that was just created.
public class BlogController : Controller {
    private readonly PostService _postService;

    public BlogController(PostService postService) {
        _postService = postService;
    }
}
Write an "API" for the article list (I suppose MVC counts as an API too?).
public IActionResult List() {
    return View(_postService.GetAll());
}
View
According to the conventions of an ASP.NET Core MVC project, web page templates should be placed in the Views directory, organized by Controller.
For this blog article list page, the conventional path is: Views/Blog/List.cshtml. Create this file.
@model List<Post>
@{
    ViewData["Title"] = "Blog List";
}
<div class="container px-4 py-3">
	@foreach (var post in Model) {
		<div class="card mb-3">
                <div class="card-header">
                    @post.Category.Name
                </div>
                <div class="card-body">
                    <h5 class="card-title">@post.Title</h5>
                    <p class="card-text">
                        @post.Summary
                    </p>
                    <a class="btn btn-outline-secondary stretched-link"
                       asp-controller="Blog" asp-action="Post" asp-route-id="@post.Id">
                        Read More
                    </a>
                </div>
            </div>
	}
</div>
This completes the simple article list.
Try the Effect
Run the project, open the browser, and enter the address http://127.0.0.1:5038/Blog/List. You can see the article list as follows—it's very simple (and rather crude), and all articles are displayed, making the page very long. This is clearly not the final effect we want.
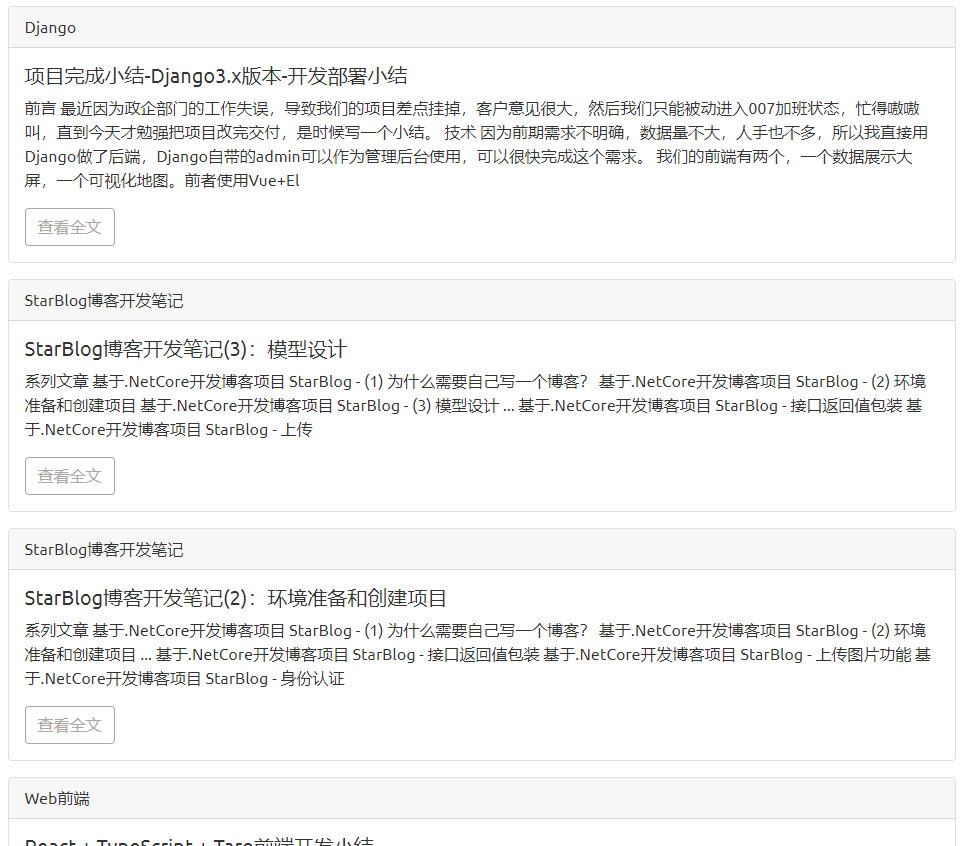
No worries—let's take it step by step to optimize.
Pagination
First, there's the issue of displaying all articles on a single page, so we need to introduce pagination.
You can implement pagination yourself or use a third-party component. The FreeSQL we're using also supports pagination APIs. Here, I'll directly use the X.PagedList that I've used in previous projects. It encapsulates data fetching with pagination and frontend pagination controls, which is quite convenient.
You can install these two packages directly via NuGet:
- X.PagedList
- X.PagedList.Mvc.Core
Usage is straightforward. The X.PagedList component defines extension methods for the List type. You can simply use it on the List obtained from the ORM.
_postRepo.Select.ToList().ToPagedList(pageNumber, pageSize);
The return type is IPagedList<T>. Besides the data for the current page, it also contains pagination information (current page, total number of pages, page size, total data count, etc.). It can be used directly like a List.
Furthermore, the X.PagedList component also encapsulates HTML components for MVC templates. Its usage is also simple:
<nav aria-label="Page navigation example">
    @Html.PagedListPager(Model.Posts, page => Url.Action(
        RazorHelper.GetCurrentActionName(ViewContext), new {page, categoryId = Model.CurrentCategoryId}),
        new PagedListRenderOptions {
            LiElementClasses = new[] {"page-item"},
            PageClasses = new[] {"page-link"},
            UlElementClasses = new[] {"pagination justify-content-center"}
        })
</nav>
On the frontend, I'm using Bootstrap's pagination component, so I pass in Bootstrap's classes. If you're using a different frontend component library, you just need to pass the corresponding class names.
The rendered page code looks like this:
<div class="pagination-container">
<ul class="pagination justify-content-center">
<li class="active page-item"><span class="page-link">1</span></li>
<li class="page-item"><a class="page-link" href="/Blog/List?page=2&categoryId=0">2</a></li>
<li class="page-item"><a class="page-link" href="/Blog/List?page=3&categoryId=0">3</a></li>
<li class="page-item"><a class="page-link" href="/Blog/List?page=4&categoryId=0">4</a></li>
<li class="page-item"><a class="page-link" href="/Blog/List?page=5&categoryId=0">5</a></li>
<li class="page-item"><a class="page-link" href="/Blog/List?page=6&categoryId=0">6</a></li>
<li class="page-item"><a class="page-link" href="/Blog/List?page=7&categoryId=0">7</a></li>
<li class="page-item"><a class="page-link" href="/Blog/List?page=8&categoryId=0">8</a></li>
<li class="page-item"><a class="page-link" href="/Blog/List?page=9&categoryId=0">9</a></li>
<li class="page-item"><a class="page-link" href="/Blog/List?page=10&categoryId=0">10</a></li>
<li class="PagedList-ellipses page-item"><a class="PagedList-skipToNext page-link" href="/Blog/List?page=11&categoryId=0" rel="next">…</a></li>
<li class="PagedList-skipToNext page-item"><a class="page-link" href="/Blog/List?page=2&categoryId=0" rel="next">></a></li>
<li class="PagedList-skipToLast page-item"><a class="page-link" href="/Blog/List?page=64&categoryId=0">>></a></li>
</ul>
</div>
Display effect:

Request Parameter Encapsulation
The pagination introduced earlier requires passing request parameters when accessing pages. This means our Controller's Action method would need to include both pageNumber and pageSize parameters. Later, we'll also need to add filters for article categories and sorting for searches—resulting in too many parameters. Including all of them in the Action method's parameter list isn't elegant. Fortunately, ASP.NET Core allows using a class as a parameter.
Create a new QueryFilters directory under StarBlog.Web/ViewModels to store request parameters for different interfaces.
Some parameters are shared across multiple interfaces. By leveraging object-oriented principles, we can write a base class first: QueryParameters.cs
public class QueryParameters {
    /// <summary>
    /// Maximum page items
    /// </summary>
    public const int MaxPageSize = 50;

    private int _pageSize = 10;

    /// <summary>
    /// Page size
    /// </summary>
    public int PageSize {
        get => _pageSize;
        set => _pageSize = (value > MaxPageSize) ? MaxPageSize : value;
    }

    /// <summary>
    /// Current page number
    /// </summary>
    public int Page { get; set; } = 1;

    /// <summary>
    /// Search keywords
    /// </summary>
    public string? Search { get; set; }

    /// <summary>
    /// Sort by field
    /// </summary>
    public string? SortBy { get; set; }
}
The article request parameters add additional fields like status and category. We can derive a new class from the above base class: PostQueryParameters.cs
public class PostQueryParameters : QueryParameters {
    /// <summary>
    /// Only request published articles
    /// </summary>
    public bool OnlyPublished { get; set; } = false;

    /// <summary>
    /// Article status
    /// </summary>
    public string? Status { get; set; }

    /// <summary>
    /// Category ID
    /// </summary>
    public int CategoryId { get; set; } = 0;

    /// <summary>
    /// Sort by field
    /// </summary>
    public new string? SortBy { get; set; } = "-LastUpdateTime";
}
Service Modification
Our core logic is all implemented within the service, so request parameters naturally need to be passed into the service for use.
Sticking with the previous GetPagedList method, after adding various filter conditions, it looks like this:
public IPagedList<Post> GetPagedList(PostQueryParameters param) {
    var querySet = _postRepo.Select;

    // Is Published
    if (param.OnlyPublished) {
        querySet = _postRepo.Select.Where(a => a.IsPublish);
    }

    // Status Filter
    if (!string.IsNullOrEmpty(param.Status)) {
        querySet = querySet.Where(a => a.Status == param.Status);
    }

    // Category Filter
    if (param.CategoryId != 0) {
        querySet = querySet.Where(a => a.CategoryId == param.CategoryId);
    }

    // Keyword Filter
    if (!string.IsNullOrEmpty(param.Search)) {
        querySet = querySet.Where(a => a.Title.Contains(param.Search));
    }

    // Sorting
    if (!string.IsNullOrEmpty(param.SortBy)) {
        // Is Ascending
        var isAscending = !param.SortBy.StartsWith("-");
        var orderByProperty = param.SortBy.Trim('-');

        querySet = querySet.OrderByPropertyName(orderByProperty, isAscending);
    }

    return querySet.Include(a => a.Category).ToList()
        .ToPagedList(param.Page, param.PageSize);
}
Based on the passed-in parameters, it can implement status filtering, category filtering, keyword filtering, sorting, and pagination functionality.
ViewModel
An MVC page can only specify a single Model. Although weakly-typed ViewBag or ViewData can be used, weak typing is hard to maintain. Let's define a ViewModel for the page to use.
First, determine what content to display on the article list page—for example, the currently selected article category and a list of all categories.
In the ViewModels directory of StarBlog.Web, create a new BlogListViewModel.cs. Based on the content we want to display, define the model as follows:
using StarBlog.Data.Models;
using X.PagedList;

namespace StarBlog.Web.ViewModels;

public class BlogListViewModel {
    public Category CurrentCategory { get; set; }
    public int CurrentCategoryId { get; set; }
    public IPagedList<Post> Posts { get; set; }
    public List<Category> Categories { get; set; }
}
Done.
Controller Refactoring
After the groundwork laid earlier, the controller section becomes straightforward here, though there are still points to note. This project includes both backend rendering and RESTful interfaces, so you need two controllers, while only one service is required.
I'll elaborate on the RESTful interface later. For now, you can look at the refactored RESTful interface controller code:
[AllowAnonymous]
[HttpGet]
public ApiResponsePaged<Post> GetList([FromQuery] PostQueryParameters param) {
    var pagedList = _postService.GetPagedList(param);
    return new ApiResponsePaged<Post> {
        Message = "Get posts list",
        Data = pagedList.ToList(),
        Pagination = pagedList.ToPaginationMetadata()
    };
}
The code is straightforward. This endpoint for retrieving the post list simply needs to return the paginated and filtered list data.
The MVC interface, however, is more complex. Everything displayed on the page must be rendered on the backend, including the current category and the complete list of categories discussed earlier.
The code looks like this:
public IActionResult List(int categoryId = 0, int page = 1, int pageSize = 5) {
    var categories = _categoryRepo.Where(a => a.Visible)
        .IncludeMany(a => a.Posts).ToList();
    categories.Insert(0, new Category { Id = 0, Name = "All", Posts = _postRepo.Select.ToList() });

    return View(new BlogListViewModel {
        CurrentCategory = categoryId == 0 ? categories[0] : categories.First(a => a.Id == categoryId),
        CurrentCategoryId = categoryId,
        Categories = categories,
        Posts = _postService.GetPagedList(new PostQueryParameters {
            CategoryId = categoryId,
            Page = page,
            PageSize = pageSize,
            OnlyPublished = true
        })
    });
}
Only three parameters are needed for input:
- Category ID
- Current page
- Page size
This interface has several tasks to perform:
- Retrieve all categories
- Determine the current category
- Fetch the list of posts
Finally, it returns the previously defined BlogListViewModel.
Then, it can be used in the page template.
View Modification
First, replace the model with BlogListViewModel.
Then, based on the data in the ViewModel, render the page. The page components used are all provided by Bootstrap, and the code is quite lengthy so I won't include it here. The complete code for the page template can be found here: https://github.com/Deali-Axy/StarBlog/blob/master/StarBlog.Web/Views/Blog/List.cshtml
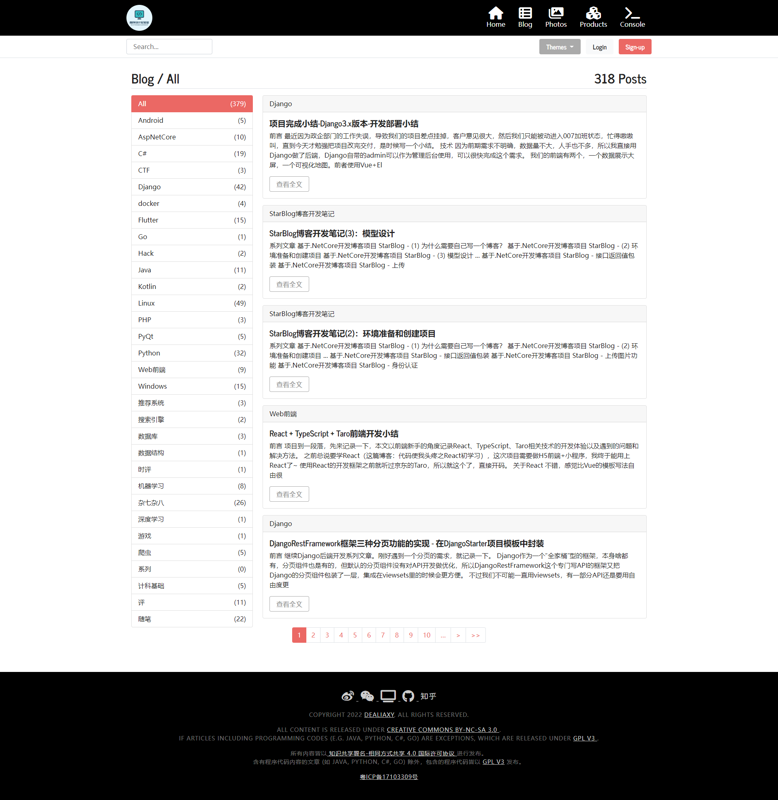
Final Effect
I captured a long screenshot, and this is what the final page looks like~
Summary
If you've made it this far, you must be a patient person :D, and you're quite interested in this project. First, thank you all for your support~
This article ended up being quite long. I originally planned to create a series with each article being shorter, to avoid putting too much pressure on readers. But once I started expanding on the topics, it involved a lot of content. I'll need to optimize the upcoming articles~
Recently, I've received messages from friends through the official account backend and WeChat, urging me to update faster or complaining that I'm updating too slowly. I'm really sorry—lately, work has left me feeling a bit overwhelmed. After getting home from work, all I want to do in the evening is read a book or play a game to relax. I've been a bit slack. But seeing so many talented people following my project instantly gives me motivation again! Let's keep going! I'll aim to update once every two days moving forward. Feel free to continue following along~
_EOF_
StarBlog Blog Development Notes (6): Blog Post List Page Development
- 本文作者:
- 程序设计实验室
- 版权声明:
- 本博客所有文章除特别声明外,均采用 BY-NC-SA 许可协议。转载请注明出处!
相关文章
StarBlog博客开发笔记(25):图片接口与文件上传
前言 上传文件的接口设计有两种风格,一种是整个项目只设置一个接口用来上传,然后其他需要用到文件的地方,都只存一个引用ID;另一种是每个需要文件的地方单独管理各自的文件。这俩各有优劣吧,本项目中选择的是后者的风格,文章图片和照片模块又要能CRUD又要批量导入,还是各自管理文件比较好。 图片接口 说会正题,先介绍一下图片相关接口。 图片列表 首先CRUD是肯定有的,图片列表的分页查看也是有的,不过因为
2023-02-05 · StarBlog博客开发笔记 · 约 1 分钟
StarBlog博客开发笔记(17):自动下载文章里的外部图片
系列文章 基于.NetCore开发博客项目 StarBlog - (1) 为什么需要自己写一个博客? 基于.NetCore开发博客项目 StarBlog - (2) 环境准备和创建项目 基于.NetCore开发博客项目 StarBlog - (3) 模型设计 基于.NetCore开发博客项目 StarBlog - (4) markdown博客批量导入 基于.NetCore开发博客项目 StarBl
2022-08-14 · StarBlog博客开发笔记 · 约 1 分钟
StarBlog博客开发笔记(2):环境准备和创建项目
系列文章 基于.NetCore开发博客项目 StarBlog - (1) 为什么需要自己写一个博客? 基于.NetCore开发博客项目 StarBlog - (2) 环境准备和创建项目 ... 基于.NetCore开发博客项目 StarBlog - 接口返回值包装 基于.NetCore开发博客项目 StarBlog - 上传图片功能 基于.NetCore开发博客项目 StarBlog - 身份认证
2022-04-22 · StarBlog博客开发笔记 · 约 1 分钟
StarBlog博客开发笔记(10):图片展示-瀑布流-首页卡片
系列文章 基于.NetCore开发博客项目 StarBlog - (1) 为什么需要自己写一个博客? 基于.NetCore开发博客项目 StarBlog - (2) 环境准备和创建项目 基于.NetCore开发博客项目 StarBlog - (3) 模型设计 基于.NetCore开发博客项目 StarBlog - (4) markdown博客批量导入 基于.NetCore开发博客项目 StarBl
2022-11-22 · StarBlog博客开发笔记 · 约 1 分钟
讨论
共 0 条加载评论中…