StarBlog Blog Development Notes (27): Using JWT to Protect the API
Preface This is the second update of the StarBlog series in 2023 😂 I've been busy these past few months, so updates have been infrequent. But not updating makes me even more anxious; after not writing for so long, it's hard to get started 😑 Back to the main topic—in previous articles, we completed most of the critical APIs for the blog, but we're still missing the most crucial "authentication and authorization." Without this, the website is like a sieve—anyone can add or delete data, causing chaos ~ The knowledge about "authentication and authorization" is rather complex. If you want to learn this part, it's recommended to break it down into steps: Basic Concepts AspN
目录12 个章节
Foreword
This is the second update in the StarBlog series for 2023 😂
I've been busy these past few months, and updates have become quite infrequent. But the longer I put off updating, the more anxious I feel—I haven’t written in a while, and getting started again is really tough 😑
Back to the main topic: in previous articles, we've completed most of the blog's key interfaces, but we're still missing the crucial "authentication and authorization." Without this, the site would be like a sieve—anyone could come in and add or delete data, causing chaos.
The knowledge around "authentication and authorization" can be quite complex. If you want to learn this area, it's advisable to break it down into steps:
- Basic Concepts
- ASP.NET Core's Identity Framework
Other frameworks, such as IdentityServer
For basic concepts, you can check out this previous article I wrote: Asp-Net-Core Learning Notes: Introduction to Identity Authentication
PS: The Identity Framework part hasn't been written yet 😂
To avoid being repetitive, this article won't delve too deeply into conceptual topics. It's recommended to finish reading the article above before starting to use JWT~
JWT
In the previous article about CRUD interfaces, the modification-related endpoints were all annotated with the [Authorize] attribute, indicating that login is required to access them. This article will implement this login authentication feature in the simplest way.
In ASP.NET Core, the workflow for using JWT is roughly as follows:
- JWT is a Base64-encoded string, divided into three parts: header/payload/signature (the signature is generated using a specific secret key and cannot be forged by others. Therefore, even if the payload information is modified, the backend verification will fail).
- When a user logs in, the backend can store data like user ID, email, or phone number in the payload, and then return this token string to the frontend for storage. Note that you should not put information that the client must not know in it
(the payload can also be encrypted). - Subsequently, when calling endpoints that require login, this JWT must be included (usually placed in the HTTP Header).
- Only the backend can parse this token string. Once the backend obtains it, it knows the user's identity.
JWT also has other features, such as being stateless, which fits well with the RESTful interfaces we use. Unlike the traditional use of sessions and cookies, the original JWT, once issued, cannot be revoked before its expiration date, and users cannot log out. To prevent security issues caused by JWT token leakage, the expiration time is usually set to be relatively short. (The inability to revoke this can be circumvented through workarounds, but that's not within the scope of this article.)
Getting Started with JWT
OK, enough talk—let's start writing code.
Generating JWT
Generating one is very simple and requires no additional configuration. It can be done with just a few lines of code.
public LoginToken GenerateLoginToken(User user) {
  var claims = new List<Claim> {
    new(JwtRegisteredClaimNames.Sub, user.Id), // User.Identity.Name
    new(JwtRegisteredClaimNames.GivenName, user.Name),
    new(JwtRegisteredClaimNames.Jti, Guid.NewGuid().ToString()), // JWT ID
  };
  var key = new SymmetricSecurityKey(Encoding.UTF8.GetBytes("jwt key"));
  var signCredential = new SigningCredentials(key, SecurityAlgorithms.HmacSha256);
  var jwtToken = new JwtSecurityToken(
    issuer: "jwt issuer 签发者",
    audience: "jwt audience 接受者",
    claims: claims,
    expires: DateTime.Now.AddDays(7),
    signingCredentials: signCredential);

  return new LoginToken {
    Token = new JwtSecurityTokenHandler().WriteToken(jwtToken),
    Expiration = TimeZoneInfo.ConvertTimeFromUtc(jwtToken.ValidTo, TimeZoneInfo.Local)
  };
}
The initial claims represent the data that the backend stores within the JWT, as mentioned earlier.
"The set of claims associated with a given entity can be thought of as a key. The particular claims define the shape of that key; much like a physical key is used to open a lock in a door. In this way, claims are used to gain access to resources." from MSDN
The Claim constructor can accept key and value parameters, both of which are strings.
For the key, .NET provides some constants within the JwtRegisteredClaimNames and ClaimTypes classes. The difference between the two is that the latter is older and generally used within the Windows ecosystem. For example, for the same Name key:
ClaimTypes.Name = "http://schemas.xmlsoap.org/ws/2005/05/identity/claims/name"JwtRegisteredClaimNames.Name = "name"
Since we are setting Claims within a JWT, using JwtRegisteredClaimNames is appropriate.
Reference: https://stackoverflow.com/questions/50012155/jwt-claim-names
Reading Information from JWT
This involves reading the various Claims contained within it.
After correctly configuring the Authentication service and JwtBearer, when a logged-in client sends a request, the backend can retrieve JWT data in the Controller.
Like this:
var name = HttpContext.User.FindFirst(JwtRegisteredClaimNames.Name)?.Value;
You can also use the extension method FindFirstValue from System.Security.Claims.PrincipalExtensions to directly obtain the string value.
Complaint: If the corresponding Claim does not exist, this extension method returns
null, but for some reason, its source code usesstringas the return value type instead ofstring?, which is really unfortunate.
Using JWT to Protect Interfaces
After understanding how JWT works, it's finally time to apply JWT to the blog project~
Configuring JWT Parameters
To avoid hardcoding, we will store the three JWT parameters—Issuer, Audience, and Key—in the configuration file.
The format is as follows:
"Auth": {
  "Jwt": {
    "Issuer": "starblog",
    "Audience": "starblog-admin-ui",
    "Key": "F2REaFzQ6xA9k77EUDLf9EnjK5H2wUot"
  }
}
Next, we need to define a class to facilitate configuration mapping.
Add Auth.cs under StarBlog.Web/Models/Config:
public class Auth {
  public Jwt Jwt { get; set; }
}

public class Jwt {
  public string Issuer { get; set; }
  public string Audience { get; set; }
  public string Key { get; set; }
}
Then register it:
builder.Services.Configure<Auth>(configuration.GetSection(nameof(Auth)));
Configuring the Authentication Service
This section has more code, so it's written as an extension method to avoid having too much code in the Program.cs file.
Add the StarBlog.Web/Extensions/ConfigureAuth.cs file.
public static class ConfigureAuth {
  public static void AddAuth(this IServiceCollection services, IConfiguration configuration) {
    services.AddScoped<AuthService>();
    services.AddAuthentication(options => {
      options.DefaultAuthenticateScheme = JwtBearerDefaults.AuthenticationScheme;
      options.DefaultChallengeScheme = JwtBearerDefaults.AuthenticationScheme;
    })
      .AddJwtBearer(options => {
        var authSetting = configuration.GetSection(nameof(Auth)).Get<Auth>();
        options.TokenValidationParameters = new TokenValidationParameters {
          ValidateAudience = true,
          ValidateLifetime = true,
          ValidateIssuer = true,
          ValidateIssuerSigningKey = true,
          ValidIssuer = authSetting.Jwt.Issuer,
          ValidAudience = authSetting.Jwt.Audience,
          IssuerSigningKey = new SymmetricSecurityKey(Encoding.UTF8.GetBytes(authSetting.Jwt.Key)),
          ClockSkew = TimeSpan.Zero
        };
      });
  }
}
Then, in Program.cs, you need to use this extension method to register the service.
builder.Services.AddAuth(builder.Configuration);
You also need to configure the middleware. The order here is important. Endpoints or resources that need to be protected by authentication must be placed after these two Auth... middleware calls.
app.UseRouting();
app.UseAuthentication();
app.UseAuthorization();
// ...
app.MapControllerRoute(...);
app.Run();
Encapsulating Login Logic
As the saying goes, for ease of use and so on...
Create a new file StarBlog.Web/Services/AuthService.cs
public class AuthService {
  private readonly Auth _auth;
  private readonly IBaseRepository<User> _userRepo;

  public AuthService(IOptions<Auth> options, IBaseRepository<User> userRepo) {
    _auth = options.Value;
    _userRepo = userRepo;
  }

  public LoginToken GenerateLoginToken(User user) {
    var claims = new List<Claim> {
      new(JwtRegisteredClaimNames.Sub, user.Id), // User.Identity.Name
      new(JwtRegisteredClaimNames.GivenName, user.Name),
      new(JwtRegisteredClaimNames.Jti, Guid.NewGuid().ToString()), // JWT ID
    };
    var key = new SymmetricSecurityKey(Encoding.UTF8.GetBytes(_auth.Jwt.Key));
    var signCredential = new SigningCredentials(key, SecurityAlgorithms.HmacSha256);
    var jwtToken = new JwtSecurityToken(
      issuer: _auth.Jwt.Issuer,
      audience: _auth.Jwt.Audience,
      claims: claims,
      expires: DateTime.Now.AddDays(7),
      signingCredentials: signCredential);

    return new LoginToken {
      Token = new JwtSecurityTokenHandler().WriteToken(jwtToken),
      Expiration = TimeZoneInfo.ConvertTimeFromUtc(jwtToken.ValidTo, TimeZoneInfo.Local)
    };
  }
}
Due to space constraints, only the key JWT generation code is shown here. Some code for fetching user information, etc., isn't the final version and may be modified later. Since it's relatively straightforward, it wasn't included.
Next, let's write a login API endpoint.
Add the file StarBlog.Web/Apis/AuthController.cs
[ApiController]
[Route("Api/[controller]")]
[ApiExplorerSettings(GroupName = ApiGroups.Auth)]
public class AuthController : ControllerBase {
  private readonly AuthService _authService;

  public AuthController(AuthService authService) {
    _authService = authService;
  }

  /// <summary>
  /// Login
  /// </summary>
  [HttpPost]
  [ProducesResponseType(typeof(ApiResponse<LoginToken>), StatusCodes.Status200OK)]
  public async Task<ApiResponse> Login(LoginUser loginUser) {
    var user = await _authService.GetUserByName(loginUser.Username);
    if (user == null) return ApiResponse.Unauthorized("Username does not exist");
    if (loginUser.Password != user.Password) return ApiResponse.Unauthorized("Username or password is incorrect");
    return ApiResponse.Ok(_authService.GenerateLoginToken(user));
  }
}
Afterwards, when we request this endpoint, if the username and password are correct, we can get the JWT token and its expiration time.
{
  "statusCode": 200,
  "successful": true,
  "message": "Ok",
  "data": {
    "token": "eyJhbGciOiJIUzI1NiIsInR123I6IkpXVCJ9.eyJ1c2VybmFtZSI6ImRlYWxpIiwibmFC1kYJ9.DaJEmBAVdXks8MOedVee4xxrB-RvUSg2wIJGc30HGkk",
    "expiration": "2023-05-04T22:29:04+08:00"
  },
  "errorData": null
}
Subsequently, when requesting endpoints that have the [Authorize] attribute, you need to include the following in the HTTP header:
Authorization: Bearer eyJhbGciOiJIUzI1NiIsInR123I6IkpXVCJ9.eyJ1c2VybmFtZSI6ImRlYWxpIiwibmFC1kYJ9.DaJEmBAVdXks8MOedVee4xxrB-RvUSg2wIJGc30HGkk
Configuring Swagger Support
After adding [Authorize], you can no longer debug interfaces directly in Swagger. You have to use tools like Postman and manually add the HTTP header.
However, such a useful tool as Swagger certainly wouldn't be that limited. It can be configured to support JWT.
First, add the NuGet package Swashbuckle.AspNetCore.Filters.
Then, edit StarBlog.Web/Extensions/ConfigureSwagger.cs to configure it (you haven't forgotten the previous article about Swagger, right?).
Inside the AddSwaggerGen method, add the following configuration code:
var security = new OpenApiSecurityScheme {
  Description = "JWT模式授权,请输入 \"Bearer {Token}\" 进行身份验证",
  Name = "Authorization",
  In = ParameterLocation.Header,
  Type = SecuritySchemeType.ApiKey
};
options.AddSecurityDefinition("oauth2", security);
options.AddSecurityRequirement(new OpenApiSecurityRequirement {{security, new List<string>()}});
options.OperationFilter<AddResponseHeadersFilter>();
options.OperationFilter<AppendAuthorizeToSummaryOperationFilter>();
options.OperationFilter<SecurityRequirementsOperationFilter>();
Done. This will add a lock icon in the upper right corner of the Swagger page. You can click it to input the JWT token.
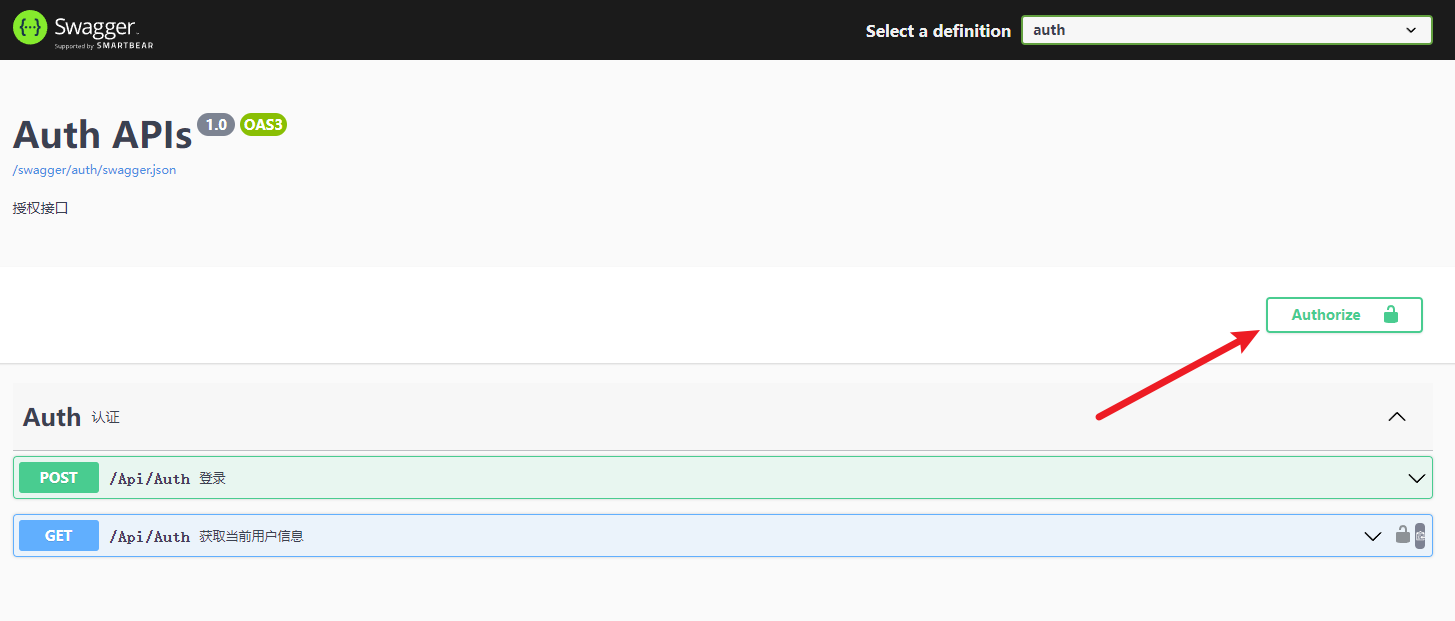
However, one inconvenience is that you need to enter the token for each API group separately. If you switch groups, you'll have to enter it again...
But at least you don't need Postman anymore!
References
- https://stackoverflow.com/questions/50012155/jwt-claim-names
- https://stackoverflow.com/questions/47923652/what-is-the-best-practice-for-fetching-user-data-after-validating-jwt-in-net-co
- https://github.com/mattfrear/Swashbuckle.AspNetCore.Filters
Series Articles
- Developing a Blog Project with .NetCore StarBlog - (1) Why Write Your Own Blog?
- Developing a Blog Project with .NetCore StarBlog - (2) Environment Preparation and Project Creation
- Developing a Blog Project with .NetCore StarBlog - (3) Model Design
- Developing a Blog Project with .NetCore StarBlog - (4) Batch Importing Markdown Blog Posts
- Developing a Blog Project with .NetCore StarBlog - (5) Starting to Build the Web Project
- Developing a Blog Project with .NetCore StarBlog - (6) Page Development - Blog Article List
- Developing a Blog Project with .NetCore StarBlog - (7) Page Development - Article Detail Page
- Developing a Blog Project with .NetCore StarBlog - (8) Category Hierarchical Structure Display
- Developing a Blog Project with .NetCore StarBlog - (9) Batch Image Import
- Developing a Blog Project with .NetCore StarBlog - (10) Image Waterfall Flow
- Developing a Blog Project with .NetCore StarBlog - (11) Implementing Visit Statistics
- Developing a Blog Project with .NetCore StarBlog - (12) Razor Page Dynamic Compilation
- Developing a Blog Project with .NetCore StarBlog - (13) Adding Blogroll Functionality
- Developing a Blog Project with .NetCore StarBlog - (14) Implementing Theme Switching
- Developing a Blog Project with .NetCore StarBlog - (15) Generating Random Size Images
- Developing a Blog Project with .NetCore StarBlog - (16) Some New Features (Monitoring/Statistics/Configuration/Initialization)
- Developing a Blog Project with .NetCore StarBlog - (17) Automatically Download External Images in Articles
- Developing a Blog Project with .NetCore StarBlog - (18) Implementing Local Typora Article Packaging and Upload
- Developing a Blog Project with .NetCore StarBlog - (19) Exploring Markdown Rendering Solutions
- Developing a Blog Project with .NetCore StarBlog - (20) Image Display Optimization
- Developing a Blog Project with .NetCore StarBlog - (21) Starting to Develop RESTful APIs
- Developing a Blog Project with .NetCore StarBlog - (22) Developing Blog Article APIs
- Developing a Blog Project with .NetCore StarBlog - (23) Article List API Pagination, Filtering, Search, Sorting
- Developing a Blog Project with .NetCore StarBlog - (24) Unifying API Data Response Format
- Developing a Blog Project with .NetCore StarBlog - (25) Image API and File Upload
- Developing a Blog Project with .NetCore StarBlog - (26) Integrating Swagger API Documentation
- Developing a Blog Project with .NetCore StarBlog - (27) Using JWT to Protect APIs
_EOF_
StarBlog Blog Development Notes (27): Using JWT to Protect the API
- 本文作者:
- 程序设计实验室
- 版权声明:
- 本博客所有文章除特别声明外,均采用 BY-NC-SA 许可协议。转载请注明出处!
相关文章
StarBlog开源博客项目 - 2023年底更新内容一览
前台UI勉强能看,后台总算不那么辣眼睛了。数据库分页改对了,不然性能差得离谱。新增slug检查?哦,终于知道避免重复了。
2023-12-16 · StarBlog博客开发笔记 · 约 1 分钟
StarBlog博客开发笔记(17):自动下载文章里的外部图片
系列文章 基于.NetCore开发博客项目 StarBlog - (1) 为什么需要自己写一个博客? 基于.NetCore开发博客项目 StarBlog - (2) 环境准备和创建项目 基于.NetCore开发博客项目 StarBlog - (3) 模型设计 基于.NetCore开发博客项目 StarBlog - (4) markdown博客批量导入 基于.NetCore开发博客项目 StarBl
2022-08-14 · StarBlog博客开发笔记 · 约 1 分钟
基于.NetCore开发博客项目 StarBlog - (30) 实现评论系统
开发者终于更新评论系统,代码量庞大只贴关键逻辑,GitHub自便。前端ElementUI与Bootstrap风格冲突,却称和谐?评论需邮箱验证码,审核流程繁琐,自动不通过还得人工。
2025-04-27 · StarBlog博客开发笔记 · 约 1 分钟
StarBlog博客开发笔记(7):页面开发之文章详情页面
系列文章 基于.NetCore开发博客项目 StarBlog - (1) 为什么需要自己写一个博客? 基于.NetCore开发博客项目 StarBlog - (2) 环境准备和创建项目 基于.NetCore开发博客项目 StarBlog - (3) 模型设计 基于.NetCore开发博客项目 StarBlog - (4) markdown博客批量导入 基于.NetCore开发博客项目 StarBl
2022-05-20 · StarBlog博客开发笔记 · 约 1 分钟
讨论
共 0 条加载评论中…