StarBlog Blog Development Notes: Frontend Development (5) - Axios Network Request Wrapper
Install Axios Axios is a Promise-based HTTP client for browsers and Node.js. We will need it later to send HTTP requests, so let's first record the installation and usage of Axios. Installation command yarn add axios Write code Modify src/views/Home.vue First, adjust the layout template div class=page h2Home Page/h2 el-alert
目录16 个章节
Installing axios
axios is a Promise-based HTTP client for browsers and Node.js. We'll need it later to send HTTP requests, so let's first document the installation and usage of axios.
Installation command
yarn add axios
Writing Code
Modify src/views/Home.vue
First, adjust the layout by adding a button to trigger the network request logic.
<template>
  <div class="page">
    <h2>Home Page</h2>
    <el-alert
      title="主页"
      type="success">
    </el-alert>
    <el-button type="primary" @click="testAxios()">Test Axios</el-button>
  </div>
</template>
Next is the script section below.
import axios from 'axios'

export default {
  name: "Home",
  methods: {
    testAxios() {
      axios.get('http://localhost:5038/Api/Category/1')
        .then(res => console.log(res.data))
    }
  }
}
Test the Page
Open the page and click the button.
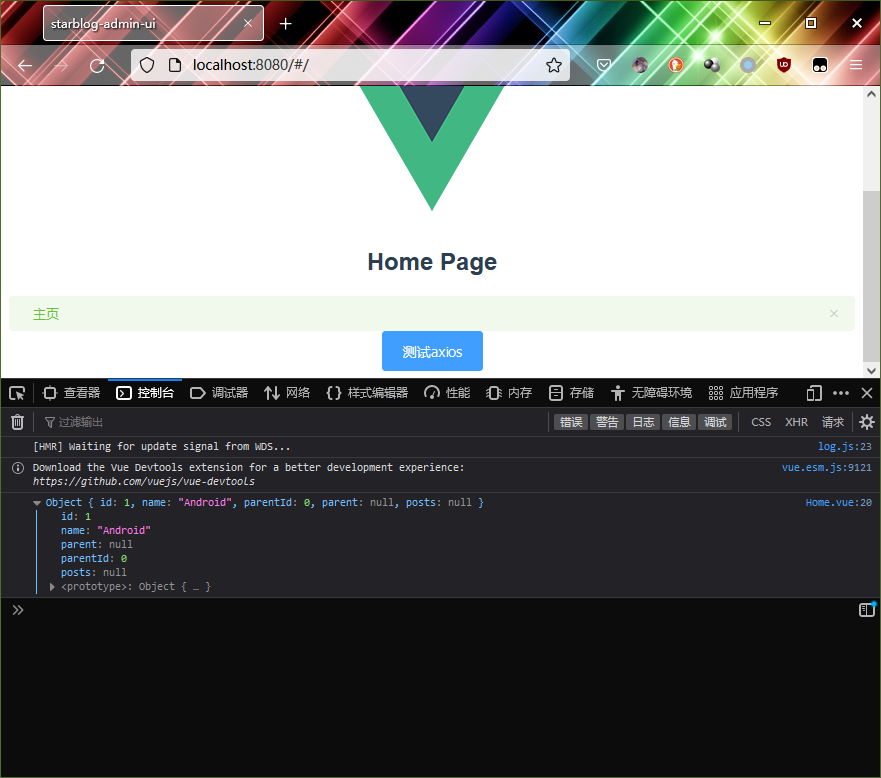
You can see that the console has already printed out the requested data, nice
Encapsulating Axios
Using axios to send a request is relatively straightforward, but without proper encapsulation and reuse, axios can lead to increasing code redundancy as the project grows. This makes the code harder to maintain. Therefore, we will first perform a secondary encapsulation of axios here, enabling request reuse across different components in the project and making the code easier to maintain.
Requirements
- Unified URL configuration.
- Unified API requests.
- Request interceptors. For example: attach tokens, set request headers, etc.
- Response interceptors. For example: unified error handling, page redirection, etc.
- Combine Vuex for global loading animations or error handling as needed.
- Encapsulate axios into a Vue plugin for use.
Directory Structure
Under the src directory, create a new folder named http to store the code for HTTP interaction APIs. The file structure is as follows:
http
├── modules        // Sub-module APIs for user management, blog management, etc.
│   ├── blog.js
│   ├── category.js
│   ├── login.js
│   ├── photo.js
│   └── user.js
├── api.js         // Aggregated request interface module, collects all module APIs.
├── axios.js       // Secondary encapsulation of the axios module, includes interceptors and other details.
├── config.js      // Default axios configuration, includes base path and other settings.
└── index.js       // Encapsulates axios as a plugin, to be imported as a plugin.
Installing js-cookie
In the axios module we've encapsulated, cookies are used to obtain the token. Therefore, the related dependencies need to be installed. Execute the following command
yarn add js-cookie
Continue Writing Code
/src/utils/global.js
We place some global configurations, constants, and methods in this file.
/**
 * Global constant and method encapsulation module
 * Mounted to Vue properties via prototype
 * Called via this.Global
 */

// Backend management system server address
export const baseUrl = 'http://localhost:5038'

export default {
  baseUrl
}
config.js
Axios configuration settings. Each configuration item is documented with explanations, as detailed in the comments.
import {baseUrl} from '@/utils/global'

export default {
  method: 'get',
  // 基础url前缀
  baseUrl: `${baseUrl}/Api`,
  // 请求头信息
  headers: {
    'Content-Type': 'application/json;charset=UTF-8'
  },
  // 参数
  data: {},
  // 设置超时时间
  timeout: 10000,
  // 携带凭证
  withCredentials: true,
  // 返回数据类型
  responseType: 'json'
}
axios.js
Axios interceptor, capable of performing request interception and response interception, executing certain operations when sending and receiving requests.
- This imports configuration file information (such as baseURL, headers, withCredentials settings, etc.) into the axios object.
- When sending a request, it obtains the token. If the token does not exist, it means the user is not logged in, and it redirects to the system login page; otherwise, it continues sending the request with the token.
- If necessary, the response interceptor can be used here to uniformly process the returned results before returning them.
The code is as follows
import axios from 'axios';
import config from './config';
import Cookies from "js-cookie";
import router from '@/router'

export default function $axios(options) {
  return new Promise((resolve, reject) => {
    const instance = axios.create({
      baseURL: config.baseUrl,
      headers: config.headers,
      timeout: config.timeout,
      withCredentials: config.withCredentials
    })
    // request interceptor
    instance.interceptors.request.use(
      config => {
        let token = Cookies.get('token')
        // Send request with token
        if (token) {
          config.headers.token = token
        } else {
          // Redirect to the login page
          router.push('/login')
        }
        return config
      },
      error => {
        // When a request error occurs
        console.log('request:', error)
        // Check for request timeout
        if (error.code === 'ECONNABORTED' && error.message.indexOf('timeout') !== -1) {
          console.log('timeout: request timed out')
        }
        // Redirect to an error page if needed
        const errorInfo = error.response
        console.log(errorInfo)
        if (errorInfo) {
          error = errorInfo.data  // The detailed error information can be obtained in the catch block on the page side, see the Promise.reject at the bottom
          const errorStatus = errorInfo.status; // 404 403 500 ...
          router.push({
            path: `/error/${errorStatus}`
          })
        }
        return Promise.reject(error) // The error information you want to return can be obtained (caught) on the calling side
      }
    )

    // response interceptor
    instance.interceptors.response.use(
      response => {
        return response.data
      },
      err => {
        if (err && err.response) {
          switch (err.response.status) {
            case 400:
              err.message = 'Request Error'
              break
            case 401:
              err.message = 'Unauthorized, please log in'
              break
            case 403:
              err.message = 'Access Denied'
              break
            case 404:
              err.message = `Request URL Error: ${err.response.config.url}`
              break
            case 408:
              err.message = 'Request Timeout'
              break
            case 500:
              err.message = 'Internal Server Error'
              break
            case 501:
              err.message = 'Service Not Implemented'
              break
            case 502:
              err.message = 'Gateway Error'
              break
            case 503:
              err.message = 'Service Unavailable'
              break
            case 504:
              err.message = 'Gateway Timeout'
              break
            case 505:
              err.message = 'HTTP Version Not Supported'
              break
            default:
          }
        }
        console.error(err)
        return Promise.reject(err) // Return the error information returned by the API
      }
    )
    // Request handling
    instance(options).then(res => {
      resolve(res)
      return false
    }).catch(error => {
      reject(error)
    })
  })
}
index.js
Here, axios is registered as a Vue plugin, and the api module is mounted on Vue's prototype as the $api object. This way, wherever a this reference is available, you can call APIs using this.$api.submodule.method.
The code is as follows:
// Import all interfaces
import api from './api'

const install = Vue => {
  if (install.installed)
    return;

  install.installed = true;

  Object.defineProperties(Vue.prototype, {
    // Note: Mounted on Vue's prototype as the $api object
    $api: {
      get() {
        return api
      }
    }
  })
}

export default install
api.js
This module is an aggregation module (聚合模块) that collects all sub-module APIs under the modules directory.
// Unified interface integration module
import * as blog from './modules/blog'
import * as category from './modules/category'
import * as login from './modules/login'
import * as photo from './modules/photo'
import * as user from './modules/user'

// Default export all
export default {blog, category, login, photo, user}
modules/blog.js
There are too many submodules under the modules directory, making it inconvenient to list them all. Here, the blog management module is used as an example.
import axios from '../axios'

// 获取博客列表
export const getList = (categoryId, page, pageSize) => {
  return axios({
    url: 'BlogPost',
    method: 'get',
    data: {categoryId, page, pageSize}
  })
}

// 获取指定博客文章
export const get = postId => {
  return axios({
    url: `BlogPost/${postId}/`,
    method: 'get',
  })
}
/src/main.js
Modify main.js to import the API module and register it using Vue.use(api). This allows you to call backend interfaces via this.$api.submodule.method.
Import the global module and mount it with Vue.prototype.global = global. This enables access to global configurations through this.global.xx.
import Vue from 'vue'
import App from './App'
import router from './router'
import api from './http'
import global from '@/utils/global';
import ElementUI from 'element-ui'
import 'element-ui/lib/theme-chalk/index.css'

Vue.config.productionTip = false

// Import Element
Vue.use(ElementUI)
// Import API module
Vue.use(api)

// Mount global configuration module
Vue.prototype.global = global

/* eslint-disable no-new */
new Vue({
  el: '#app',
  router,
  components: {App},
  template: '<App/>'
})
Completed
OK, the Axios encapsulation is done here. I won't test it here~~(lazy)~~
With the preparation work basically complete, it's time to start writing the page.
_EOF_
StarBlog Blog Development Notes: Frontend Development (5) - Axios Network Request Wrapper
- 本文作者:
- 程序设计实验室
- 版权声明:
- 本博客所有文章除特别声明外,均采用 BY-NC-SA 许可协议。转载请注明出处!
相关文章
StarBlog博客开发笔记:前端相关
markdown编辑器 v-md-editor,http://ckang1229.gitee.io/vue-markdown-editor/zh/ 在我的项目里最大化有问题,后面我自己搭配vuex实现了 优点是界面比较好,TOC可以放在左边 其他尝试 vue-element-admin整合的markdown编辑器:https://panjiachen.github.io/vue-element-a
2023-07-14 · StarBlog前端开发-Vue · 约 1 分钟
StarBlog博客开发笔记:前端开发(2)之页面路由
前言 Vue.js使用虚拟DOM处理单页面,然后使用Webpack打包。通过第5章的示例,读者也许已经发现,无论语法和写法如何不同,Vue.js程序打包后都是一个单一的HTML文件,同时会引入一个标准的JavaScript文件。 Vue.js中编写的所有代码都被Webpack自动打包成可以被浏览器解析的HTML和JavaScript代码,并且项目本身就只有一个页面。这意味着所有的用户对服务器发出进
2024-12-11 · StarBlog前端开发-Vue · 约 1 分钟
StarBlog博客开发笔记:前端开发之瀑布流图片列表
用到的组件:vue-waterfall 项目地址:https://github.com/MopTym/vue-waterfall 参考资料 Vue<瀑布流加载效果>:https://www.jianshu.com/p/97b89597ab5c
2023-07-14 · StarBlog前端开发-Vue · 约 1 分钟
StarBlog博客开发笔记:前端开发(7)之主页面
界面设计 按照ElementUI提供的布局来 左边是导航栏,右边上方是标签页,然后是主内容区 如图 二级类目 开始写代码 主页面的内容已经比较复杂了,全部写在一个文件内不现实 我们来分解一下 根据这个布局,页面可以分为头部、主体、左侧导航栏三部分 所以我来新建三个vue页面 HeaderBar.vue Navbar.vue MainContent.vue 完成之后目录结构如下 views ├──
2023-07-14 · StarBlog前端开发-Vue · 约 1 分钟
讨论
共 0 条加载评论中…