

StarBlog Development Notes (13): Adding the Friend Links Feature
Series articles Developing a Blog Project with .NetCore: StarBlog - (1) Why Write Your Own Blog? Developing a Blog Project with .NetCore: StarBlog - (2) Environment Setup and Creating the Project Developing a Blog Project with .NetCore: StarBlog - (3) Model Design Developing a Blog Project with .NetCore: StarBlog - (4) Batch Import of Markdown Blog Posts Developing a Blog Project with .NetCore: StarBl
目录11 个章节
Series Articles
- Developing a Blog Project with .NetCore: StarBlog - (1) Why Write Your Own Blog?
- Developing a Blog Project with .NetCore: StarBlog - (2) Environment Setup and Creating the Project
- Developing a Blog Project with .NetCore: StarBlog - (3) Model Design
- Developing a Blog Project with .NetCore: StarBlog - (4) Batch Import of Markdown Blog Posts
- Developing a Blog Project with .NetCore: StarBlog - (5) Starting to Build the Web Project
- Developing a Blog Project with .NetCore: StarBlog - (6) Page Development: Blog Post List
- Developing a Blog Project with .NetCore: StarBlog - (7) Page Development: Post Detail Page
- Developing a Blog Project with .NetCore: StarBlog - (8) Displaying the Category Hierarchy
- Developing a Blog Project with .NetCore: StarBlog - (9) Batch Image Import
- Developing a Blog Project with .NetCore: StarBlog - (10) Image Waterfall Layout
- Developing a Blog Project with .NetCore: StarBlog - (11) Implementing Visit Statistics
- Developing a Blog Project with .NetCore: StarBlog - (12) Dynamic Compilation of Razor Pages
- Developing a Blog Project with .NetCore: StarBlog - (13) Adding the Friend Links Feature
- ...
Preface
Time flies—just like that, the blog has already been live for a week (URL: http://blog.deali.cn)
The page views aren't high, but for a site that hasn't done any SEO, it's already pretty good~
I've been busy during this time, but I've still been writing code to keep improving the blog (Commits on Github every single day)
And here it is, the friend links feature is here~
This article will walk through the implementation of this feature step by step.
All project code has also been uploaded to GitHub. Stars/Forks from you experts are welcome!
- Blog backend + frontend project: https://github.com/Deali-Axy/StarBlog
- Admin dashboard frontend project: https://github.com/Deali-Axy/StarBlog-Admin
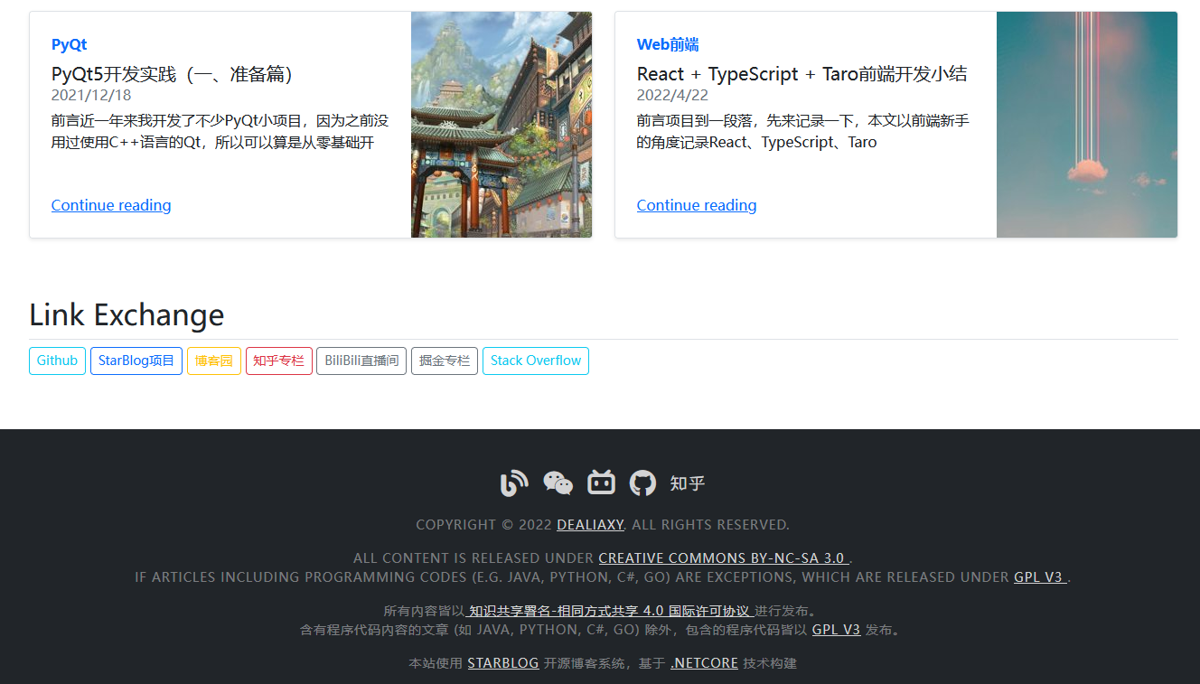
See the Result First
Analysis
Let's analyze the feature first
Friend links can be added manually, or applied for by people visiting the site
Other site owners can apply to exchange friend links. After submitting an application, it can be seen in the blog admin backend, and once confirmed it will show up on the site~
That's the initial feature design
Of course I also thought of some extended features, such as adjusting the display order of links based on click counts (Baidu: why does that sound so familiar)
Modeling
Based on the requirements, we need two models
One is the friend links to display, and the other is friend link application records
Let's get started
Create the data models in StarBlog.Data/Models
/// <summary>
/// 友情链接
/// </summary>
public class Link {
    [Column(IsIdentity = true, IsPrimary = true)]
    public int Id { get; set; }

    /// <summary>
    /// 网站名称
    /// </summary>
    public string Name { get; set; }

    /// <summary>
    /// 介绍
    /// </summary>
    public string? Description { get; set; }

    /// <summary>
    /// 网址
    /// </summary>
    public string Url { get; set; }

    /// <summary>
    /// 是否显示
    /// </summary>
    public bool Visible { get; set; }
}
And this one as well
/// <summary>
/// 友情链接申请记录
/// </summary>
public class LinkExchange {
    [Column(IsIdentity = true, IsPrimary = true)]
    public int Id { get; set; }

    /// <summary>
    /// 网站名称
    /// </summary>
    public string Name { get; set; }

    /// <summary>
    /// 介绍
    /// </summary>
    public string? Description { get; set; }

    /// <summary>
    /// 网址
    /// </summary>
    public string Url { get; set; }

    /// <summary>
    /// 站长
    /// </summary>
    public string WebMaster { get; set; }

    /// <summary>
    /// 联系邮箱
    /// </summary>
    public string Email { get; set; }

    /// <summary>
    /// 是否已验证
    /// <para>友情链接需要验证后才显示在网站上</para>
    /// </summary>
    public bool Verified { get; set; } = false;

    /// <summary>
    /// 申请时间
    /// </summary>
    public DateTime ApplyTime { get; set; } = DateTime.Now;
}
Service
With the models ready, next let's flesh out the logic
Write the logic in StarBlog.Web/Services
First, for friend links, besides CRUD, also add a shortcut for setting visibility
public class LinkService {
    private IBaseRepository<Link> _repo;

    public LinkService(IBaseRepository<Link> repo) {
        _repo = repo;
    }

    /// <summary>
    /// 获取全部友情链接
    /// </summary>
    /// <param name="onlyVisible">只获取显示的链接</param>
    /// <returns></returns>
    public List<Link> GetAll(bool onlyVisible = true) {
        return onlyVisible
            ? _repo.Where(a => a.Visible).ToList()
            : _repo.Select.ToList();
    }

    public Link? GetById(int id) {
        return _repo.Where(a => a.Id == id).First();
    }

    public Link? GetByName(string name) {
        return _repo.Where(a => a.Name == name).First();
    }

    public Link AddOrUpdate(Link item) {
        return _repo.InsertOrUpdate(item);
    }

    public Link? SetVisibility(int id, bool visible) {
        var item = GetById(id);
        if (item == null) return null;
        item.Visible = visible;
        _repo.Update(item);
        return GetById(id);
    }

    public int DeleteById(int id) {
        return _repo.Delete(a => a.Id == id);
    }
}
Nothing special here
Continuing
Logic for managing friend link application records, which also has CRUD. This part of the code is the same as above, so it's omitted
Here I'll only paste the code for setting verification status
public class LinkExchangeService {
    private readonly IBaseRepository<LinkExchange> _repo;
    private readonly LinkService _linkService;

    public LinkExchangeService(IBaseRepository<LinkExchange> repo, LinkService linkService) {
        _repo = repo;
        _linkService = linkService;
    }

	// 设置是否验证
    public LinkExchange? SetVerifyStatus(int id, bool status) {
        var item = GetById(id);
        if (item == null) return null;

        item.Verified = status;
        _repo.Update(item);


        var link = _linkService.GetByName(item.Name);
        if (status) {
            if (link == null) {
                _linkService.AddOrUpdate(new Link {
                    Name = item.Name,
                    Description = item.Description,
                    Url = item.Url,
                    Visible = true
                });
            }
            else {
                _linkService.SetVisibility(link.Id, true);
            }
        }
        else {
            if (link != null) _linkService.DeleteById(link.Id);
        }

        return GetById(id);
    }
}
In the method for setting verification status, it implements:
- Setting an application as verified automatically adds that application's link to the friend links
- Setting an application as unverified automatically deletes the corresponding friend link (if it exists)
The rest is the same as the friend links above.
Don't forget to register the services after writing them
builder.Services.AddScoped<LinkExchangeService>();
builder.Services.AddScoped<LinkService>();
Adding Data
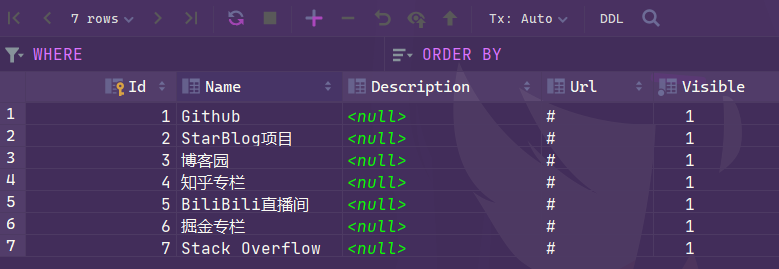
Although I also wrote APIs for managing these links, this series of articles is still covering the frontend part, so I plan to save the API implementation for the later RESTFul API development section~
So for now, let's just add them directly in the database~
Page Display
The data models and logic are all implemented. Next is finding a suitable place to display them
After looking at a few similar blogs, I decided to put the friend links at the bottom of the homepage
Edit StarBlog.Web/ViewModels/HomeViewModel.cs and add a new property
public class HomeViewModel {
    /// <summary>
    /// 友情链接
    /// </summary>
    public List<Link> Links { get; set; } = new();
}
Use Bootstrap5's responsive variation to make a responsive friend links display
<div class="d-grid gap-2 d-md-block">
  <button class="btn btn-primary" type="button">Button</button>
  <button class="btn btn-primary" type="button">Button</button>
</div>
The example on the official site looks like this

It's okay-ish, but they're all the same color, too monotonous. I want them colorful!
Encapsulating a Razor Component
So I encapsulated a Razor component named ColorfulButton
First define the ViewModel, used to configure this component
Add a ColorfulButtonViewModel.cs file in StarBlog.Web/ViewModels. The code is as follows
public static class LinkTarget {
    public const string Blank = "_blank";
    public const string Parent = "_parent";
    public const string Self = "_self";
    public const string Top = "_top";
}

public class ColorfulButtonViewModel {
    public string Name { get; set; }
    public string Url { get; set; } = "#";
    public string Target { get; set; } = "_self";
}
Then add ColorfulButton.cshtml under StarBlog.Web/Views/Shared/Widgets
Put in the button colors Bootstrap supports, then randomly show one each time~
@model ColorfulButtonViewModel

@{
    var rnd = Random.Shared;
    var colorList = new[] {
        "btn-outline-primary",
        "btn-outline-secondary",
        "btn-outline-success",
        "btn-outline-danger",
        "btn-outline-warning",
        "btn-outline-info",
        "btn-outline-dark",
    };
    var btnColor = colorList[rnd.Next(0, colorList.Length)];
}

<a href="@Model.Url" role="button" class="btn btn-sm @btnColor mb-1" target="@Model.Target">
    @Model.Name
</a>
Add to the Page
The component is done. Finally, implement the friend-link display on the homepage.
Edit the StarBlog.Web/Views/Home/Index.cshtml file
Add the following code at the bottom (below the recommended blogs section)
<div class="container px-4 py-3">
    <h2 class="pb-2 border-bottom">Link Exchange</h2>
    @if (Model.Links.Count > 0) {
        <div class="d-grid gap-2 d-md-block">
            @foreach (var link in Model.Links) {
                @await Html.PartialAsync("Widgets/ColorfulButton",
                    new ColorfulButtonViewModel { Name = link.Name, Url = link.Url })
            }
        </div>
    }
    else {
        @await Html.PartialAsync("Widgets/PlaceholderCard", "友情链接")
    }
</div>
The final result is as shown at the beginning: every visit gets a different color. Super cool~
Done
That's it. A simple feature that can add a little color to an otherwise plain blog~
Fellow site owners are also welcome to exchange friend links~!
_EOF_
StarBlog Development Notes (13): Adding the Friend Links Feature
- 本文作者:
- 程序设计实验室
- 版权声明:
- 本博客所有文章除特别声明外,均采用 BY-NC-SA 许可协议。转载请注明出处!
相关文章
StarBlog博客开发笔记(20):图片显示优化
前言 我的服务器带宽比较高,博客部署在上面访问的时候几乎没感觉有加载延迟,就没做图片这块的优化,不过最近有小伙伴说博客的图片加载比较慢,那就来把图片优化完善一下吧~ 目前有两个地方需要完善 图片瀑布流 图片缩略图 图片瀑布流 关于瀑布流之前的文章有介绍: 基于.NetCore开发博客项目 StarBlog - (10) 图片瀑布流 不过当时直接套用的 Bootstrap5 例子代码,有偶尔显示错位
2022-11-27 · StarBlog博客开发笔记 · 约 1 分钟
StarBlog博客开发笔记(4):markdown博客批量导入
系列文章 基于.NetCore开发博客项目 StarBlog - (1) 为什么需要自己写一个博客? 基于.NetCore开发博客项目 StarBlog - (2) 环境准备和创建项目 基于.NetCore开发博客项目 StarBlog - (3) 模型设计 基于.NetCore开发博客项目 StarBlog - (4) markdown博客批量导入 ... 前言 上周介绍了博客的模型设计,现在模
2025-04-27 · StarBlog博客开发笔记 · 约 1 分钟
StarBlog博客开发笔记(5):开始搭建Web项目
系列文章 基于.NetCore开发博客项目 StarBlog - (1) 为什么需要自己写一个博客? 基于.NetCore开发博客项目 StarBlog - (2) 环境准备和创建项目 基于.NetCore开发博客项目 StarBlog - (3) 模型设计 基于.NetCore开发博客项目 StarBlog - (4) markdown博客批量导入 基于.NetCore开发博客项目 StarBl
2023-02-08 · StarBlog博客开发笔记 · 约 1 分钟
StarBlog博客开发笔记(7):页面开发之文章详情页面
系列文章 基于.NetCore开发博客项目 StarBlog - (1) 为什么需要自己写一个博客? 基于.NetCore开发博客项目 StarBlog - (2) 环境准备和创建项目 基于.NetCore开发博客项目 StarBlog - (3) 模型设计 基于.NetCore开发博客项目 StarBlog - (4) markdown博客批量导入 基于.NetCore开发博客项目 StarBl
2022-05-20 · StarBlog博客开发笔记 · 约 1 分钟
讨论
共 0 条加载评论中…