Developing a blog project based on .NetCore StarBlog - (30) Implementing a comment system
The developer finally updated the comment system, but the code is so extensive that only the key logic is shared here, available on GitHub. The frontend ElementUI clashes with Bootstrap styling, yet they call it harmonious? Commenting requires email verification, the review process is cumbersome, and automatic rejections still require manual handling.
目录26 个章节
Preface
After five months, it's finally time to update the StarBlog series again~
This time, it's the highly requested comment system.
Since the amount of code involved is quite large, this article will not include all the code. It will only introduce the key logic. For the specific code, please check the GitHub repository yourself.
The code related to the blog frontend and backend is mainly in the following files:
StarBlog.Web/Services/CommentService.csStarBlog.Web/Apis/Comments/CommentController.csStarBlog.Web/Views/Blog/Widgets/Comment.cshtmlStarBlog.Web/wwwroot/js/comment.js
The code for the admin backend is in the following file:
src/views/Comment/Comments.vue
Implementation Effect
Before you begin, let's take a look at the implementation effect.
Blog Frontend
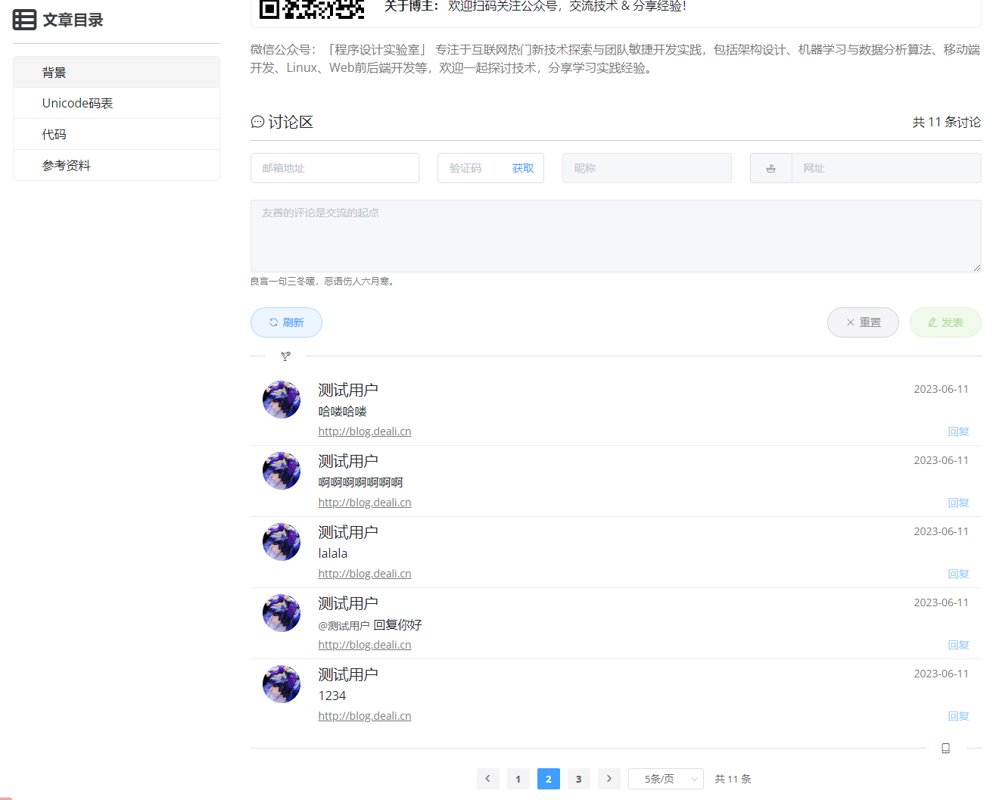
This part of the discussion forum's UI is driven by Vue. For development efficiency, components from ElementUI are also integrated. Although the style differs slightly from the blog's original Bootstrap design, it still looks quite harmonious.
You can post or reply to comments without logging in, but you need to enter an email address and receive an email verification code.
To build a civilized and harmonious online environment, comments are automatically reviewed by an automated moderation system after being posted. They will only be displayed if approved.
If the automated moderation system does not approve a comment, it will enter a manual review process.
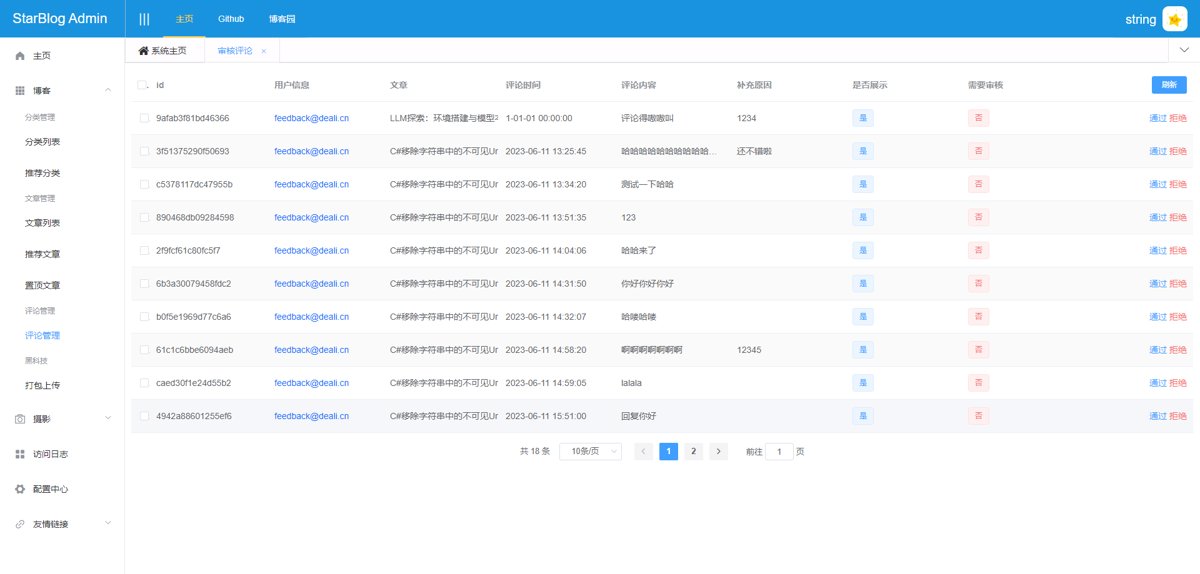
Admin Panel
The admin panel allows you to approve or reject comments.
Model Design
The functionality has been introduced earlier, so I won't elaborate further. Let's jump straight into the code.
This feature introduces two new entity classes: Comment and AnonymousUser.
The code for the comment entity class is as follows. Apart from the reference to AnonymousUser, you can see that I have also reserved a User property. Currently, the blog frontend does not have a login feature implemented, but reserving this property will make it easier to allow logged-in users to comment in the future.
public class Comment : ModelBase {
  [Column(IsIdentity = false, IsPrimary = true)]
  public string Id { get; set; }

  public string? ParentId { get; set; }
  public Comment? Parent { get; set; }
  public List<Comment>? Comments { get; set; }

  public string PostId { get; set; }
  public Post Post { get; set; }

  public string? UserId { get; set; }
  public User? User { get; set; }

  public string? AnonymousUserId { get; set; }
  public AnonymousUser? AnonymousUser { get; set; }

  public string? UserAgent { get; set; }
  public string Content { get; set; }
  public bool Visible { get; set; }

  /// <summary>
  /// 是否需要审核 (Whether it needs review)
  /// </summary>
  public bool IsNeedAudit { get; set; } = false;

  /// <summary>
  /// 原因 (Reason)
  /// <para>如果验证不通过的话,可能会附上原因 (If validation fails, a reason might be attached)</para>
  /// </summary>
  public string? Reason { get; set; }
}
The anonymous user entity class is quite simple. Visitors are required to fill in only three fields, while the IP address is recorded automatically.
public class AnonymousUser : ModelBase {
  public string Id { get; set; }
  public string Name { get; set; }
  public string Email { get; set; }
  public string? Url { get; set; }
  public string? Ip { get; set; }
}
Frontend API Encapsulation
For frontend API calls, using axios makes it convenient, though you could also use the native ES5 fetch function—it just requires more code. Laziness is the primary driver of productivity.
We use Promise to wrap the return values, enabling the use of ES5's async/await syntax, which provides an asynchronous development experience similar to C#.
Due to space constraints, this article cannot include all API encapsulation code, so I will only provide two typical examples.
Here is an API for getting an anonymous user, as an example of a GET method.
getAnonymousUser(email, otp) {
  return new Promise((resolve, reject) => {
    axios.get(`/Api/Comment/GetAnonymousUser?email=${email}&otp=${otp}`)
      .then(res => resolve(res.data))
      .catch(res => resolve(res.response.data))
  })
}
Here is an API for submitting a comment, as an example of a POST method.
submitComment(data) {
  return new Promise((resolve, reject) => {
    axios.post(`/Api/Comment`, {...data})
      .then(res => resolve(res.data))
      .catch(res => resolve(res.response.data))
  })
}
OK, these are the two simplest examples, without any data processing.
Generate Email Verification Code
Typically, a hash table data structure is used to store this type of data. In this project, I use the built-in MemoryCache in .NET Core to store verification codes. Alternatively, directly using Dictionary or Redis are also viable options.
When sending an email, you need to store the email address and its corresponding verification code in the cache, then retrieve it during verification. After successful verification, delete the record.
First, register the service in Program.cs
builder.Services.AddMemoryCache();
Check if an email address is valid
In CommentService.cs, create a method that uses a regular expression to check the email address.
/// <summary>
/// Checks if an email address is valid
/// </summary>
public static bool IsValidEmail(string email) {
  if (string.IsNullOrEmpty(email) || email.Length < 7) {
    return false;
  }

  var match = Regex.Match(email, @"[^@ \t\r\n]+@[^@ \t\r\n]+\.[^@ \t\r\n]+");
  var isMatch = match.Success;
  return isMatch;
}
Sending Email Verification Codes
To facilitate sending emails, I've encapsulated an EmailService, and the code for sending verification codes is as follows.
To generate a four-digit verification code, simply use Random to generate a random number between 1000-9999.
Regarding sending emails, it's introduced in the friendship links article: Developing a Blog Project with .NetCore - StarBlog (28) Developing Friendship Links API
/// <summary>
/// Send email verification code
/// <returns>Generated random verification code</returns>
/// <param name="mock">Only generate the verification code, do not send email</param>
/// </summary>
public async Task<string> SendOtpMail(string email, bool mock = false) {
  var otp = Random.Shared.NextInt64(1000, 9999).ToString();

  var sb = new StringBuilder();
  sb.AppendLine($"<p>Welcome to StarBlog! Verification code: {otp}</p>");
  sb.AppendLine($"<p>If you didn't perform any action, please ignore this email.</p>");

  if (!mock) {
    await SendEmailAsync(
      "[StarBlog]Email Verification Code",
      sb.ToString(),
      email,
      email
    );
  }

  return otp;
}
Check if a verification code cache exists. If not, generate one, send the email, and store it in the cache. Here, I've set the expiration time to 5 minutes.
public async Task<(bool, string?)> GenerateOtp(string email, bool mock = false) {
  var cacheKey = $"comment-otp-{email}";
  var hasCache = _memoryCache.TryGetValue<string>(cacheKey, out var existingValue);
  if (hasCache) return (false, existingValue);

  var otp = await _emailService.SendOtpMail(email, mock);
  _memoryCache.Set<string>(cacheKey, otp, new MemoryCacheEntryOptions {
    AbsoluteExpirationRelativeToNow = TimeSpan.FromMinutes(5)
  });

  return (true, otp);
}
Interface
Finally, implement this interface in the Controller.
Here, only three scenarios are considered:
- Invalid email address
- Successful email delivery
- The previous verification code (验证码) is still valid, so no email is sent
In reality, there is another scenario where email delivery fails, but I didn’t include it in this interface. If the delivery fails, an error will be thrown and intercepted by the global error handler, which will return a 500 response.
/// <summary>
/// Get the email verification code (验证码)
/// </summary>
[HttpGet("[action]")]
public async Task<ApiResponse> GetEmailOtp(string email) {
  if (!CommentService.IsValidEmail(email)) {
    return ApiResponse.BadRequest("The provided email address is invalid.");
  }

  var (result, _) = await _commentService.GenerateOtp(email);
  return result
    ? ApiResponse.Ok("Email verification code (验证码) sent successfully. It is valid for five minutes.")
    : ApiResponse.BadRequest("The previous verification code (验证码) is still valid. Please do not request a new one repeatedly.");
}
Checking Verification Codes and Obtaining Anonymous Users
As mentioned earlier in the "Model Design" section, both unauthenticated and authenticated users can post comments (although the functionality for other user logins is not yet provided). This article only designs the comment submission process for unauthenticated users (i.e., anonymous users).
After a user submits an email verification code and the code is successfully verified, the system can retrieve the anonymous user information corresponding to the email address through the interface. This prevents visitors from having to repeatedly enter the same information multiple times, while also allowing them to modify this information during the next comment submission.
Verify the Verification Code
I have encapsulated the following method in CommentService.cs to verify the OTP (一次性密码, One-Time Password), and added a clear parameter that controls whether to clear the OTP after successful verification.
/// <summary>
/// 验证一次性密码
/// </summary>
/// <param name="clear">验证通过后是否清除</param>
public bool VerifyOtp(string email, string otp, bool clear = true) {
  var cacheKey = $"comment-otp-{email}";
  _memoryCache.TryGetValue<string>(cacheKey, out var value);

  if (otp != value) return false;

  if (clear) _memoryCache.Remove(cacheKey);
  return true;
}
Backend Interface
The interface code is as follows.
Here, the code for generating a new OTP (one-time password) has been commented out. Originally, I designed it so that both retrieving anonymous user information and posting comments required an OTP. Therefore, after obtaining the anonymous user information, a new OTP would need to be generated (but not emailed) and sent to the frontend, which would then update the temporarily stored OTP.
However, I realized this was a bit over-engineered, and this approach could cause some inconvenience for visitors (the submitted OTP would not be the same as the one received via email). So, I simplified this feature, but the logic remains in the code.
/// <summary>
/// Retrieve anonymous user information based on email and OTP
/// </summary>
[HttpGet("[action]")]
public async Task<ApiResponse> GetAnonymousUser(string email, string otp) {
  if (!CommentService.IsValidEmail(email)) return ApiResponse.BadRequest("The provided email address is invalid");

  var verified = _commentService.VerifyOtp(email, otp, clear: false);
  if (!verified) return ApiResponse.BadRequest("Invalid OTP");

  var anonymous = await _commentService.GetAnonymousUser(email);
  // Not using the function to generate a new OTP for now to avoid a disjointed user experience
  // var (_, newOtp) = await _commentService.GenerateOtp(email, true);

  return ApiResponse.Ok(new {
    AnonymousUser = anonymous,
    NewOtp = otp
  });
}
Frontend Logic
When a visitor fills in the CAPTCHA on the discussion forum interface, the change event is triggered, executing the following JavaScript code. (Simplified for brevity.)
After the user enters a CAPTCHA of the correct length, it sends a request to the backend API to verify whether the CAPTCHA is correct. If the CAPTCHA is correct, the backend will also return the anonymous user information corresponding to this email address.
Subsequently, the input fields that were previously locked become interactive, or the user can click the "Reply" button to reply to other comments.
async handleEmailOtpChange(value) {
  console.log('handleEmailOtpChange', value)
  if (this.form.email?.length === 0 || value.length < 4) return

  // Set UI loading state
  this.[corresponding_UI_component] = true

  // Verify OTP & get anonymous user
  let res = await this.getAnonymousUser(this.form.email, value)

  if (res.successful) {
    if (res.data.anonymousUser) {
      this.form.userName = res.data.anonymousUser.name
      this.form.url = res.data.anonymousUser.url
    }
    this.form.emailOtp = res.data.newOtp
    // Lock the email and CAPTCHA, no further editing needed
    this.[corresponding_UI_component] = true
    // Enable editing for username, website, content, and replies
    this.[corresponding_UI_component] = false
  } else {
    this.$message.error(res.message)
  }
  this.userNameLoading = false
  this.urlLoading = false
}
Submitting Comments
This part is relatively complex, so I'll explain it step by step.
Form Validation
Utilizing the form validation functionality provided by ElementUI, although it's a somewhat dated component library, this part of its functionality is still quite good.
First, define the form rules.
formRules: {
  userName: [
    {required: true, message: 'Please enter the user name', trigger: 'blur'},
    {min: 2, max: 20, message: 'Length should be between 2 and 20 characters', trigger: 'blur'}
  ],
  email: [
    {required: true, message: 'Please enter the email', trigger: 'blur'},
    {type: 'email', message: 'Incorrect email format'}
  ],
  emailOtp: [
    {required: true, message: 'Please enter the email verification code', trigger: 'change'},
    {len: 4, message: 'Length should be 4 characters', trigger: 'change'}
  ],
  url: [
    {type: 'url', message: `Please enter a valid URL`, trigger: 'blur'},
  ],
  content: [
    {required: true, message: 'Please enter the comment content', trigger: 'blur'},
    {min: 1, max: 300, message: 'Length should be between 1 and 300 characters', trigger: 'blur'},
    {whitespace: true, message: 'Comment content cannot be only spaces', trigger: 'blur'},
  ]
}
Then, bind these defined rules to the form component.
<el-form :model="form" status-icon :rules="formRules" ref="form" class="my-3">
Call the following code for form validation upon submission.
Upon successful validation, you can perform operations like API calls within its callback.
this.$refs.form.validate(async (valid) => {
  if (valid) {}
}
Sending Request
After the form validation passes, call the previously encapsulated API to submit the comment.
If comment submission fails, display the error message.
If comment submission is successful, after displaying the success message, clear the entire form but retain the email address to facilitate the visitor submitting the next comment.
Finally, regardless of success or failure, refresh the comments list.
async handleSubmit() {
  this.$refs.form.validate(async (valid) => {
    if (valid) {
      this.submitLoading = true
      let res = await this.submitComment(this.form)
      if (res.successful) {
        this.$message.success(res.message)
        let email = `${this.form.email}`
        this.handleReset()
        this.form.email = email
      } else this.$message.error(res.message)
      this.submitLoading = false
      await this.getComments()
    }
  })
}
Interface Design
Having covered the frontend, let's now move to the backend part. The following code performs these tasks:
- Verify the verification code
- Obtain an anonymous user
- Generate a new comment
- Little Steward's automatic review (sensitive word detection)
- Save the comment and return the result
[HttpPost]
public async Task<ApiResponse<Comment>> Add(CommentCreationDto dto) {
  if (!_commentService.VerifyOtp(dto.Email, dto.EmailOtp)) {
    return ApiResponse.BadRequest("验证码无效");
  }

  var anonymousUser = await _commentService.GetOrCreateAnonymousUser(
    dto.UserName, dto.Email, dto.Url,
    HttpContext.GetRemoteIPAddress()?.ToString().Split(":")?.Last()
  );

  var comment = new Comment {
    ParentId = dto.ParentId,
    PostId = dto.PostId,
    AnonymousUserId = anonymousUser.Id,
    UserAgent = Request.Headers.UserAgent,
    Content = dto.Content
  };

  string msg;
  if (_filter.CheckBadWord(dto.Content)) {
    comment.IsNeedAudit = true;
    comment.Visible = false;
    msg = "小管家发现您可能使用了不良用语,该评论将在审核通过后展示~";
  }
  else {
    comment.Visible = true;
    msg = "评论由小管家审核通过,感谢您参与讨论~";
  }

  comment = await _commentService.Add(comment);

  return new ApiResponse<Comment>(comment) {
    Message = msg
  };
}
Little Manager Review
This is ostensibly about comment review, but it's essentially sensitive word detection. This project uses a DFA (Deterministic Finite Automaton) to implement detection.
Originally, this part could have been written as a separate article, but since it's already mentioned here, a brief introduction is fine.
A DFA (Deterministic Finite Automaton) is used to implement automatic transitions between states. Corresponding to the DFA is also an NFA (Non-deterministic Finite Automaton). Together, they are collectively known as Finite State Machines (FSM). The main difference lies in whether the next state can be uniquely determined during a transition. For an NFA, the transition often does not lead to a single definite state but rather to a set of states, where any state within the set can serve as the next state. A DFA, on the other hand, is deterministic.
Composition of a DFA (Deterministic Finite Automaton)
- A non-empty finite set of states, Q (状态集合)
- An input alphabet, E (输入集合)
- A transition function, f (状态转移函数)
- A start state, q0, which is an element of Q (初始状态)
- A set of accept states, Z, which is a subset of Q (终止状态集合)
A DFA can be denoted as M=(Q, E, f, q0, Z)
How to Implement a Sensitive Word Filtering Algorithm Using DFA
Assume we have three sensitive words: NND, CNM, and MLGB. Then:
Q = {N, NN, NND, C, CN, CNM, M, ML, MLG, MLGB}
Using all the components of the sensitive words as the state set, the state machine only needs to transition between these states.
E = {B, C, D, G, L, N, M}. Using all individual characters that compose the sensitive words as the input set, the state machine only needs to recognize the characters that form the sensitive words.
qo = null. The initial state is empty. An empty initial state can transition to any state.
Z = {NND, CNM, MLGB}. When any sensitive word is recognized, the state transition can terminate.
Therefore, f can be a function that, after reading a character, checks whether it is a state in Q and then performsThe request was rejected because it was considered high risk
Usage
The implementation code is quite lengthy, so I won't include it here—the article is already significantly over its intended length...
In short, I've packaged this code in the CodeLab.Share NuGet package, and you can simply call it directly.
As you can see, I wrote a TempFilterService in the StarBlog project.
Because the packaged StopWordsToolkit has many features—not only can it detect sensitive words, but it can also automatically replace them with asterisks, etc.—when I was working on this feature, I thought about whether to add some unusual functionalities. That's why I added the "Temp" prefix to this service.
public class TempFilterService {
    private readonly StopWordsToolkit _toolkit;

    public TempFilterService() {
        var words = JsonSerializer.Deserialize<IEnumerable<Word>>(File.ReadAllText("words.json"));
        _toolkit = new StopWordsToolkit(words!.Select(a => a.Value));
    }

    public bool CheckBadWord(string word) {
        return _toolkit.CheckBadWord(word);
    }
}
During initialization here, it requires the words.json sensitive word library file. For the sake of maintaining a civilized and harmonious online environment, this project's open-source code cannot include it. Those who need it can collect it themselves.
The format looks like this:
[
  {
    "Id": 1,
    "Value": "小可爱",
    "Tag": "暴力"
  },
  {
    "Id": 2,
    "Value": "河蟹",
    "Tag": "广告"
  }
]
If it's genuinely necessary for learning or testing purposes, you can send a private message "badwords" to the WeChat public account "程序设计实验室" to obtain it.
Manual Review
When a comment is flagged by the moderator for containing sensitive words, it is marked with IsNeedAudit=true and enters the manual review process.
This involves the Accept and Reject methods.
public async Task<Comment> Accept(Comment comment, string? reason = null) {
  comment.Visible = true;
  comment.IsNeedAudit = false;
  comment.Reason = reason;
  await _commentRepo.UpdateAsync(comment);
  return comment;
}
The corresponding interface is:
[Authorize]
[HttpPost("{id}/[action]")]
public async Task<ApiResponse<Comment>> Accept([FromRoute] string id, [FromBody] CommentAcceptDto dto) {
  var item = await _commentService.GetById(id);
  if (item == null) return ApiResponse.NotFound();
  return new ApiResponse<Comment>(await _commentService.Accept(item, dto.Reason));
}
Admin Dashboard
There will be a dedicated series later on introducing Vue-based admin dashboard development, so this article will not spend too much space on it and only briefly records some points.
Originally, I used a Dialog to let users input the reason for approving or rejecting a comment review, but later discovered that ElementUI provides the prompt function, which can pop up a simple input box.
Therefore, the code for rejecting a certain comment is as follows:
handleReject(item) {
  this.$prompt('请输入原因', '审核评论 - 补充原因', {
    confirmButtonText: '确定',
    cancelButtonText: '取消',
  }).then(({value}) => {
    this.$api.comment.reject(item.id, value)
      .then(res => {
      this.$message.success('操作成功!')
    })
      .catch(res => {
      console.error(res)
      this.$message.warning(`操作失败!${res.message}`)
    })
      .finally(() => this.loadData())
  }).catch(() => {
  })
}
Summary
Comments are not a simple feature. This article only covers the key steps and code involved in developing a comment system, yet it already takes up considerable length. To make it fully functional and user-friendly, numerous details must be considered. After a period of effort, I have initially completed a simple and usable comment system in StarBlog.
References
- Element-UI Form Validation Rules Configuration: Common Tips and Tricks (黑科技) - https://www.cnblogs.com/loveyt/p/13282518.html
- http://mot.ttthyy.com/328.html
_EOF_
Developing a blog project based on .NetCore StarBlog - (30) Implementing a comment system
- 本文作者:
- 程序设计实验室
- 版权声明:
- 本博客所有文章除特别声明外,均采用 BY-NC-SA 许可协议。转载请注明出处!
相关文章
StarBlog博客开发笔记(16):一些新功能
系列文章 基于.NetCore开发博客项目 StarBlog - (1) 为什么需要自己写一个博客? 基于.NetCore开发博客项目 StarBlog - (2) 环境准备和创建项目 基于.NetCore开发博客项目 StarBlog - (3) 模型设计 基于.NetCore开发博客项目 StarBlog - (4) markdown博客批量导入 基于.NetCore开发博客项目 StarBl
2022-08-13 · StarBlog博客开发笔记 · 约 1 分钟
StarBlog博客开发笔记(12):Razor页面动态编译
系列文章 基于.NetCore开发博客项目 StarBlog - (1) 为什么需要自己写一个博客? 基于.NetCore开发博客项目 StarBlog - (2) 环境准备和创建项目 基于.NetCore开发博客项目 StarBlog - (3) 模型设计 基于.NetCore开发博客项目 StarBlog - (4) markdown博客批量导入 基于.NetCore开发博客项目 StarBl
2022-06-19 · StarBlog博客开发笔记 · 约 1 分钟
StarBlog博客开发笔记(10):图片展示-瀑布流-首页卡片
系列文章 基于.NetCore开发博客项目 StarBlog - (1) 为什么需要自己写一个博客? 基于.NetCore开发博客项目 StarBlog - (2) 环境准备和创建项目 基于.NetCore开发博客项目 StarBlog - (3) 模型设计 基于.NetCore开发博客项目 StarBlog - (4) markdown博客批量导入 基于.NetCore开发博客项目 StarBl
2022-11-22 · StarBlog博客开发笔记 · 约 1 分钟
StarBlog博客开发笔记:身份认证功能
身份认证使用JWT,关于AspNetCore的身份认证和JWT可以看看我之前这篇博客 先安装nuget包 dotnet add package Microsoft.AspNetCore.Authentication.JwtBearer 在Services目录下新建一个AuthService类,先留着不写代码,等把准备工作完成了再来。 用户模型 在 StarBlog.Data 项目的 Models
2022-02-25 · StarBlog博客开发笔记 · 约 1 分钟
讨论
共 0 条加载评论中…