Back to basics! Use Alpine.js to build interactive web apps and ditch node_modules and webpack!
Frontend frameworks are constantly emerging, and projects are getting bigger. Libraries like Alpine.js and htmx go against the trend, allowing modern web applications to be developed in the simplest way possible.
目录34 个章节
Preface
I've been using DjangoStarter to develop various small projects recently. Previously, I preferred a frontend-backend separation approach, with Ninja API for the backend and Next.js for the frontend. It was quite comfortable to develop with, and the interaction experience was good.
However, while browsing the internet, I also learned about lightweight frontend libraries like htmx and Alpine.js that pair well with Django, so I decided to try them out in a new pet project. (This article will first try Alpine.js, using the LiveChat project I'm currently developing as an example.)
The backend-rendered development approach of Django templates is very convenient, but sometimes you need to implement some interactions on the page. Older projects might opt for jQuery, but since it's no longer maintained, I naturally wouldn't choose it. What I've used more frequently is including Vue.js in the page to handle simple interactions, which can replace jQuery to some extent. Later on, I even incorporated React, writing JSX directly. However, without webpack, using Babel for rendering resulted in somewhat poor performance.
Reference: Using React and JSX in HTML
Traditional frontend frameworks like React, Vue.js, and Angular are powerful, but for some small to medium-sized projects or simple interaction requirements, they might seem overly cumbersome and have a steeper learning curve. This has prompted developers to seek solutions that are both lightweight and flexible, capable of implementing dynamic interactions without introducing excessive complexity.
Alpine.js emerged in this context. It is a lightweight JavaScript framework designed to provide declarative and composable features similar to Vue.js and React, but implemented in a minimalist way. Alpine.js allows developers to embed interaction logic directly within HTML templates, enabling rich dynamic effects without the need for complex build tools and configurations.
About the LiveChat Project
The technology used in this project is actually quite similar to that described in my previous article Using Django-Channels for WebSocket Communication + Large Model Dialogue, but this one is for multi-person chat, not interaction with a large model.
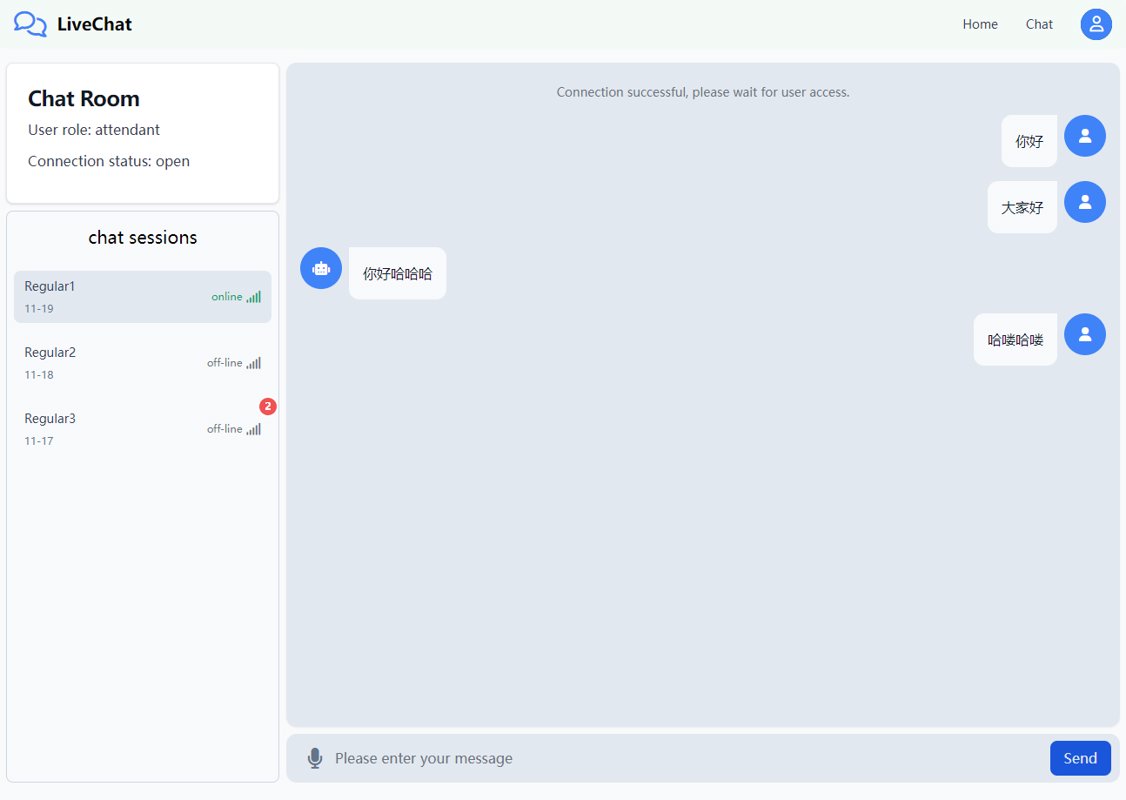
The project is still under development. Here's a simple screenshot; currently, text and voice chat have been implemented.
About Alpine.js
Alpine.js is a lightweight JavaScript framework designed to provide developers with a simple and efficient method for adding interactive functionality to web pages. Inspired by Vue.js, it is even more lightweight and concise. By embedding concise directives directly within HTML templates, Alpine.js allows developers to implement dynamic interactions with minimal code, without the need for bulky frameworks or complex build tools.
Website: https://alpinejs.dev/
Development Background
Alpine.js was introduced by developer Caleb Porzio in 2020 to bridge the gap between jQuery and modern frontend frameworks. It combines the directness of jQuery with the declarative advantages of Vue.js, offering a concise yet powerful tool for building interactive web pages.
Core Features
- Lightweight: The core library is only a few KB in size, significantly increasing page load times, making it ideal for projects with strict performance requirements.
- Intuitive Syntax: Uses directives similar to Vue.js (like
x-data,x-bind,x-on, etc.), allowing developers to write interactive logic directly in HTML, making the code more intuitive and readable. - Easy Integration: Requires no complex build tools or project configuration. Simply include the Alpine.js script file to start using it in any existing project.
- Declarative Rendering: Adopts a declarative programming style, focusing on describing "what" the interface should be rather than "how" to update it, greatly simplifying the development process.
- High Flexibility: Suitable for everything from simple interactive effects to moderately complex web applications, meeting most front-end development needs.
Comparison with Other Frameworks
Compared to Vue.js and React
- Much smaller in size: Alpine.js is only a fraction of the size of Vue.js and React, making it extremely lightweight.
- Gentle learning curve: There is no need to learn complex framework concepts or JSX syntax; familiarity with HTML and basic JavaScript is sufficient to get started.
- No build tools required: Eliminates the need for configuring build tools like Webpack and Babel, reducing project complexity.
Compared to jQuery
- Modern programming approach: Alpine.js employs declarative rendering and data binding, avoiding tedious DOM manipulation.
- Better maintainability: The code structure is clear, with logic and views tightly integrated, facilitating later maintenance and iteration.
Applicable Scenarios
- Small projects or components: When a project doesn't require a large framework, Alpine.js is an ideal choice.
- Enhancing existing projects: In traditional server-rendered projects where you want to add some dynamic interaction, you can directly introduce Alpine.js without refactoring the project structure.
- Rapid prototyping: Suitable for scenarios where you need to quickly validate ideas or build prototypes.
Installation
Compared to Vue and React projects that require webpack, using Alpine.js is very easy; you only need to include a JS file in the HTML.
Using CDN
The simplest approach is to add the JS reference at the bottom of the page, directly using the jsdelivr CDN.
<html>
    <head>
        ...

        <script defer src="https://cdn.jsdelivr.net/npm/alpinejs@3.x.x/dist/cdn.min.js"></script>
    </head>
    ...
</html>
Using Local Resources
DjangoStarter uses npm to manage front-end resources, so integrating additional libraries involves a few more steps, but it’s still straightforward.
First, install the dependencies using npm:
pnpm i alpinejs
After installation via npm, the files will be in the node_modules directory. DjangoStarter uses gulp to collect front-end resources, so next, you’ll need to add Alpine.js to the gulp task.
Edit gulpfile.js:
// Front-end component packages downloaded using npm
const libs = [
  {name: 'alpinejs', dist: './node_modules/alpinejs/dist/**/*.*'},
]
Run the gulp task to collect static resources:
gulp move
This places Alpine.js in the project’s static directory, making it available for use in templates.
Edit the template to include the static resource. Remember to load the static template tag:
{% load static %}

<html>
  <body>

    <script defer src="{% static 'lib/alpinejs/dist/cdn.min.js' %}"></script>
    {% block extra_js %}{% endblock %}
  </body>
</html>
And that’s it! It might look complex, but in practice, these steps are done during project initialization. I’ll also integrate Alpine.js and htmx into the upcoming version of DjangoStarter, so you won’t need to repeat these steps during actual development.
Initialization
Add the x-data attribute to the element that needs to be taken over (接管) by Alpine.js.
Just like this:
<div class="grid grid-cols-1 lg:grid-cols-4 gap-2 mb-4" x-data="chatApp()">
</div>
Then define chatApp() in JavaScript.
function chatApp() {
  return {
    messages: [],
    init() {
      // Initialization code
    },
  }
}
The code has been simplified for readability.
Message Box
Looking directly at the code will give you a more intuitive understanding of how we use Alpine.js to develop.
Backend rendering can also be componentized. I've written a messages_container.html component.
<!-- Messages -->
<div x-ref="messages"
     class="flex-1 space-y-4 overflow-y-auto rounded-xl bg-slate-200 px-4 py-2 text-sm leading-6 text-slate-900 shadow-sm dark:bg-slate-900 dark:text-slate-300 sm:text-base sm:leading-7">
  <template x-for="item in messages">
    <div>
      <template x-if="item.role==='system'">
        <div class="text-center text-sm text-gray-500" x-text="item.message"></div>
      </template>
      <template x-if="item.role==='user'">
        <div class="flex flex-row-reverse items-start gap-2">
          <div class="p-2 h-12 w-12 rounded-full bg-blue-500 flex justify-center items-center">
            <i class="fa-solid fa-user text-white"></i>
          </div>
          <div class="flex min-h-[85px] rounded-b-xl rounded-tl-xl bg-slate-50 p-4 dark:bg-slate-800 sm:min-h-0 sm:max-w-md md:max-w-2xl">
            <template x-if="item.type==='text'">
              <p x-text="item.message"></p>
            </template>
            <template x-if="item.type==='audio'">
              <div class="flex flex-col gap-2">
                <div>Audio <span x-text="item.length"></span>s</div>
                <button type="button" @click="playAudio(item)"
                        class="px-3 py-2 text-xs font-medium text-center inline-flex gap-2 items-center text-white bg-blue-700 rounded-lg hover:bg-blue-800 focus:ring-4 focus:outline-none focus:ring-blue-300 dark:bg-blue-600 dark:hover:bg-blue-700 dark:focus:ring-blue-800 ">
                  <i class="fa-solid fa-play text-white"> </i>
                  play
                </button>
              </div>
            </template>
          </div>
        </div>
      </template>
      <template x-if="item.role==='ai'">
        <div class="flex items-start gap-2">
          <div class="p-2 h-12 w-12 rounded-full bg-blue-500 flex justify-center items-center">
            <i class="fa-solid fa-robot text-white"> </i>
          </div>
          <div class="flex rounded-b-xl rounded-tr-xl bg-slate-50 p-4 dark:bg-slate-800 sm:max-w-md md:max-w-2xl">
            <p x-text="item.message"> </p>
          </div>
        </div>
      </template>
    </div>
  </template>
</div>
As you can see, several attributes and elements that are not part of standard HTML are used here:
x-refx-forx-iftemplate
We will introduce them one by one next.
x-ref
This is similar to the ones in Vue and React.
It's equivalent to directly using getElementById or querySelector to access elements.
Here, the main goal is to implement automatic message scrolling to the bottom (which I'll explain later).
x-for and x-if
As the name suggests, these are for looping and conditional rendering, similar to their usage in Vue.
Notes
- These two directives can only be used with the
templateelement - The
templateelement can only contain a single element x-ifonly takes effect within an element that hasx-data
x-text
When displaying messages, unlike Vue which uses {item.message} for rendering, Alpine.js uses the x-text directive.
<p x-text="item.message"></p>
This directive sets the text content inside an element. Similarly, there is also the x-html directive, which can directly set the innerHtml.
Implementing Automatic Scroll to Bottom for Messages
Let's recall how this was implemented in React earlier.
React.useEffect(() => {
  // 自动滚动到消息容器底部
  messagesRef.current.scrollIntoView({behavior: 'smooth'})
}, [messages]);
By using the useEffect hook, we listen for changes in messages. When a change occurs, it scrolls to the bottom.
In Alpine.js, we can also implement listening. Edit the init() method inside chatApp and use the $watch magic property.
init() {
  this.$watch('messages', () => {
    console.log('$watch messages changed', this.messages)

    // 滚动到最新消息
    this.$nextTick(() => {
      // this.$refs.messages.scrollIntoView({behavior: 'smooth'});
      // 另一种方法滚动到底部
      this.$refs.messages.scrollTop = this.$refs.messages.scrollHeight;
    });
  })
}
Here, I changed it to scrollTop = scrollHeight to implement scrolling to the bottom. The previously used scrollIntoView method seemed to be ineffective.
Magic Properties
Starting with $ are called magic properties in alpine.js, and many functionalities are implemented through this type of property.
Commonly used magic properties:
$el: Reference to the current element.$refs: Reference other elements with thex-refdirective.$event: The current event object.$nextTick: Execute a function after the next DOM update.
Input Field and Data Binding
Continue to understand the core concepts of Alpine.js through code.
Let's look at the code.
<form class="mt-2">
  <label for="chat-input" class="sr-only">Enter your prompt</label>
  <div class="relative">
    <button
            type="button" @click="audioMode=!audioMode"
            class="absolute inset-y-0 left-0 flex items-center pl-6 text-slate-500 hover:text-blue-600 dark:text-slate-400 dark:hover:text-blue-600"
            >
      <i class="fa-solid fa-microphone text-2xl"></i>
      <span class="sr-only">use voice input</span>
    </button>
    <textarea
              id="chat-input"
              class="block w-full resize-none rounded-xl border-none bg-slate-200 p-4 pl-14 pr-20 text-sm text-slate-900 focus:outline-none focus:ring-1 focus:ring-blue-400 dark:bg-slate-900 dark:text-slate-200 dark:placeholder-slate-400 dark:focus:ring-blue-600 sm:text-base"
              placeholder="Please enter your message"
              rows="1"
              required
              x-model="message"
              :disabled="!receiver"
              @keydown.enter.prevent="sendMessage()"
              ></textarea>
    <button
            type="button" @click="sendMessage()" :disabled="!receiver"
            class="absolute bottom-2 right-2.5 rounded-lg bg-blue-700 px-4 py-2 text-sm font-medium text-slate-200 hover:bg-blue-800 focus:outline-none focus:ring-4 focus:ring-blue-300 dark:bg-blue-600 dark:hover:bg-blue-700 dark:focus:ring-blue-800 sm:text-base"
            >
      Send <span class="sr-only">Send</span>
    </button>
  </div>
</form>
Two-Way Data Binding
First, there's data binding, which is very similar to Vue and Blazor.
The input field in this project uses the <textarea> element, employing the x-model directive to achieve two-way binding between form input and data state.
Modifiers
.lazy: Updates the data on thechangeevent rather than theinputevent..debounce: Adds debouncing to the input event, for example,x-model.debounce.500ms="query".
Attribute Binding
Using the x-bind directive (which can be abbreviated as :), you can bind data to an element's attributes, enabling dynamic updates of attributes.
In the code above, this is reflected as the :disabled="!receiver" on the <textare> and <button> elements.
Event Handling
Alpine.js listens to DOM events and triggers corresponding handler functions through the x-on directive (which can also be abbreviated as @).
For example:
<button @click="sendMessage()">
  Send Message
</button>
Modifiers
Alpine.js supports event modifiers for controlling event behavior:
.prevent: Callsevent.preventDefault()..stop: Callsevent.stopPropagation()..window: Listens for events on the globalwindowobject.
For example:
<button @click.prevent="sendMessage()">
  Send Message
</button>
The classic debouncing and throttling are also available.
Debounce:
<input @input.debounce.500ms="fetchResults">
Throttle:
<div @scroll.window.throttle.750ms="handleScroll">...</div>
Extensions
This project does not utilize many features of Alpine.js. I checked the official website and found that this library is quite feature-rich. Here, I will introduce a few of them.
Global State Management
This is also implemented using magic properties.
Using dark mode toggling as an example (adapted from the official example):
<button x-data @click="$store.darkMode.toggle()">Toggle Dark Mode</button>

...

<div x-data :class="$store.darkMode.on && 'bg-black'">
  ...
</div>


<script>
  document.addEventListener('alpine:init', () => {
    Alpine.store('darkMode', {
      on: false,

      toggle() {
        this.on = ! this.on
      }
    })
  })
</script>
Animations
The x-transition directive can be used to implement animations. However, the available animations are quite limited at the moment. For serious animation needs, it's better to use Tailwind CSS or write CSS directly.
<div x-data="{ open: false }">
    <button @click="open = ! open">Toggle</button>

    <div x-show="open" x-transition>
        Hello 👋
    </div>
</div>
More
While writing this, I read through the Alpine.js documentation, and there are many more features I won't list one by one—most of them are related to interactivity. For example:
- The
x-teleportdirective for implementing modals - The
x-iddirective for batch-creating elements with generated IDs - A cross-tab state plugin (based on localStorage)
- Many other plugins are used for implementing interactions (like dropdowns, collapses, sorting, etc.)
The extensions provided by Alpine.js can help us implement the components we need. However, for many features, I still prefer to combine them with component libraries (like Flowbite, which is based on Tailwind CSS) to avoid reinventing the wheel.
How to Send Voice Messages?
Extending this a bit further, the LiveChat project is not only capable of sending text but also voice messages.
Sending voice is somewhat more complex compared to text. What I have here is just a demo version and is not yet fully perfected.
Recording
Primarily uses MediaRecorder for recording. On the browser, a permission request will pop up, and recording can only start after the user grants permission.
Reference MDN documentation: https://developer.mozilla.org/en-US/docs/Web/API/MediaRecorder
Start Recording
// Start recording
startRecording() {
  navigator.mediaDevices.getUserMedia({audio: true})
    .then(stream => {
    this.audioStream = stream;
    this.mediaRecorder = new MediaRecorder(stream);

    this.mediaRecorder.ondataavailable = event => {
      this.audioChunks.push(event.data);
    };

    this.mediaRecorder.onstop = () => {
      const audioBlob = new Blob(this.audioChunks, {type: 'audio/wav'});
      const reader = new FileReader();
      reader.onloadend = () => {
        const arrayBuffer = reader.result;

        // Create AudioContext instance
        const audioContext = new (window.AudioContext || window.webkitAudioContext)();

        // Decode audio data
        audioContext.decodeAudioData(arrayBuffer)
          .then((audioBuffer) => {
          const duration = audioBuffer.duration;
          console.log(`Audio duration: ${duration} seconds`);
          this.socket.send(arrayBuffer);
          this.messages.push(new Message(
            'user', audioBuffer, 'audio', duration
          ))
          audioContext.close();
        })
          .catch((error) => {
          console.error('Error decoding audio data', error);
        })
      }
      reader.readAsArrayBuffer(audioBlob);
      this.audioChunks = [];
    };

    this.mediaRecorder.start();
    console.log("Recording started");
  })
    .catch(err => {
    console.error("Failed to get microphone permission: ", err);
  });
}
Stop Recording
// Stop recording
stopRecording() {
  if (this.mediaRecorder) {
    this.mediaRecorder.stop();
    // Stop microphone stream
    this.audioStream.getTracks().forEach(track => track.stop());
    console.log("Recording stopped");
  }
}
Play Audio
playAudio(message) {
  console.log('playAudio', message)
  if (message.type === 'audio' && message.message) {
    const audioContext = new (window.AudioContext || window.webkitAudioContext)();
    const source = audioContext.createBufferSource();
    source.buffer = message.message;
    source.connect(audioContext.destination);
    source.start(0);
  }
}
Summary
Frontend frameworks are constantly emerging, and projects are growing ever larger. Libraries like alpine.js and htmx, however, take a counterintuitive approach—offering a simple way to develop modern web applications.
Next, I plan to integrate both of these into the new version of DjangoStarter. This is truly the ideal technology for full-stack developers!
_EOF_
Back to basics! Use Alpine.js to build interactive web apps and ditch node_modules and webpack!
- 本文作者:
- 程序设计实验室
- 版权声明:
- 本博客所有文章除特别声明外,均采用 BY-NC-SA 许可协议。转载请注明出处!
相关文章
2025年底的 TailwindCSS 组件库简单横评
TailwindCSS组件库多到让人选择困难。shadcn/ui虽优雅但不够全,Origin UI倒是堆了500+组件——这年头连UI都要内卷?大而全还是小而精,选型前先想清楚自己要不要加班调样式。
2025-11-23 · Web前端 · 约 1 分钟
魔改了一下bootstrap-treeview组件,发布个NPM包体验一下
前言 之前在这篇文章 基于.NetCore开发博客项目 StarBlog - (8) 分类层级结构展示 中说到,我为了让文章分类列表支持层级结构,用了一个树形组件,不过这个组件太老了,使用的Bootstrap版本居然是3.x的,但又找不到更好的,只能硬着头皮用。 但实际效果有很多我不满意的,人家作者直接放弃了,在GitHub上标记项目为Archive状态,没辙。 感谢开源,我直接fork一份代码来
2022-05-27 · Web前端 · 约 1 分钟
配置Chrome支持网页内的frame跨域
前言 跨域限制可以保证安全,但是调试的时候关掉会更方便,然而现在网络上能找到的关闭跨域限制方法,在新版的Chrome浏览器上根本没用…… 经过一番摸索,发现用旧版的Chrome就可以绕过跨域限制,刚好我做的这个需要跨域内嵌frame的网页只是单纯展示的,所以这个正好符合我的需求,奥利给! 然后我找到了旧版的Chrome软件,解压出来是绿色版的可以直接运行,不过运行后发现直接把系统的Chrome给调
2021-12-18 · Web前端 · 约 1 分钟
Next.js路由段配置选项笔记
Next.js的路由段配置选项?真有这么简单?官方文档写得倒是分散,自己整理下倒也罢了。动态渲染还是静态?缓存策略又该怎么定?开发者还是得自己琢磨。
2025-10-30 · Web前端 · 约 1 分钟
讨论
共 0 条加载评论中…