PVE Tinkering Notes (2) Mounting the hard drive previously used in QNAP
QNAP hard drive data migration is really a hassle, with RAID, DRBD, and LVM layers nested together, making it harder to read than solving an equation. mdadm can recognize it but fails to mount, and you need to activate LVM to access files—what a pitfall! Reinstalling the system directly is the easiest solution; keeping the original setup is possible but risky. QTS's sneaky design is enough to make you want to smash the machine.
目录21 个章节
Foreword
In the previous article, we completed the installation of the PVE system.
The next step is to read the data from the hard drives previously used by QNAP within PVE.
Remove RAID Labels (Optional)
I did not enable QNAP's RAID functionality and instead used each hard drive individually.
In this case, I refer to it as: "Pseudo RAID"
Nevertheless, QNAP still added each drive to a separate RAID array.
Since I need to install the system on a hard drive (in this example, an SSD), I had to create a partition to back up the original files and restore them after the system installation.
However, partitions with the "Linux RAID member" label cannot be resized; the RAID label must be removed first.
Prerequisite: Ensure that the partition can be directly mounted and that you can see the files inside, with the file system intact.
A Live system must be used. I recommend the LinuxMint Live system, as it comes with many useful tools.
sudo mdadm --zero-superblock /dev/nvme1n1p1
However, this step revealed quite a few pitfalls, so it might be better to just format the entire drive and reinstall the system.
Mounting QNAP Drives Before Installation
This QTS is quite clever—it formats the drives in a QNAP-specific way, making them a bit inconvenient to use directly on other machines.
Even though I never used QNAP’s RAID setup, both drives were still marked with RAID labels by the system…
I have to give Fedora credit here—its support for mdadm and LVM is quite good. After installation, everything worked out of the box, no extra steps needed, which was very smooth. Debian, on the other hand, isn’t that straightforward.
Initially, I asked an AI assistant for guidance on the steps, and it gave me a bunch of complicated commands like hexdump -C /dev/sda3 | grep '53 ef' -m 1 and offset mount—none of which actually worked.
Later, by following Fedora’s approach—treating each standalone drive as part of a RAID array—I was able to solve the problem.
First Attempt
First, I used the following command to try to get the RAID running
# 1) Install mdadm (if not already installed)
apt update && apt install -y mdadm
# 2) Examine the superblock to confirm it is indeed an isolated single disk
mdadm --examine /dev/sda3 | less
mdadm --examine /dev/sdb3 | less
# 3) Assemble and Mount the Temporary Array in Read-Only Mode
mdadm --assemble --run --readonly --scan
lsblk -f            # You should now see /dev/md0, /dev/md1, etc.
mkdir -p /mnt/hdd_ro
mount -o ro /dev/md0 /mnt/hdd_ro   # Choose any md device
ls /mnt/hdd_ro                    # Browse to ensure files are present
umount /mnt/hdd_ro
The attempt failed.
Below is the output of the mdadm --examine command:
root@pve:~# mdadm --examine /dev/sda3
/dev/sda3:
          Magic : a92b4efc
        Version : 1.0
    Feature Map : 0x0
     Array UUID : 82110a99:bed38360:83a46ad3:07cf1ed5
           Name : 3
  Creation Time : Wed Oct  5 20:52:11 2022
     Raid Level : raid1
   Raid Devices : 1

 Avail Dev Size : 7794127240 sectors (3.63 TiB 3.99 TB)
     Array Size : 3897063616 KiB (3.63 TiB 3.99 TB)
  Used Dev Size : 7794127232 sectors (3.63 TiB 3.99 TB)
   Super Offset : 7794127504 sectors
   Unused Space : before=0 sectors, after=272 sectors
          State : clean
    Device UUID : 39fc7080:89b1f8e2:b1e87049:e0be897b

    Update Time : Thu Jun  5 00:26:17 2025
       Checksum : b0d6c53d - correct
         Events : 38


   Device Role : Active device 0
   Array State : A ('A' == active, '.' == missing, 'R' == replacing)

root@pve:~# mdadm --examine /dev/sdb3
/dev/sdb3:
          Magic : a92b4efc
        Version : 1.0
    Feature Map : 0x0
     Array UUID : 384872c5:5115e767:8a1b1743:21a92774
           Name : 2
  Creation Time : Wed Oct  5 20:51:31 2022
     Raid Level : raid1
   Raid Devices : 1

 Avail Dev Size : 7794127240 sectors (3.63 TiB 3.99 TB)
     Array Size : 3897063616 KiB (3.63 TiB 3.99 TB)
  Used Dev Size : 7794127232 sectors (3.63 TiB 3.99 TB)
   Super Offset : 7794127504 sectors
   Unused Space : before=0 sectors, after=272 sectors
          State : clean
    Device UUID : b9812252:6926d965:a4742fdd:002a808b

    Update Time : Thu Jun  5 00:26:17 2025
       Checksum : eb9e7ff0 - correct
         Events : 38


   Device Role : Active device 0
   Array State : A ('A' == active, '.' == missing, 'R' == replacing)
Afterward, I executed the mdadm --assemble --run --readonly --scan command, which completed normally with no errors.
Next is the output of the lsblk -f command, which shows that the RAID levels for the original two hard drives (Data1 and Data2) are correctly identified.
root@pve:~# lsblk -f
NAME               FSTYPE      FSVER    LABEL          UUID                                   FSAVAIL FSUSE% MOUNTPOINTS
sda
├─sda1             linux_raid_ 1.0      9              8150abf9-12a5-e494-3788-e27afd1724d6
│ └─md9
├─sda2             linux_raid_ 1.0      256            e9614eab-cd95-5094-e256-6e821fece908
│ └─md256          swap        1
├─sda3             linux_raid_ 1.0      3              82110a99-bed3-8360-83a4-6ad307cf1ed5
│ └─md3            drbd        v08                     7e1eee85c60383a8
│   ├─vg290-lv546
│   └─vg290-lv3    ext4        1.0      Data1           fea46d46-360a-43ab-b08d-3b6611d5febb
├─sda4             linux_raid_ 1.0      13             9683911f-8ce2-1590-d4ef-ad48834a11d6
│ └─md13
└─sda5             linux_raid_ 1.0      322            69c648ec-bff1-f508-2a33-68e853686173
  └─md322          swap        1
sdb
├─sdb1             linux_raid_ 1.0      9              8150abf9-12a5-e494-3788-e27afd1724d6
│ └─md9
├─sdb2             linux_raid_ 1.0      256            e9614eab-cd95-5094-e256-6e821fece908
│ └─md256          swap        1
├─sdb3             linux_raid_ 1.0      2              384872c5-5115-e767-8a1b-174321a92774
│ └─md2            drbd        v08                     1701cfea3a83aeca
│   ├─vg289-lv545
│   └─vg289-lv2    ext4        1.0      Data2            41416d24-8e6c-410b-a352-99a7906d01b2
├─sdb4             linux_raid_ 1.0      13             9683911f-8ce2-1590-d4ef-ad48834a11d6
│ └─md13
└─sdb5             linux_raid_ 1.0      322            69c648ec-bff1-f508-2a33-68e853686173
  └─md322          swap        1
mmcblk0
├─mmcblk0p1        vfat        FAT16                   94A6-6032
├─mmcblk0p2        ext2        1.0      QTS_BOOT_PART2 cb599a87-2d25-4bbf-b539-2a63d15fe65b
├─mmcblk0p3        ext2        1.0      QTS_BOOT_PART3 446fd8ae-09c9-461e-acf8-64c0ea7d5d59
├─mmcblk0p5        ext2        1.0                     1675f897-f7d6-4770-adf1-52b4029caa6b
├─mmcblk0p6        ext2        1.0                     c3670c22-10b5-4432-8e2e-538946b979b2
└─mmcblk0p7        ext2        1.0                     e281a9c0-35f1-4238-bed9-19517c854d5a
mmcblk0boot0
mmcblk0boot1
nvme0n1
├─nvme0n1p1        vfat        FAT32                   9232-1821
├─nvme0n1p2        ext4        1.0                     17a25403-2cb7-45e5-8964-4c875c523f0f
└─nvme0n1p3        btrfs                fedora         d54dac0a-639d-452a-8a81-30ac674d5503
nvme1n1
├─nvme1n1p1
├─nvme1n1p2        vfat        FAT32                   DEF4-57C4                              1010.3M     1% /boot/efi
└─nvme1n1p3        LVM2_member LVM2 001                SRQLSp-m0jk-epeM-a0zD-OVMa-hkRH-YO2cSG
  ├─pve-swap       swap        1                       dbef4bdc-0425-454b-a60e-876d03a5965d                  [SWAP]
  ├─pve-root       ext4        1.0                     6c380545-526f-4214-a261-8413efe88ec6     85.5G     4% /
  ├─pve-data_tmeta
  │ └─pve-data
  └─pve-data_tdata
    └─pve-data
However, when I attempted to mount md3, an error occurred:
root@pve:~# mount -o ro /dev/md3 /mnt/hdd_ro
mount: /mnt/hdd_ro: unknown filesystem type 'drbd'.
       dmesg(1) may have more information after failed mount system call.
mount: (hint) your fstab has been modified, but systemd still uses
       the old version; use 'systemctl daemon-reload' to reload.
Second Attempt
Analysis: /dev/md3 and /dev/md2 externally appear to be mdadm "single-disk arrays," but internally QNAP adds another layer of DRBD (used for its own snapshots/replication), then places LVM on top of DRBD, and finally ext4.
mdX ──▶ drbdX ──▶ VG29x ──▶ LV (ext4)
So directly mounting /dev/md3 results in the error "unknown filesystem type 'drbd'".
At this point, first mount the data in read-only mode.
mount -o ro /dev/md3 /tmp/md3
0. Ensure Tools Are Complete
apt install -y lvm2 drbd-utils # drbd-utils is optional but recommended for safety
1. Activate Volumes in LVM (DRBD has automatically become primary; lsblk can see the lv)
vgscan vgchange -ay # Activate vg289 / vg290
# 2. Create Mount Points
mkdir -p /mnt/qnap_data1   # ext4 in sda3 (label=Data1)
mkdir -p /mnt/qnap_data2   # ext4 in sdb3 (label=Data2)
# 3. Read-Only Mount
mount -o ro /dev/vg290/lv3 /mnt/qnap_data1
mount -o ro /dev/vg289/lv2 /mnt/qnap_data2
# 4. Verification
ls /mnt/qnap_data1 | head
ls /mnt/qnap_data2  | head
After activating the LVM volumes this time, they were finally mounted successfully, and I can see the files inside now. Awesome~
What to Do Next
Now that the data reading issue is resolved, what should you do with the hard drives from the previous QNAP? There are several options moving forward:
| Option | Action | Applicable Scenario |
|---|---|---|
| Leave as is | Continue using md+DRBD+LVM | Easiest option, 100% non-destructive to data |
| Remove DRBD only | drbdadm down → lvconvert --config to remove metadata (or simply copy to a new drive) | When you don't need distributed replication and just want to remove one layer |
| Completely redo | Full backup → mdadm --zero-superblock → Repartition with ext4/ZFS | When you want to use the two drives as regular drives or with ZFS |
Removing DRBD only is a bit cumbersome, while completely redoing it is straightforward—back up data to a new drive, then reformat the original one.
Therefore, I will only introduce the option of leaving as is (md+DRBD+LVM) here.
By the way, the approach I personally chose was to back up the data to a new drive and redo the old one... After all, it's a NAS, and stability comes first.
Continuing to Use the Original Hard Drive
Risks
If you leave it untouched, once you start using it, it is subsequently not recommended to continue using this drive back in QNAP's QTS system. The reason is that QNAP creates hidden snapshot volumes (thin snapshots) within LVM. If you write directly to the original volume in Proxmox VE (PVE), the dependency relationship between the snapshot and the main volume is broken—when QNAP retrieves this drive, it may be unable to roll back or delete the snapshot.
When the drive is later inserted back into the QNAP NAS, the system may report errors or prompt that the "snapshot is corrupted." In severe cases, the volume may fail to mount.
Additionally, regarding QNAP's dual-unit synchronization / remote replication (DRBD synchronization) function, this is reflected in the drbd metadata seen earlier. It represents disk 0 of cluster A, last synchronized to a certain version number. If another NAS still holds a "replica disk," after writing in PVE, the data between the two NAS units diverges. This will cause the remote node to be unable to synchronize again, and a forced resynchronization will overwrite the data you just wrote.
Safe Steps
If you have disregarded the risks, you can follow these steps to ensure data safety.
-
Unmount the Read-Only Mounts
umount /mnt/qnap_data umount /mnt/qnap_pan -
Filesystem Consistency Check (Highly Recommended)
e2fsck -f /dev/vg290/lv3   # Data1 卷 (Data1 Volume)
e2fsck -f /dev/vg289/lv2   # Data2 卷 (Data2 Volume)
This step will repair the ext4 journal if necessary, ensuring safe read/write operations afterward.
-
Normal Mount as Read-Write
mount /dev/vg290/lv3 /mnt/qnap_data1 mount /dev/vg289/lv2 /mnt/qnap_data2 -
Confirm Write Access
touch /mnt/qnap_data1/__test && rm /mnt/qnap_data1/__test -
Persist in /etc/fstab (Example)
UUID=fea46d46-360a-43ab-b08d-3b6611d5febb /mnt/qnap_data1 ext4 defaults,noatime 0 2
UUID=41416d24-8e6c-410b-a352-99a7906d01b2 /mnt/qnap_data2 ext4 defaults,noatime 0 2
Then execute
systemctl daemon-reload
mount -a
Filesystem Consistency Check
Before using the original hard drive, there was a step for filesystem consistency check using the e2fsck command.
When I used this command, it found some errors, which I've recorded and analyzed here:
There are mainly a few types of errors:
Pass 1: Checking inodes, blocks, and sizes Inode 36831239 has INDEX_FL flag set on filesystem without htree support. Clear HTree index<y>?Pass 2: Checking directory structure Problem in HTREE directory inode 36831239: block #1 has bad max hash Problem in HTREE directory inode 36831239: block #2 has bad min hash Invalid HTREE directory inode 36831239 (/Data/Music/M-hM-^KM-1M-fM-^VM-^G). Clear HTree index<y>?
Translating the Errors into Plain Language
| Error | Meaning | Impact |
|---|---|---|
Inode … has INDEX_FL flag set on filesystem **without htree support** | The directory entry has the "directory indexing enabled" flag set, but the entire filesystem super-block does not declare the dir_index feature. | This is only a metadata inconsistency; clear the flag or enable dir_index on the filesystem to fix it. |
Problem in HTREE directory inode …: bad max/min hash<br/>Invalid HTREE directory inode … Clear HTree index? | The HTree index block of the directory (a B-Tree used to accelerate traversal of large directories) is corrupted and failed verification. | The directory index will be deleted and rebuilt by fsck, but the actual files will not be damaged. |
This is a typical case of "mild corruption in directory indexing" and not damage to file content. e2fsck will only delete/rebuild the index, not delete the actual files.
Possible Causes for the Errors
- When QNAP formatted ext4 in early versions,
dir_indexwas not enabled by default, but later it set index flags on directories → leading to inconsistency. - Long-term power loss or unsafe shutdowns can also cause the checksum of directory index blocks to become misaligned.
- This is unrelated to the number of layers (LVM / DRBD / RAID)—these errors occur at the topmost layer of ext4, and fsck repair only modifies ext4 metadata.
Fix
The safest approach is to take a snapshot first, then run fsck.
# 1) Create a copy-on-write snapshot for the logical volume, 10 GiB is sufficient to handle metadata rollback
lvcreate -s -L 10G -n lv3_snap /dev/vg290/lv3
# 2) Perform Automatic Repair on the Original Volume (with -y Auto-Confirm Throughout)
e2fsck -fy -C0 /dev/vg290/lv3
# 3) If everything is fine, delete the snapshot
lvremove /dev/vg290/lv3_snap
If something major really does go wrong during the fsck (very low probability), lvconvert --merge /dev/vg290/lv3_snap can roll back the volume to the point in time of the snapshot.
After the repair, check again whether dir_index is enabled
tune2fs -l /dev/vg290/lv3 | grep 'Filesystem features'
If you see dir_index ⇒ it means fsck has automatically enabled it and rebuilt the index. Everything is OK.
If dir_index is not present, you can manually enable it and run fsck -D again:
tune2fs -O dir_index /dev/vg290/lv3
e2fsck -fD /dev/vg290/lv3
Additional Safety Measures
SMART Full Disk Self-Test
smartctl -t long /dev/sda
After completion, use smartctl -a to view the results.
Regular Offline Backups
RAID/LVM/DRBD only provide availability, not backups.
It is recommended to use vzdump or rsync to push important files to another machine or cloud.
Adding to PVE Storage Pool
Web UI → Datacenter > Storage > Add > Directory, select the path /mnt/qnap_data1 or /mnt/qnap_data2, and check the usage options according to your needs. As shown below:
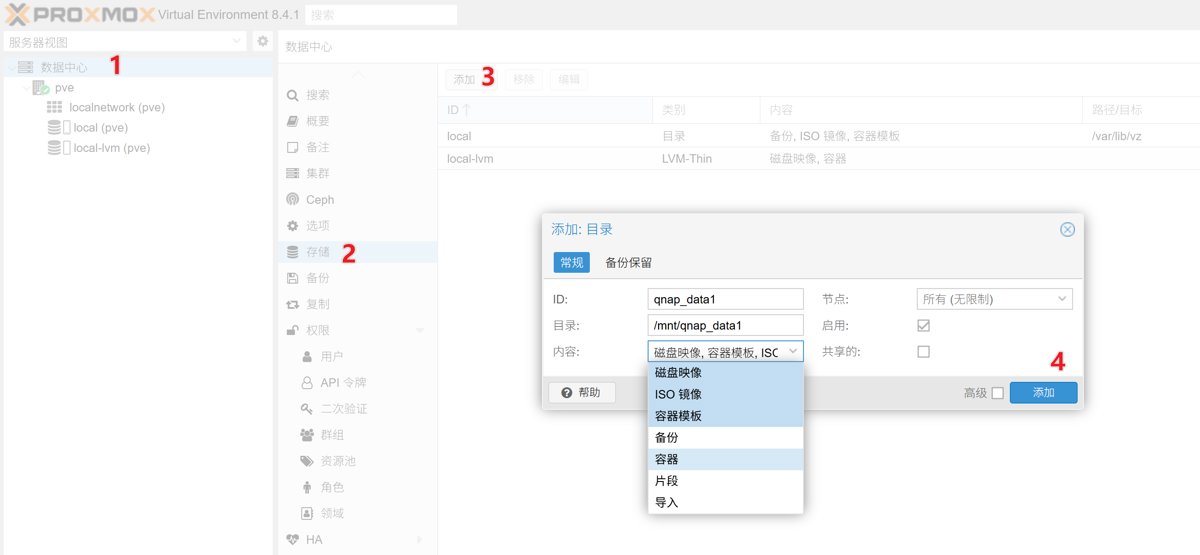
Limitations of Read-Only Mount Directories
The documentation told me: in Proxmox VE (PVE), it is theoretically possible to add a read-only directory as a storage pool.
However, when I actually tried it, I still encountered an error:
create storage failed: mkdir /storage/data/template: Read-only file system at /usr/share/perl5/PVE/Storage/Plugin.pm line 1543. (500)
Never mind, I’ll recreate the storage pool after the backup is complete~
At that time, I might also need to look into things like LVM.
Summary
Looking at it this way, the technology used by pre-built NAS like Synology and QNAP seems quite outdated.
All that layer upon layer of complexity, and in the end, the result isn't as good as ZFS and BTRFS.
The final conclusion is that if you want to continue using the drives previously used in QTS, it's best to reformat them as ZFS or BTRFS for better management.
_EOF_
PVE Tinkering Notes (2) Mounting the hard drive previously used in QNAP
- 本文作者:
- 程序设计实验室
- 版权声明:
- 本博客所有文章除特别声明外,均采用 BY-NC-SA 许可协议。转载请注明出处!
相关文章
为什么我给虚拟机分了 32G 硬盘,Ubuntu 却只识别 16G?
32G硬盘在PVE里明明分配好了,到Ubuntu就变15G,LVM这鬼东西把空间藏哪儿去了?根目录就分了一半?这算哪门子逻辑,简直离谱。扩容三步走倒是简单,但谁特喵会用到这种坑爹设计。
2025-10-10 · 个人数据保全计划 · 约 1 分钟
个人数据保全计划:(1)NAS开箱
前言 从几年前第一个硬盘故障导致参赛的文件丢失之后,我就开始意识到数据安全的重要性,开始用各种云盘做备份,当时还不是百度云一家独大,我们也都没意识到网盘备份是极其不靠谱的行为,直到因为某些不可抗力因素,一夜之间所有网盘都宣布停服,这时才意识到,数据始终是掌握在自己手中才安全可控。 随着数据量增大,我又购入一个2T硬盘,但因为不懂 + 被无良奸商坑了,买到手发现是叠瓦盘,用了一年多就频繁卡顿和丢数据
2022-11-13 · 个人数据保全计划 · 约 1 分钟
个人数据保全计划:安装Jellyfin
选择镜像:nyanmisaka/jellyfin Jellyfin中国特供版+Docker镜像,含驱动,免折腾开箱即用:https://post.smzdm.com/p/a3gw6g47/ 使用 docker-compose 部署 cd /share/Container/docker-apps/jellyfin mkdir cache config docker命令 docker run -d -
2022-11-04 · 个人数据保全计划 · 约 1 分钟
PVE折腾笔记 (1) 告别卡顿的QTS,在威联通TS464c上安装PVE系统
QNAP 的 QTS 系统真是垃圾中的垃圾,臃肿不堪还拖慢速度。换个 PVE 系统立马飞起,纯净高效,性能和自由度直接拉满。折腾安装过程虽然繁琐,但结果绝对物超所值,NAS 升级服务器只需一步。
2025-06-15 · 个人数据保全计划 · 约 1 分钟
讨论
共 0 条加载评论中…