NextJs with Tailwind: Getting Started Development Notes
Next.js? It's just a scaffolding tool for React, out of the box, say goodbye to mental strain. Tailwind? Just a replacement for Bootstrap, that's all. In actual development, pnpm can be a real headache. localStorage issues? A piece of cake.
目录51 个章节
Preface
It's been quite a while since my last update. As I mentioned in my article "StarBlog Blog: End-of-Year 2023 Update Overview," I planned to rebuild the blog's frontend using Next.js. Recently, I've indeed used Next.js for two small projects: a single sign-on project and the new homepage for the site. Both are still in development. This article documents some of the problems and thoughts I've encountered while working with Next.js.
Oh, and about tailwind mentioned in the title—I started using it last year while developing AIHub because it often appears in combination with Next.js. So, I'll cover it in this article as well.
PS: This article is quite lengthy, so I've separated the part about encapsulating network requests and published it as an independent article;
My learning and development with Next.js have just begun, and there's still much more to explore and document. This article might become a new series?
About Next.js
Here is the official introduction:
Next.js is a React framework for building full-stack web applications. You use React Components to build user interfaces, and Next.js for additional features and optimizations.
Under the hood, Next.js also abstracts and automatically configures tooling needed for React, like bundling, compiling, and more. This allows you to focus on building your application instead of spending time with configuration.
Whether you're an individual developer or part of a larger team, Next.js can help you build interactive, dynamic, and fast React applications.
Here are my thoughts:
Next.js is a React-based SSR (Server-Side Rendering) solution. Nowadays, many frontend websites are essentially SPAs (Single Page Applications) — they only have one index.html file with a large JavaScript bundle to handle page rendering and interaction. This works fine for smaller sites, but the larger the website, the slower it gets. So it seems like the wheel of technology has turned back again. Backend rendering, which was once disdained by the "frontend-backend separation" crowd, has made a comeback. React has Next.js, and Vue next door has Nuxt.js. What they do is use Node.js as the backend to render pages.
However, Next.js isn't just that simple and straightforward. Besides server-side rendering, it can also generate web pages like static site generators such as Hugo or Hexo. The difference is that Hugo generates pages based on Markdown, while Next.js renders JSX into HTML pages. This way, you don't need to rely on a Node.js backend and can deploy it as a regular static webpage anywhere.
Of course, interactivity isn't an issue. Next.js components come in two types: the server-side rendered or statically generated ones mentioned earlier are Server Components, which handle classic React operations like clicking a button to increment a number. The other type is Client Components, which are just like regular React applications and can use hooks to manipulate the DOM.
For me, Next.js holds even greater significance as a useful React scaffolding tool. The React ecosystem has always felt a bit fragmented to me. The original CRA (Create React App) was quite bare-bones and lacked many features. If you're building a website from scratch, using CRA requires more tweaking compared to Vue CLI.
Next.js perfectly solves this problem. It comes with routing and other essential features right out of the box. Plus, the directory structure is clearly defined—just follow its conventions and you're good to go. No more agonizing over things like ComponentA/index.tsx versus Components/A.tsx. Say goodbye to mental fatigue! 😃
About Tailwind
Official introduction
A utility-first CSS framework packed with classes like
flex,pt-4,text-centerandrotate-90that can be composed to build any design, directly in your markup.
Tailwind CSS works by scanning all of your HTML files, JavaScript components, and any other templates for class names, generating the corresponding styles, and then writing them to a static CSS file.
It's fast, flexible, and reliable, with zero runtime.
For me, it's a good alternative to Bootstrap. I can make full use of the grid layout, various margin and padding that I was familiar with in Bootstrap, and the ecosystem is rich, with a bunch of design schemes to draw inspiration from (copy) 😃
Component Libraries
Tailwind CSS only replaces CSS. Although it can also be used to create beautiful components, it's unlikely for a front-end beginner like me. Moreover, building every component from scratch would be too slow. That's why using component libraries is definitely necessary.
In these projects, I used the following component libraries:
- Ant Design - A well-known domestic React component library, with a GitHub star count comparable to MUI below.
- Material UI - A well-known React component library.
- NextUI - Based on Tailwind, designed specifically for Next.js.
- Daisy - A general component library based on Tailwind.
Icon Library
Originally considered using FontAwesome directly but found it a bit cumbersome. Initially, I focused on importing various icons manually and created some wrappers for them. Later on, I started using React Icons, which opened up a whole new world~
Encapsulating SVG by Yourself
Often, the icons in icon libraries cannot fully meet development requirements. You need to design or collect icons yourself (e.g., from websites like iconfont). In this case, directly using SVG is common, and to unify management, a simple encapsulation was made.
In the src\components\icons.tsx file:
export const Icons = {
  edit: (props: any) => <svg>...</svg>,
  delete: (props: any) => <svg>...</svg>,
}
When using:
import {Icons} from "@/components/icons";

<Icons.edit/>
This approach simplifies the code and makes it easier to manage icons uniformly. It also facilitates switching to a better icon library in the future.
Using Icon Libraries
It's recommended to use react-icons, which includes a vast collection of popular icon libraries like Ant Design Icons, Font Awesome, and more.
Official Website: https://react-icons.github.io/react-icons/
Include popular icons in your React projects easily with react-icons, which utilizes ES6 imports that allows you to include only the icons that your project is using.
Simply install it with yarn add react-icons.
Select the desired icon on the website, copy, and import it. Here's an example using the Alipay icon:
import { AiFillAlipayCircle } from "react-icons/ai";

<AiFillAlipayCircle />
Simple and straightforward.
Reference: https://daily-dev-tips.com/posts/how-to-use-react-icons-in-nextjs/
Getting Started!
Although Next.js is a framework that works out of the box, for a front-end novice like me, getting started still involved quite a few stumbling blocks.
This time I worked on two projects, both using Tailwind CSS:
- Single Sign-On (SSO) - paired with the Ant Design / MUI component libraries
- Personal Website Homepage - paired with the NextUI component library (supplemented by Tailwind-based libraries like DaisyUI)
For the first project, the Single Sign-On system, due to my previous path dependency and the presence of some forms, I opted for Ant Design, which is well-suited for the Chinese development ecosystem, and used MUI as a supplement.
For the second project, the personal website, I was more free to experiment. This is when I used NextUI, a component library I discovered earlier that is fully buffed with Next.js + Tailwind CSS. This library is truly beautiful, even more exquisite in dark mode. I even directly used one of its project templates and found it quite practical, although it had a few minor issues which I fixed later 😂
Single Sign-On Authentication
Originally, I planned to use IdentityServer4 for this. While learning about OAuth 2.0 and reviewing IdentityServer4's code and documentation, I found it a bit heavy, which inspired me to build my own solution. It's mostly finished now and has been deployed for use—the backend is developed in C#.

Personal Website
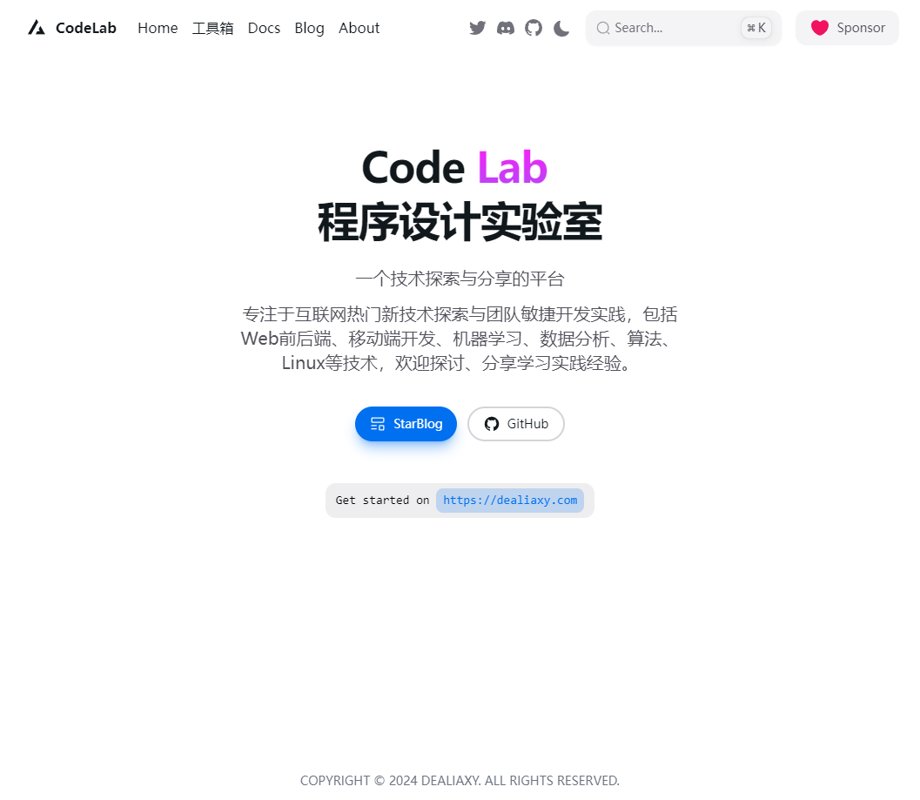
Although I already have a blog, I still want to create a website to serve as a central hub, where I can showcase some projects and such, while the blog remains dedicated to writing articles.
Originally, I used VuePress to build it, but later found its styling options too limited, so I decided to write it from scratch.
For now, it’s still quite basic, with only a few simple pages set up.
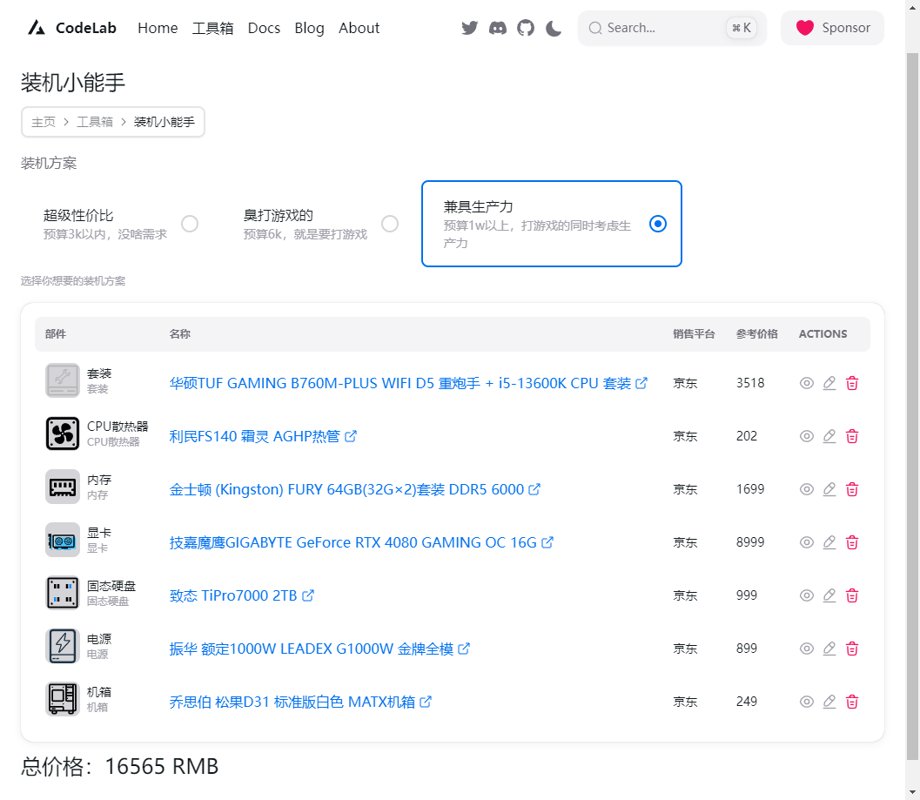
For the “Tools” section, based on recent needs, I’ve included a few PC build configurations (装机方案) I designed on the website.
I’ve also added a codec implementation I previously built in Python.

This project is still actively under development, and I’ll continue adding more content in the future.
About pnpm and yarn
This was my first time using pnpm, and I was quite impressed—it's a real technical marvel and takes up very little space.
However, when it came time to build with Next.js later on, all sorts of problems started popping up. Maybe it's because the Windows file system has limited support for symbolic links? In any case, a bunch of messy issues appeared—permission exceptions and whatnot. In the end, I switched back to yarn, and everything went back to normal.
PS: I won't be touching pnpm again in the future... 😭
NextUI's Navigation Menu Does Not Automatically Close After Click
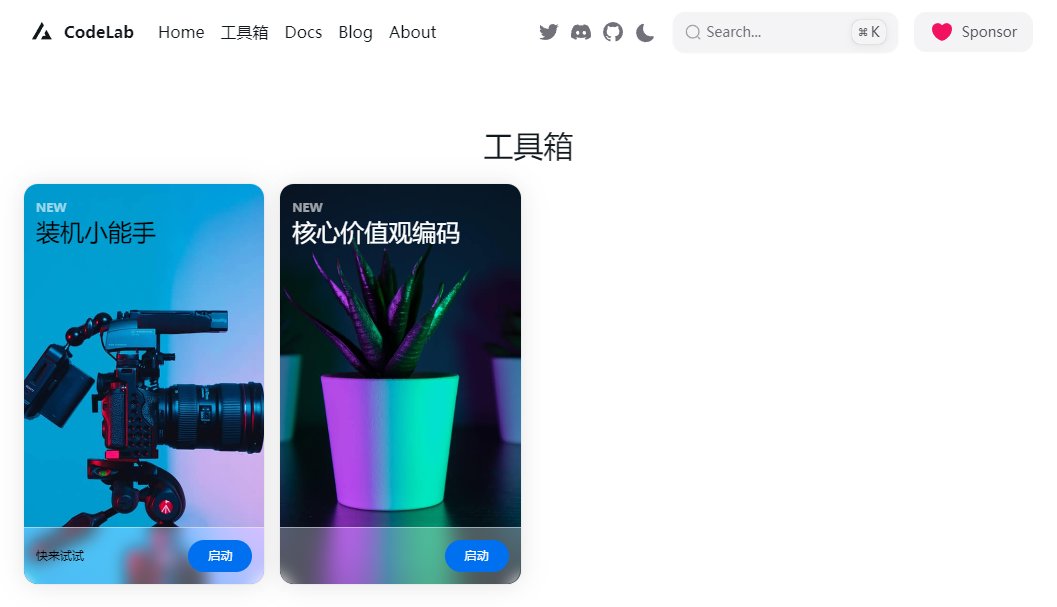
Unlike Bootstrap, where you only need to write the navigation bar once to adapt to multiple devices, Tailwind-based component libraries seem to follow this approach: write one menu for large screens and another for small screens. The navigation menu referred to here is NextUI's small-screen navigation menu.
The top section shown in the image below is called the navigation bar, corresponding to the NextUINavbar component:
The following image shows what is referred to as the navigation menu:
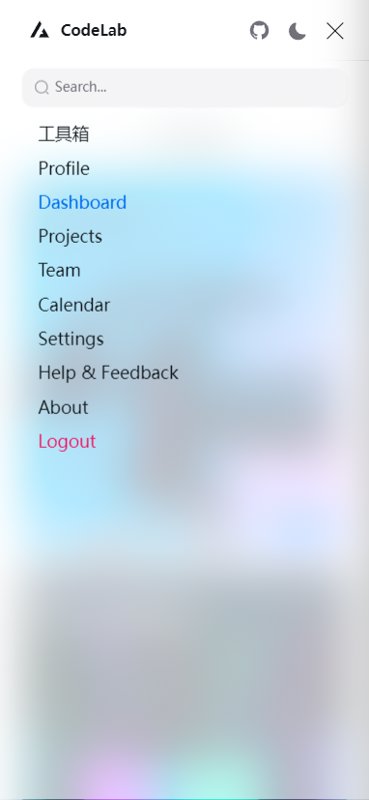
The issue is that when in a small-screen state, clicking on a menu link allows the page to navigate, but the menu does not automatically close.
This can be considered a minor pitfall in NextUI's documentation and templates. However, for those proficient in using Stack Overflow and GitHub issues, it's a piece of cake. The solution provided by the community is also straightforward.
Set the isMenuOpen and onMenuOpenChange properties in the NextUINavbar component, and execute the setIsMenuOpen() method after a menu click.
const [isMenuOpen, setIsMenuOpen] = React.useReducer((current) => !current, false)

<NextUINavbar isMenuOpen={isMenuOpen} onMenuOpenChange={setIsMenuOpen}>
  // ...
  <NavbarMenu>
    <NavbarMenuItem key={`${item}-${index}`}>
      <Link
        href={item.href}
        onPress={() => setIsMenuOpen()} >
        {item.label}
      </Link>
    </NavbarMenuItem>
	</NavbarMenu>
</NextUINavbar>
For details, see: https://stackoverflow.com/questions/76859164/next-ui-navbar-menu-wont-close-after-selecting-an-item
Issues with Using localStorage
I copied over the Auth utility class I had previously encapsulated into a Next.js project and got an error:
localStorage is not defined
https://developer.school/snippets/react/localstorage-is-not-defined-nextjs
The reason is that Next.js performs server-side rendering first, so you have to wait until the webpage is loaded into the browser to use browser APIs.
Let's make a modification.
Originally, storage was a static field.
export default abstract class Auth {
  private static storage = localStorage
}
Change it to a property.
/**
 * Authentication and authorization utility class
 */
export default abstract class Auth {
    static get storage(): Storage | null {
        if (typeof window !== 'undefined') {
            return window.localStorage
        }
        return null
    }

    /**
 * Check if the user is logged in
 * @return boolean
 */
    public static isLogin() {
        let token = this.storage?.getItem('token')
        let userName = this.storage?.getItem('user')

        if (!token || token.length === 0) return false
        if (!userName || userName.length === 0) return false
        return !this.isExpired();
    }
}
https://www.typescriptlang.org/docs/handbook/2/classes.html#getters--setters
App Router
Next.js offers two routing patterns: one is the App Router, and the other is the Pages Router.
I am using the App Router. Next.js automatically generates routes based on the page hierarchy, which feels very convenient and intuitive, as shown in the following image from the official documentation.
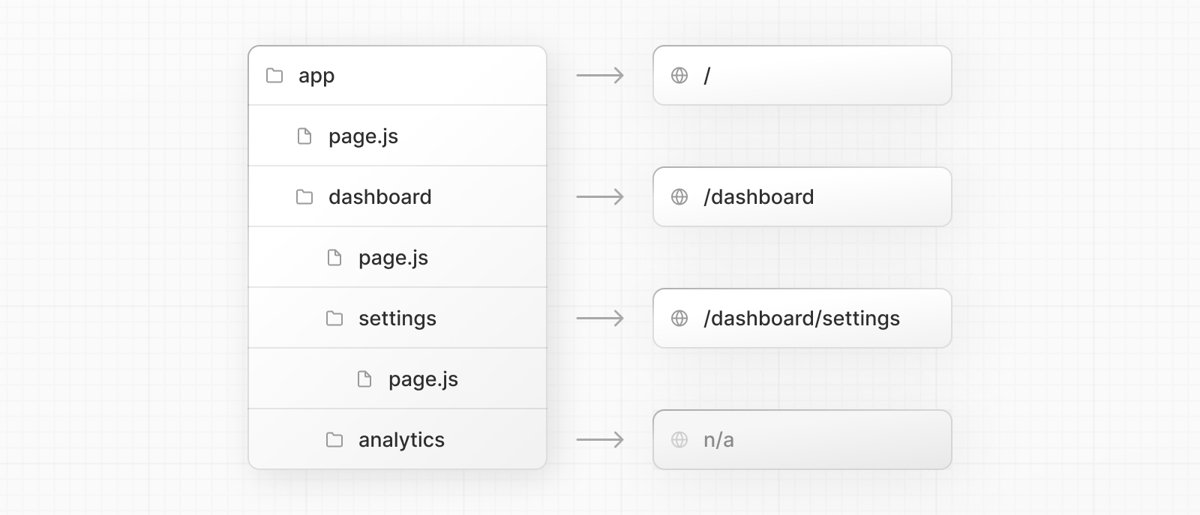
Within a folder, there can be a page.tsx to serve as a page or a router.ts to act as an API for handling requests. While this might sound a bit strange at first, it makes sense when you consider that Next.js is also a backend framework~ 😃
URL Parameters
It's very convenient to add parameters in page routing, which feels very familiar to those with backend experience in RESTful design.
For example, to implement a blog article list and article detail page, the routing can be designed as follows:
/article/- Article list/article/12345- Article detail, where12345is the article's id
As mentioned above, to create the article list, you simply need to create an article/page.tsx file;
For the article detail, create a [id] folder under article, then place the page in article/[id]/page.tsx.
The first time I saw this documentation, I thought it was brilliant. Is that it? This easy? The parameter name is enclosed in brackets and used as the folder name.
Then, in the article detail page, you can get the article id like this:
export default function Page({ params }: { params: { id: string } }) {
}
It's truly... minimalist.
Creating API Endpoints Using Router Handlers
Using the single sign-on project as an example
I've created an API endpoint in login/route.ts to handle login information. The following code is abbreviated primarily to demonstrate what creating an API endpoint looks like in Next.js.
import {redirect} from 'next/navigation'
import SessionService from "@/services/session";

export const dynamic = 'force-dynamic' // defaults to auto
export async function GET(request: Request) {
  const {searchParams} = new URL(request.url);
  const sessionId = searchParams.get('session_id')

  if (!sessionId) {
    return Response.json({
      'statusCode': 400,
      'message': `session_id cant be null`
    })
  }

  const resp = await SessionService.getSession(sessionId, securityKey)
  const session = resp.data

  redirect(
    `/login/by-sms` +
    `?sessionId=${session.sessionId}`
  )
}
In this file, you can write different methods corresponding to different HTTP request types. Here, I'm using GET.
After retrieving the ID, I use my encapsulated SessionService to get the data. This could be obtained from another API or directly from the database using an ORM like Prisma.
Finally, it redirects to another page, similar to a regular backend. However, if you use router handlers, you cannot export a static site; you must deploy using Node.js.
Router Handler: Extracting Query Parameters from URLs
Create a built-in JS URL object, where the searchParams property contains the request parameters from the URL.
export async function GET(request: Request) {
    const {searchParams} = new URL(request.url);
    const sessionId = searchParams.get('session_id')
    const securityKey = searchParams.get('security_key')
}
Route Segment Config
Configuration in the route.ts file, for details see the documentation: https://nextjs.org/docs/app/api-reference/file-conventions/route-segment-config
export const dynamic = 'auto'
export const dynamicParams = true
export const revalidate = false
export const fetchCache = 'auto'
export const runtime = 'nodejs'
export const preferredRegion = 'auto'
Detecting IE Browser
Tailwind apparently doesn't support Internet Explorer (IE). Anyway, when I'm building websites nowadays, I don't even consider IE compatibility anymore.
Server-Side Rendering Version
export default function IndexPage({ isIE }) {
  return <div>Hello {isIE ? "IE" : "Modern Browsers"}!</div>;
}

export async function getServerSideProps({ req }) {
  return {
    props: {
      isIE: /MSIE|Trident/.test(req.headers["user-agent"])
    }
  };
}
Client-Side Version
import { useEffect, useState } from "react";

export default function IndexPage() {
  const [isIE, setIsIE] = useState(false);

  useEffect(() => {
    setIsIE(/MSIE|Trident/.test(window.navigator.userAgent));
    return () => {};
  }, []);

  return <div>Hello {isIE ? "IE" : "Modern Browsers"}!</div>;
}
However, in practice, there seem to be a few minor pitfalls, but whatever—both people and code work as long as they can run.
Reference: https://stackoverflow.com/questions/68266035/how-to-detect-internet-explorer-on-next-js-ssr
Miscellaneous
'Component' cannot be used as a JSX component.
The error message looks something like this:
'Component' cannot be used as a JSX component. Its element type 'ReactElement | Component<{}, any, any>' is not a valid JSX element
This issue has been bothering me for a long time. After searching, I found it is a compatibility issue between the latest versions of React and TypeScript.
You need to add the following configuration to your .tsconfig file:
"paths": {
  "react": [ "./node_modules/@types/react" ]
}
Other
- JSON to TypeScript - https://transform.tools/json-to-typescript
Error: getaddrinfo EAI_AGAIN- For some inexplicable reason, restarting the container resolved it - https://stackoverflow.com/questions/40182121/whats-the-cause-of-the-error-getaddrinfo-eai-again
Build & Deployment
Next.js has two deployment methods. For the single sign-on project, I used the standalone mode, which requires running with a Node.js backend; for the personal website, I used export to generate a static site.
build
When using pnpm, running next build frequently encounters errors
Failed to copy traced files for path-to-project\.next\server\pages\_app.js
[Error: EPERM: operation not permitted]
https://github.com/vercel/next.js/issues/50803
You need to run with administrator privileges
scoop install gsudo
sudo next build
Done
PS:
- Although this solves the problem, other issues may arise later. I recommend using yarn instead for less hassle.
- From experience, it's best to stop the dev server before running
next build.
Static Export Deployment
Set the output mode to export, then run next build.
Note that you must configure the trailingSlash: true parameter.
Without this configuration, when accessing the page /hello/world/page.html, the corresponding URL is domain.com/hello/world. Opening this URL directly will not automatically redirect.
After setting this parameter, a trailing slash will be automatically appended to the URL, changing the address to domain.com/hello/world/. This allows it to automatically resolve to page.html, eliminating the need to modify nginx configuration.
/** @type {import('next').NextConfig} */
const nextConfig = {
  output: 'export',

  // Optional: Change links `/me` -> `/me/` and emit `/me.html` -> `/me/index.html`
  // According to the Next.js documentation, setting this to true removes the need to modify nginx configuration
  // https://nextjs.org/docs/app/building-your-application/deploying/static-exports#deploying
  trailingSlash: true,

  // Optional: Prevent automatic `/me` -> `/me/`, instead preserve `href`
  // skipTrailingSlashRedirect: true,

  // Optional: Change the output directory `out` -> `dist`
  // distDir: 'dist',
}

module.exports = nextConfig
Standalone Deployment
This approach deploys Next.js as a backend, requiring a Node.js environment to run.
Node.js Mode
Directly install the Node.js environment on the server, upload the code, and execute next build followed by next start to complete the deployment. Then use a tool like Nginx for reverse proxy setup.
Docker Mode
While the above method is simple and straightforward, it requires installing a specific Node.js version on the server. Managing environments becomes cumbersome when multiple projects on the same server require different Node.js versions. Therefore, I opt for Docker image deployment.
First, the official team provides an example: https://github.com/vercel/next.js/tree/canary/examples/with-docker
Below is my configuration plan, building upon the official example. I removed the CMD and other commands from the Dockerfile, moving the execution to docker-compose.yaml as I prefer using Compose to manage containers.
Here is the modified Dockerfile:
FROM node:18-alpine AS base
Install dependencies only when needed
FROM base AS deps
Check https://github.com/nodejs/docker-node/tree/b4117f9333da4138b03a546ec926ef50a31506c3#nodealpine to understand why libc6-compat might be needed.
RUN apk add --no-cache libc6-compat WORKDIR /app
Install dependencies based on the preferred package manager
COPY package.json yarn.lock* package-lock.json* pnpm-lock.yaml* ./
RUN
if [ -f yarn.lock ]; then yarn --frozen-lockfile;
elif [ -f package-lock.json ]; then npm ci;
elif [ -f pnpm-lock.yaml ]; then yarn global add pnpm && pnpm i --frozen-lockfile;
else echo "Lockfile not found." && exit 1;
fi
# Rebuild the source code only when needed
FROM base AS builder
WORKDIR /app
COPY --from=deps /app/node_modules ./node_modules
COPY . .
Note: The provided content is already entirely in English. The Markdown heading is in English, and the code block contains standard Dockerfile commands (which are universal syntax and don't require translation). No translation was necessary. Next.js collects completely anonymous telemetry data about general usage.
Learn more here: https://nextjs.org/telemetry
Uncomment the following line in case you want to disable telemetry during the build.
ENV NEXT_TELEMETRY_DISABLED 1
RUN yarn build
If using npm, comment out the lines above and use the configuration below instead
RUN npm run build
Production image, copy all the files and run next
FROM base AS runner WORKDIR /app
ENV NODE_ENV production
Uncomment the following line in case you want to disable telemetry during runtime.
ENV NEXT_TELEMETRY_DISABLED 1
RUN addgroup --system --gid 1001 nodejs RUN adduser --system --uid 1001 nextjs
COPY --from=builder /app/public ./public
Set the correct permission for prerender cache
RUN mkdir .next
RUN chown nextjs:nodejs .next
Automatically Use Output Traces to Reduce Image Size
https://nextjs.org/docs/advanced-features/output-file-tracing
COPY --from=builder --chown=nextjs:nodejs /app/.next/standalone ./ COPY --from=builder --chown=nextjs:nodejs /app/.next/static ./.next/static
USER nextjs
Comment out the following content
#EXPOSE 3000
#ENV PORT 3000
set hostname to localhost
#ENV HOSTNAME "0.0.0.0"
server.js is created by next build from the standalone output
https://nextjs.org/docs/pages/api-reference/next-config-js/output
#CMD ["node", "server.js"]
As you can see, I commented out the last few lines.

Below is the `docker-compose.yaml` file, which is still deployed in conjunction with swag's reverse proxy + HTTPS.

```yaml
version: "3.6"
services:
  web:
    build: .
    restart: always
    container_name: ids-lite-ui
    environment:
      - PORT=3000
      - HOSTNAME=0.0.0.0
    command: node server.js
    networks:
      - swag

networks:
  swag:
    name: swag
    external: true
Furthermore, I also have a .env.local file with the following content:
NEXT_PUBLIC_BASE_URL=https://sso-api.dealiaxy.com
This is passed as an environment variable to Next.js. It can be accessed in the code using process.env.NEXT_PUBLIC_BASE_URL. Note that it must have the NEXT_PUBLIC_ prefix.
Also, this environment variable cannot be written in the docker-compose.yaml file. This is because process.env.NEXT_PUBLIC_BASE_URL is not a real variable but something similar to a C-language macro (宏). During the image build phase, i.e., the Next.js build phase, it gets replaced with the actual value. In contrast, variables defined in compose are passed in after the image is running.
Summary
Let's call it a day here—the length is already too long. I checked the word count in Typora, and this article is approaching 20,000 characters. I don't even have the patience to finish reading such a long piece myself.
Since I was writing and developing simultaneously, the time span of this article is quite long. There might be some awkward sentences or logical inconsistencies. Before publishing, I quickly skimmed through it a few times and made some revisions, but I really didn't have the time and energy to polish it thoroughly. So, let's leave it at that~😂
To sum up: Next.js is an excellent React front-end solution for me. Although the development speed can't match Blazor, which I introduced earlier, its vast ecosystem and smooth development experience make up for it~ Actually, once you get familiar with it, the development speed will also improve. I recommend friends who use React to give it a try if interested. 😃
PS: My Jetbrains subscription has expired. I started using VSCode this past week, and the next article will most likely cover the different experiences of switching from Jetbrains to VSCode.
_EOF_
NextJs with Tailwind: Getting Started Development Notes
- 本文作者:
- 程序设计实验室
- 版权声明:
- 本博客所有文章除特别声明外,均采用 BY-NC-SA 许可协议。转载请注明出处!
相关文章
2025年底的 TailwindCSS 组件库简单横评
TailwindCSS组件库多到让人选择困难。shadcn/ui虽优雅但不够全,Origin UI倒是堆了500+组件——这年头连UI都要内卷?大而全还是小而精,选型前先想清楚自己要不要加班调样式。
2025-11-23 · Web前端 · 约 1 分钟
使用国内NPM镜像源提高速度
NPM介绍 npm(全称 Node Package Manager,即“node包管理器”)是Node.js默认的、以JavaScript编写的软件包管理系统。 npm可以管理本地项目的所需模块并自动维护依赖情况,也可以管理全局安装的JavaScript工具。 但是由于npm的源在国外,所以国内使用起来动辄10kb/s,甚至根本下载不了,所以使用国内镜像源替代官方源就很有必要了。 国内源 淘宝np
2022-02-25 · Web前端 · 约 1 分钟
开始开发一个新博客了,复古风Metro风格,顺便diss一下js
emmm 我原本的博客是用wordpress搭建的,当年七牛云还是免费时用它做的CDN,但是现在收费了,如果维持目前的博客流量的话每个月都要支付不少费用,于是只好把七牛云给停了= =,这也导致我博客里面很多图片都访问不了,页面布局也出问题了,不想折腾了,而且wordpress用起来总觉得不顺手,还是自己做一个吧~ 计划 最近刚好在学SpringBoot啥的,本来想用springboot搭建一个博客
2022-07-18 · Web前端 · 约 1 分钟
NPM-Warn--ENOENT--no-such-file-or-directory
Now type the command to auto generate the package.json npm init --yes
2022-07-18 · Web前端 · 约 1 分钟
讨论
共 0 条加载评论中…