

Using Kotlin with Spring Boot to Develop RESTful APIs
Hello, long time no see. I glanced at my posting history and realized I haven't published an article in almost a month. Busy->tired->lazy, so I never got around to writing. I recently finished my defense, and I can finally spare some time to share a bit of what I've been learning lately~ About Kotlin I first noticed this language last year or the year before, when Google endorsed Kotlin, and I even bought several Kotlin books for the team. Overall I've been fairly optimistic about this language's future, but I never actually used it. This time I'll dip my toes in with Kotlin and the Spring Boot framework, looking forward to Kotlin's elegance
目录12 个章节
Hello, long time no see. I glanced at my posting history and realized I haven't published an article in almost a month. Busy->tired->lazy, so I never got around to writing. I recently finished my defense, and I can finally spare some time to share a bit of what I've been learning lately~
About Kotlin
I first noticed this language last year or the year before, when Google endorsed Kotlin, and I even bought several Kotlin books for the team. Overall I've been fairly optimistic about this language's future, but I never actually used it. This time I'll dip my toes in with Kotlin and the Spring Boot framework, looking forward to what sparks Kotlin's elegant syntax and Spring's powerful ecosystem can strike together~
PS: This article is for readers who already have a basic grasp of Spring development and Gradle.
Creating the Project
Alright, time to get to the point. Listen up, everyone.
First we create a Gradle script and save it in an empty directory to initialize the project:
buildscript {
    ext.kotlin_version = '1.3.72' // Required for Kotlin integration
    ext.spring_version = '5.2.6.RELEASE'
    ext.spring_boot_version = '2.3.0.RELEASE'
    repositories {
        jcenter()
    }
    dependencies {
        classpath "org.jetbrains.kotlin:kotlin-gradle-plugin:$kotlin_version" // Required for Kotlin integration
        classpath "org.jetbrains.kotlin:kotlin-allopen:$kotlin_version" // See https://kotlinlang.org/docs/reference/compiler-plugins.html#spring-support
        classpath "org.springframework.boot:spring-boot-gradle-plugin:$spring_boot_version"
    }
}

apply plugin: 'kotlin' // Required for Kotlin integration
apply plugin: "kotlin-spring" // https://kotlinlang.org/docs/reference/compiler-plugins.html#spring-support
apply plugin: 'org.springframework.boot'
apply plugin: 'io.spring.dependency-management'

repositories {
    jcenter()
}

dependencies {
    compile "org.jetbrains.kotlin:kotlin-stdlib:$kotlin_version"
    compile "org.springframework.boot:spring-boot-starter-web"
    compile "com.fasterxml.jackson.module:jackson-module-kotlin"
    testCompile('org.springframework.boot:spring-boot-starter-test')
}
After saving, run gradle build. Anyone with a basic Spring Boot background should know this step, so I won't waste space pasting the how-to.
Once the build finishes, an src folder is generated. We just create our package structure and code under src/main. The only difference from Java is that the java folder is replaced by a kotlin folder.
Writing the First Endpoint
The code in this section is based on the official Kotlin language examples~
First we create a simple model. Under the model package, create Greeting.kt and write a data class:
data class Greeting(val id: Long, val content: String)
OK, next write the controller logic. Under the controller package, create GreetingController.kt with the following code:
@RestController
class GreetingController {
    val counter = AtomicLong()
    @GetMapping("/greeting")
    fun greeting(@RequestParam(value = "name", defaultValue = "World") name: String) =
            Greeting(counter.incrementAndGet(), "Hello, $name")
}
Look at this code—doesn't it have that familiar Spring Boot flavor~
Next, run the gradlew bootRun task and it will start. The overall flow is no different from developing Spring Boot with Java; it's just more comfortable to write than verbose Java thanks to Kotlin's syntax.
Visit http://127.0.0.1:8080/greeting in the browser, and you'll see:
{
  "id": 1,
  "content": "Hello, World"
}
Introducing an ORM
That was just a warm-up. Next we'll get into real development. Web systems usually need to access a database. When using Java, many people would pick JPA or MyBatis-Plus and the like. But since we're using Kotlin, we should switch to an ORM built specifically for Kotlin. There are many such ORMs to choose from. On a blog's recommendation, I picked Ktorm, developed by a Chinese author—as the name suggests, it's Kotlin-specific.
Official docs: https://ktorm.liuwj.me/zh-cn/quick-start.html
If you haven't used it before, you can give this ORM a try. Aside from lacking database migration, it more or less meets my requirements. It now also supports data classes as entity classes, but when I wrote this I followed the official docs and used interfaces as entity classes, which is a small pitfall when passing parameters in the controller.
(PS: If you need this in production, don't go looking for trouble—this ORM has quite a few pitfalls.)
One more thing: I couldn't get the official Ktorm–Spring Boot integration project on GitHub to run. Not sure what the issue was.
On to the actual development~
First, add the Ktorm and spring-jdbc related dependencies in the Gradle script. Here's a pitfall I ran into: the official docs say to use Spring's JDBC, but when I did that I could never read the application config or inject a DataSource. After switching to Spring Boot's JDBC, it worked. Personal projects really do have some pitfalls after all.
First define a variable:
ext.ktorm_version = '2.7.2'
Next add the dependencies. I usually use SQLite in the development environment; those who need MySQL, please replace it yourselves:
compile "me.liuwj.ktorm:ktorm-core:$ktorm_version"
compile "me.liuwj.ktorm:ktorm-jackson:$ktorm_version"
compile "me.liuwj.ktorm:ktorm-support-sqlite:$ktorm_version"
compile "io.github.willena:sqlite-jdbc:3.30.1"
Write the configuration class:
@Configuration
class KtormConfiguration {
    @Autowired
    lateinit var dataSource: DataSource
    @Bean
    fun database(): Database {
        return Database.connectWithSpringSupport(
                dataSource = dataSource,
                dialect = SQLiteDialect()
        )
    }
    @Bean
    fun ktormModule(): Module {
        return KtormModule()
    }
}
Writing Entity Classes
Here we use the data structure from the official example:
import me.liuwj.ktorm.entity.Entity
interface Department : Entity<Department> {
    companion object : Entity.Factory<Department>()
    val id: Int
    var name: String
    var location: String
}
Then write another class to define the table structure and bind columns to the entity class:
import me.liuwj.ktorm.schema.Table
import me.liuwj.ktorm.schema.int
import me.liuwj.ktorm.schema.varchar
object Departments : Table<Department>("t_department") {
    val id by int("id").primaryKey().bindTo { it.id }
    val name by varchar("name").bindTo { it.name }
    val location by varchar("location").bindTo { it.location }
}
This is just an example; the following code may not actually use this entity class, but you can extrapolate from it.
Starting CRUD
Next up is the traditional craft of web developers—copy-pasting CRUD at lightning speed. Let's go~
Here's the code: standard RESTful endpoints using the four HTTP methods GET, POST, PUT, and DELETE. This organization is exactly the same as DjangoRestFramework—the APIs are concise and expressive.
It also demonstrates database operations with Ktorm; you can see it's quite convenient to use.
@RestController
@RequestMapping("/department")
class DepartmentController {
    @Autowired
    lateinit var database: Database

    @GetMapping("/")
    fun list(): Response<List<Department>> {
        return Response(true, "获取部门列表",
                database.sequenceOf(DepartmentDao).toList())
    }

    @GetMapping("/{id}")
    fun get(@RequestParam("id") id: Int): Response<Department> {
        val department = database.sequenceOf(DepartmentDao).find { it.id eq id }
                ?: return Response(false, "部门不存在", null)

        return Response(true, "获取部门信息", department)
    }

    @PostMapping("/")
    fun create(
            @RequestParam("name") name: String,
            @RequestParam("location") location: String
    ): Response<Department> {
        val department = Department()
        department.name = name
        department.location = location

        val result = database.sequenceOf(DepartmentDao).add(department)
        return if (result > 0)
            Response(true, "添加部门成功", department)
        else
            Response(false, "添加部门失败", null)
    }

    @PutMapping("/{id}")
    fun update(
            @RequestParam("id") id: Int,
            @RequestParam("name") name: String,
            @RequestParam("location") location: String
    ): Response<Department> {
        val department = database.sequenceOf(DepartmentDao).find { it.id eq id }
                ?: return Response(false, "部门不存在", null)

        department.name = name
        department.location = location
        val result = department.flushChanges()
        return if (result > 0)
            Response(true, "修改部门信息成功", department)
        else
            Response(false, "修改部门信息失败", null)
    }

    @DeleteMapping("/{id}")
    fun delete(@RequestParam("id") id: Int): Response<Nothing> {
        val department = database.sequenceOf(DepartmentDao).find { it.id eq id }
                ?: return Response(false, "部门不存在", null)
        val result = department.delete()

        return if (result > 0)
            Response(true, "删除部门成功", null)
        else
            Response(false, "删除部门失败", null)
    }
}
Integrating Swagger Docs
Once the APIs are written, the next step is of course sending them to the frontend for integration. Time to whip out Swagger~
Integration is very convenient. Step one, add the dependencies:
compile "io.springfox:springfox-swagger2:2.9.2"
compile "io.springfox:springfox-swagger-ui:2.9.2"
Step two, write the configuration:
@Configuration
@EnableSwagger2
class SwaggerConfig {

    @Bean
    fun api(): Docket {
        return Docket(DocumentationType.SWAGGER_2)
                .select()
                .apis(RequestHandlerSelectors.any())
                .paths(PathSelectors.any())
                .build()
                .apiInfo(apiInfo())
    }

    private fun apiInfo(): ApiInfo {
        return ApiInfo(
                "kotlin-springboot",
                "博客:http://blog.deali.cn",
                "api v1.0",
                "http://blog.deali.cn",
                Contact(
                        "DealiAxy",
                        "http://blog.deali.cn",
                        "admin@deali.cn"
                ),
                "GPL v2",
                "http://www.apache.org/",
                Collections.emptyList()
        )
    }
}
Step three: add annotations to the APIs. This step isn't actually required, but once you add them you can clearly see on the API webpage what each endpoint is for.
Finally, open a browser to see the result: http://127.0.0.1:8080/swagger-ui.html. It looks roughly like this:
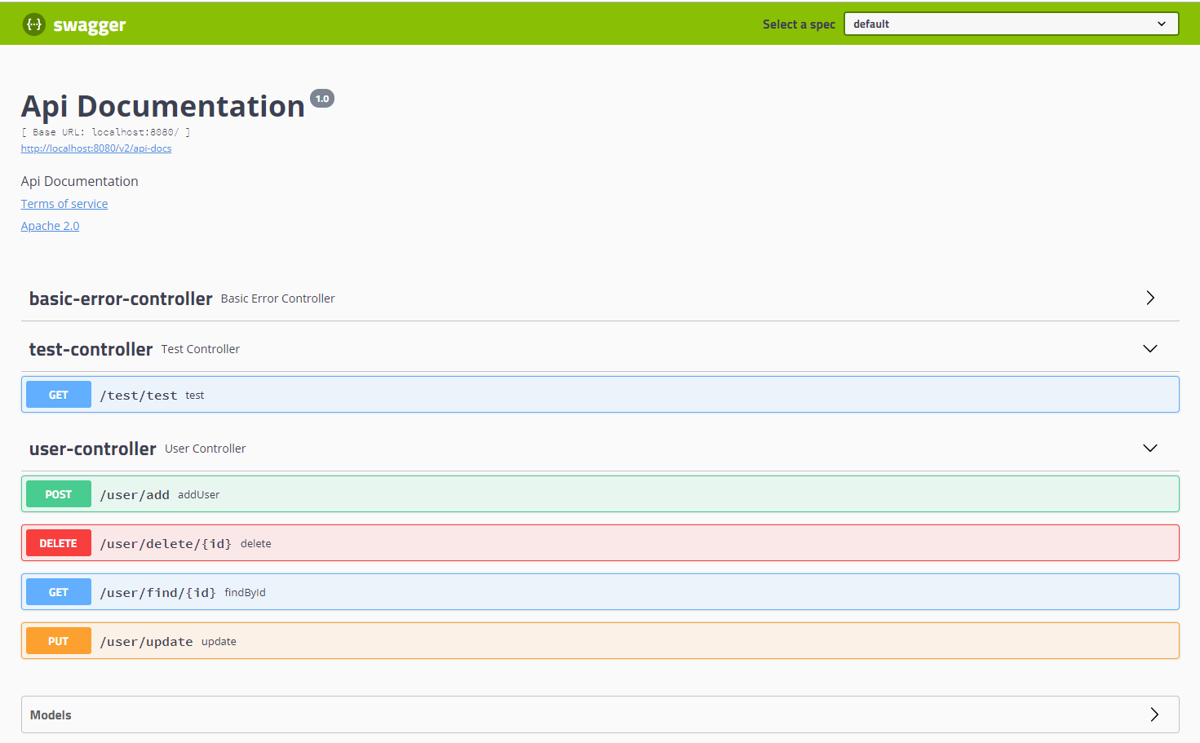
For this part of the configuration, you can refer to: https://www.ibm.com/developerworks/cn/java/j-using-swagger-in-a-spring-boot-project/index.html
Just mentally convert the Java code to Kotlin yourself~
Build and Deploy
Finally we need to deploy our finished project to a server. Using the following approach—an executable jar plus Docker—is much more convenient than Python~ (Go and C# would say that when it comes to deployment, everyone else here is trash hhhh)
Build an executable jar
Run the following command:
gradlew bootJar
This will generate a jar in the build/libs directory. Copy the db.sqlite3 database file from the project root into the same directory.
Then run:
java -jar xxx.jar
to start the service. You can upload this directly to the server and run it.
The next step is deploying with Docker.
Docker deployment
The Dockerfile is as follows:
FROM java:8

MAINTAINER DealiAxy <dealiaxy@gmail.com>
# VOLUME 指定了临时文件目录为/tmp。在主机 /var/lib/docker 目录下创建了一个临时文件,并链接到容器的/tmp
VOLUME /tmp
# 将jar包添加到容器中并更名为app.jar
ADD build/libs/spring-boot-restful.jar app.jar
# 添加数据库
ADD db.sqlite3 db.sqlite3
# 运行jar包
RUN bash -c 'touch /app.jar'
Plus my preferred docker-compose deployment
version: "3"
services:
  web:
    restart: always # 除正常工作外,容器会在任何时候重启,比如遭遇 bug、进程崩溃、docker 重启等情况。
    build: .
    environment:
      - ENVIRONMENT=docker
    command: java -Djava.security.egd=file:/dev/./urandom -jar /app.jar
    ports:
      - "8001:9123"
Final Summary
Kotlin feels to me like a mix of Java, TypeScript, and Python. Compared to C# I think it's still a bit behind, but it's already left Java several streets behind. Combined with Spring's unbeatable ecosystem, writing backend APIs and template-rendered websites is still fast and convenient. With this Kotlin learning experience, when I need a backend for some projects in the future I'll also consider practicing with this stack~
Finally, thanks to Kotlin for letting me avoid the Java cesspit while still using the Spring Boot ecosystem to develop APIs. Hahahaha I'm out
Welcome to Discuss
I've put together a series of technical articles and materials. Reply with linux, flutter, c#, netcore, android, java, python, etc. in the backend of the WeChat official account 「程序设计实验室」 to get related technical articles and materials. You can also leave a message in the official account backend if you have any questions~
_EOF_
Using Kotlin with Spring Boot to Develop RESTful APIs
- 本文作者:
- 程序设计实验室
- 版权声明:
- 本博客所有文章除特别声明外,均采用 BY-NC-SA 许可协议。转载请注明出处!
相关文章
使用Kotlin搭配Springboot开发RESTFul接口(二)自定义配置、跨域、分页、ViewModel
前言 上一篇文章请看这里: https://zhuanlan.zhihu.com/p/146733027 上一篇文章介绍了Kotlin搭配Springboot的开发流程,从搭建项目、ORM、Controller到Swagger集成和docker部署都有,不过大师说我那篇文章太多代码了,吹水太少了,于是我决定再水一篇,介绍一下Web开发中常用的几种操作。 在做完这个简单的系统,Kotlin搭配Spr
2021-12-18 · Kotlin · 约 1 分钟
Android-Studio-插件记录
GsonFormat https://blog.csdn.net/leejizhou/article/details/50557786 ButterKnifeZelezny http://blog.csdn.net/leejizhou/article/details/50541356 SQLScout SQLite调试神器。 http://www.idescout.com/ https://plu
2021-12-18 · Android开发 · 约 1 分钟
开箱俩Type-C拓展坞
买了俩Type-C拓展坞,绿联便宜接口少不敢充,联想高价接口全值了。MacBook窗口管理逊色,划屏操作烦人。
2026-09-08 · 拓展坞 · 约 1 分钟
Asp-Net-Core开发笔记:集成Hangfire实现异步任务队列和定时任务
前言 最近把Python写的数据采集平台往.Net Core上迁移,原本的采集任务使用多进程+线程池的方式来加快采集速度,使用Celery作为异步任务队列兼具定时任务功能,这套东西用着还行,但反正就折腾嘛,直接上C#~ 本文记录 Hangfire 在实际应用里的用法,我发现网络上找到的大部分文章都是用 Hangfire 的异步任务输出个 Hello World,然后就没了。我实在不知道这样的文章写
2023-03-09 · Asp-Net-Core开发笔记 · 约 1 分钟
讨论
共 0 条加载评论中…