

Continuous Integration Guide: Automated Build and Deployment of AspNetCore Projects Using GitHub Action
Another boring automation tutorial: GitHub Actions builds AspNetCore Docker image and pushes to Alibaba Cloud, then deploys with a local runner. Simplify the workflow? Who cares about these details? Proxy configuration is so annoying!
目录15 个章节
Foreword
Previously, I researched using GitHub Actions to automatically build and publish nuget packages: Developing Modern .NetCore Console Applications: (4) Using GitHub Actions for Automatic Building and Publishing nuget Packages
Now, let's take it a step further: use GitHub Actions to build Docker images within the provided runners, then submit them to Alibaba Cloud's private image registry, and finally pull the images down to run them on a local runner.
This article uses the AIHub project as an example.
AIHub is an AI platform that integrates multiple models, offering features such as large language models, computer vision, and natural language processing. It is developed based on AspNetCore + Blazor Server technology.
Preparing the Dockerfile
First, prepare the Dockerfile for building the image.
Generally, when using the dotnet cli to create a project, this Dockerfile can be generated automatically.
If it's not available, you can refer to my example below.
FROM mcr.microsoft.com/dotnet/aspnet:7.0 AS base
WORKDIR /app
EXPOSE 80
EXPOSE 443

FROM mcr.microsoft.com/dotnet/sdk:7.0 AS build
WORKDIR /src
COPY ["AIHub.Blazor/AIHub.Blazor.csproj", "AIHub.Blazor/"]
RUN dotnet restore "AIHub.Blazor/AIHub.Blazor.csproj"
COPY . .
WORKDIR "/src/AIHub.Blazor"
RUN dotnet build "AIHub.Blazor.csproj" -c Release -o /app/build

FROM build AS publish
RUN dotnet publish "AIHub.Blazor.csproj" -c Release -o /app/publish /p:UseAppHost=false

FROM base AS final
WORKDIR /app
COPY --from=publish /app/publish .
ENTRYPOINT ["dotnet", "AIHub.Blazor.dll"]
You can try building it locally first to see if there are any issues.
docker build .
If everything is normal, you can proceed to the next step.
Creating a Private Image Repository
You can set one up yourself or use cloud service products. Here, I use Alibaba Cloud's "Container Registry (ACR)," and the personal edition is free.
Create an image repository, select "Local Repository" as the code source, and you can push images to the repository via the command line.
PS: I noticed there is also a GitHub repository as a code source inside, but I haven't tested it yet.
After creation, there will be an operation guide, which is not very important. We only need to focus on the username and password.
The username used for login is the full Alibaba Cloud account name, and the password is the one set when the service was activated.
You can modify the credential password on the Access Credential page.
OK, save this information well; it will be needed next.
The repository address used in this article is: registry.cn-hangzhou.aliyuncs.com/deali/aihub-test
Configure GitHub Action Secret
Configure the address, username, password, and other information of the Alibaba Cloud repository into Action Secret.
Here, the names I set are:
ALIYUN_DOCKER_REPOALIYUN_USERNAMEALIYUN_PWD
Building the Image
Write the GitHub workflow configuration, the details will not be repeated here. For those who are unclear, you can refer to this article: Developing Modern .NetCore Console Applications: (4) Using GitHub Actions for Automatic Build and NuGet Package Publishing
GitHub Workflow
This is provided by GitHub. I haven't used this solution myself, but those interested can give it a try.
# This workflow uses unauthenticated GitHub actions.
# They are provided by third parties and are subject to
# Separate Terms of Service, Privacy Policy, and Support
# Documentation.
# GitHub recommends pinning actions to commit SHAs.
# To get a newer version, you need to update SHA.
# You can also reference tags or branches, but this operation may change without warning.

name: Publish Docker image

on:
  release:
    types: [published]

jobs:
  push_to_registry:
    name: Push Docker image to Docker Hub
    runs-on: ubuntu-latest
    steps:
      - name: Check out the repo
        uses: actions/checkout@v4

      - name: Log in to Docker Hub
        uses: docker/login-action@f4ef78c080cd8ba55a85445d5b36e214a81df20a
        with:
          username: ${{ secrets.DOCKER_USERNAME }}
          password: ${{ secrets.DOCKER_PASSWORD }}

      - name: Extract metadata (tags, labels) for Docker
        id: meta
        uses: docker/metadata-action@9ec57ed1fcdbf14dcef7dfbe97b2010124a938b7
        with:
          images: my-docker-hub-namespace/my-docker-hub-repository

      - name: Build and push Docker image
        uses: docker/build-push-action@3b5e8027fcad23fda98b2e3ac259d8d67585f671
        with:
          context: .
          file: ./Dockerfile
          push: true
          tags: ${{ steps.meta.outputs.tags }}
          labels: ${{ steps.meta.outputs.labels }}
### Simple Version Workflow

This is a workflow I wrote myself, which is a bit simpler than the examples provided by GitHub.

```yaml
name: Docker Image CI
run-name: ${{ github.actor }} is building a image

on: [push]

jobs:

  build:

    runs-on: ubuntu-latest

    steps:
    - uses: actions/checkout@v3
    - name: Build the Docker image
      run: docker build . --file ./next-antd/AIHub.Blazor/Dockerfile --tag ${{ secrets.ALIYUN_DOCKER_REPO }}:${{ github.run_id }}
    - name: Login to aliyun docker repository
      run: docker login -u ${{ secrets.ALIYUN_USERNAME }} -p ${{ secrets.ALIYUN_PWD }} ${{ secrets.ALIYUN_DOCKER_REPO }}
    - name: Push image to aliyun docker repository
      run: docker push ${{ secrets.ALIYUN_DOCKER_REPO }}:${{ github.run_id }}
This build step constructs a Docker image on a GitHub-hosted runner and pushes it to a private repository (私有镜像仓库).
For the image's tag version, I used the run_id environment variable (环境变量), which represents the unique ID of this build task, for example, 1658821493.
Alternatively, you could use ${{ github.sha }} to represent the commit SHA of this trigger, but I chose not to as it's too long.
GITHUB_SHA: The commit SHA that triggered the workflow. The value of this commit SHA depends on the event that triggered the workflow. For more information, see "Events that trigger workflows". For example,ffac537e6cbbf934b08745a378932722df287a53.
P.S.: The official example uses a $(date +%s) timestamp, but I haven't figured out how to concatenate strings within an environment variable yet.
Setting up a Local Runner
The image is built, but it still needs to run on a local server.
It's simple—you just pull down the image and then run docker compose up. Now let's add this step to the workflow as well.
Adding a Runner
Visit this page: https://github.com/star-plan/aihub/settings/actions/runners
Click the New self-hosted runner button.
Select the corresponding system and architecture, then follow the provided commands, and you're all set.
In this guide, we've chosen the Linux - x64 approach.
The commands provided by GitHub are as follows (Note: this is just an example; the actual commands should be based on your project's configuration page).
# Create a folder
$ mkdir actions-runner && cd actions-runner# Download the latest runner package
$ curl -o actions-runner-linux-x64-2.311.0.tar.gz -L https://github.com/actions/runner/releases/download/v2.311.0/actions-runner-linux-x64-2.311.0.tar.gz# Optional: Validate the hash
The download step might encounter issues because, for some inexplicable reason, GitHub may be inaccessible. In such cases, you need to use the proxychains tool—please search for and configure it yourself.
PS: Wow, this runner is 180MB.
Then run the runner command
./config.sh --url [REPO_URL] --token [TOKEN]
- You'll be prompted to enter a runner group name; the default is fine.
- You'll need to provide a runner name; I entered
aihub. - You can also input labels, etc., as needed.
Once the configuration is complete, start the runner.
./run.sh
Installing as a Service
The runner started with ./run.sh is unstable; it stops running after you log out. Even if you run it in the background using & or Ctrl+Z, it’s still not very reliable.
GitHub Runner can be run as a Linux service, which is also simple to use.
First, stop the currently running runner.
ps aux | grep run.sh
After finding the pid, kill it
kill -9 pid
Install service

```bash
sudo ./svc.sh install
Start service
sudo ./svc.sh start
For more operations, please refer to the fourth reference material.
View Runner List
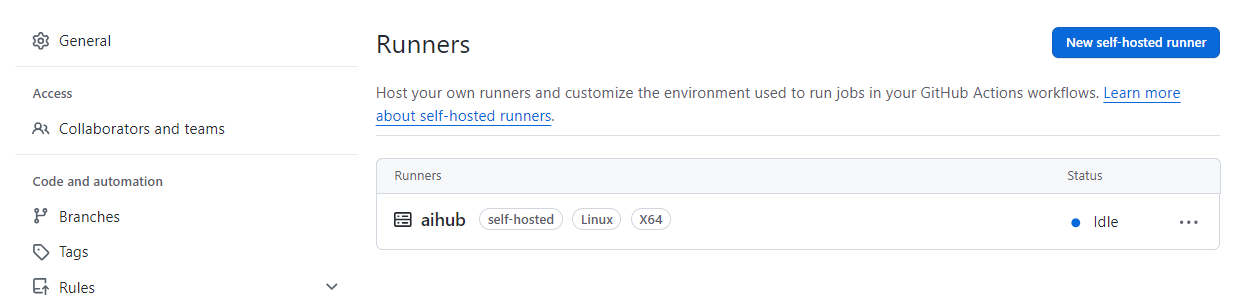
View the currently running runners on the GitHub page
Address: https://github.com/star-plan/aihub/settings/actions/runners
You can see there is already a runner named aihub
Runner Network Proxy
GitHub is so thoughtful about this! They've already considered situations where GitHub might be inaccessible. I'm literally crying here 😭
You can set a proxy in environment variables or configure it in the .env file. I'll choose the .env method here.
https_proxy=http://proxy.local:8080
no_proxy=example.com,myserver.local:443
For more documentation on setting up a local runner, please refer to the third item in the references.
Deploying Services Using a Local Runner
As usual, we use docker-compose to orchestrate the services.
First, create a directory to store the docker-compose.yml file and some persistent files.
The path for this example is: /home/apps/aihub
version: '3.6'

services:
  web:
    image: ${IMAGE}
    container_name: aihub-test
    restart: always
    environment:
      - ASPNETCORE_ENVIRONMENT=Production
      - ASPNETCORE_URLS=http://+:80
    volumes:
      - ./aihub.app.db:/app/aihub.app.db
    ports:
      - "12002:80"
    networks:
      - default
      - swag

networks:
  swag:
    name: swag
    external: true
  default:
    name: aihub-test
I used an environment variable for the image part because the tag of the built image is different each time. I need to write the tag into the .env file within the workflow. Of course, you could also hardcode it as latest.
The .env file looks like this:
IMAGE=registry.cn-hangzhou.aliyuncs.com/deali/aihub-test:6861065827
OK, we're finally at the last step. Let's continue editing our workflow to add a deployment job.
name: Docker Image CI
run-name: ${{ github.actor }} is building a image

on: [push]

jobs:

  build:
    runs-on: ubuntu-latest
    steps:
    - uses: actions/checkout@v3
    - name: Build the Docker image
      run: docker build . --file ./next-antd/AIHub.Blazor/Dockerfile --tag ${{ secrets.ALIYUN_DOCKER_REPO }}:${{ github.run_id }}
    - name: Login to aliyun docker repository
      run: docker login -u ${{ secrets.ALIYUN_USERNAME }} -p ${{ secrets.ALIYUN_PWD }} ${{ secrets.ALIYUN_DOCKER_REPO }}
    - name: Push image to aliyun docker repository
      run: docker push ${{ secrets.ALIYUN_DOCKER_REPO }}:${{ github.run_id }}

	deployment:
    runs-on: [self-hosted, linux, x64]
    needs: [build]
    steps:
    - name: export environment variant
      run: echo 'IMAGE=${{ secrets.ALIYUN_DOCKER_REPO }}:${{ github.run_id }}' > /home/apps/aihub/.env
    - name: docker compose deploy
      run: docker compose -f /home/apps/aihub/docker-compose.yml --project-directory /home/apps/aihub up -d
Note:
-
Jobs run in parallel by default. Therefore, you need to add the
needsconfiguration in thedeploymentjob to ensure it runs only after thebuildjob completes.Using
jobs.<job_id>.needsidentifies all jobs that must successfully complete before the current job runs. It can be a string or an array of strings. If any job fails or is skipped, all jobs that depend on it are skipped, unless those jobs use a conditional expression allowing it to continue. If a run contains a series of jobs that depend on each other, a failure or skip applies to all jobs in the dependency chain starting from the point of failure or skip. If you want a job to run even if its dependency jobs were not successful, use thealways()conditional expression injobs.<job_id>.if. -
The
deploymentjob runs locally, soruns-onuses multiple labels to select the local runner. -
When executing the
docker composecommand, the working directory is inside the GitHub Action tool's_workdirectory. Therefore, you need to specify the--project-directoryparameter or specify the.envfile location using--env-file.
View Execution Results
You can view the execution results on the GitHub Action page.
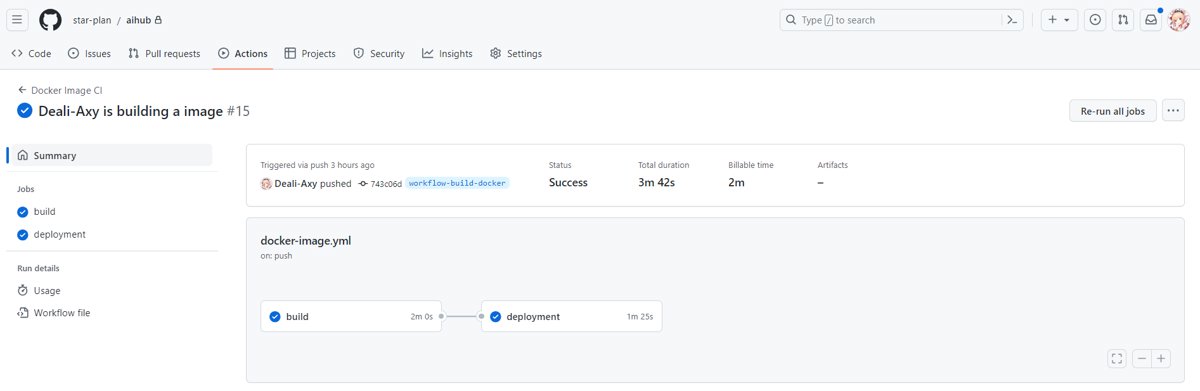
Done!
References
- https://docs.github.com/en/actions/learn-github-actions/variables
- https://docs.github.com/en/actions/publishing-packages/publishing-docker-images
- https://docs.github.com/en/actions/hosting-your-own-runners/managing-self-hosted-runners/about-self-hosted-runners
- https://docs.github.com/en/actions/hosting-your-own-runners/managing-self-hosted-runners/configuring-the-self-hosted-runner-application-as-a-service
- https://docs.github.com/en/actions/hosting-your-own-runners/managing-self-hosted-runners/using-a-proxy-server-with-self-hosted-runners
- https://docs.github.com/en/actions/using-jobs/using-jobs-in-a-workflow
- https://docs.docker.com/compose/environment-variables/set-environment-variables/
_EOF_
Continuous Integration Guide: Automated Build and Deployment of AspNetCore Projects Using GitHub Action
- 本文作者:
- 程序设计实验室
- 版权声明:
- 本博客所有文章除特别声明外,均采用 BY-NC-SA 许可协议。转载请注明出处!
相关文章
极大提高项目部署的生产力!分享一个半自动化的CICD实现方案
半自动CICD?听起来就像是对完全自动化方案的妥协。用脚本一键发布,还真能省事,不过得忍受服务器内网访问等麻烦。国内环境下的CI/CD,果然还是得自己想办法。
2025-07-11 · DevOps · 约 1 分钟
部署MatterMost-开源团队协作平台
MatterMost,开源协作平台,自托管安全可控?部署折腾Docker配置,SSO集成文档坑爹。手机App不支持Play Store,界面劝退,何必自虐?SaaS更省心。
2024-08-11 · DevOps · 约 1 分钟
Nginx开启SSL渐进式方案
直接证书 let's encrypt nginx-proxy-manager LinuxServer SWAG
2022-11-04 · DevOps · 约 1 分钟
单点认证(SSO)方案调研总结
单点登录(SSO)是一种身份验证解决方案,可让用户通过一次性用户身份验证登录多个应用程序和网站。这意味着用户只需输入一次用户名和密码,即可访问所有相互信任的系统,而无需在每个系统中单独登录。
2025-01-14 · DevOps · 约 1 分钟
讨论
共 0 条加载评论中…