

Complete Backend Development in One Hour: DjangoRestFramework Development Practice
DjangoRestFramework Development Practice Previously I wrote a blog post on rapid development practice with Django and DRF, Django Rapid Development Practice: A Guide to DRF Framework and xadmin Configuration, which briefly covered DRF configuration and basic usage. However, it only involved the most basic CRUD. Operations involved in normal backend development such as authentication and permissions, message queues, and caching were not covered in the previous post. This time I carefully read those parts of the official documentation and fleshed out these features. D
目录16 个章节
DjangoRestFramework Development Practice
Previously I wrote a blog post on rapid development practice with Django and DRF, Django Rapid Development Practice: A Guide to DRF Framework and xadmin Configuration, which briefly covered DRF configuration and basic usage. However, it only involved the most basic CRUD. Operations involved in normal backend development such as authentication and permissions, message queues, and caching were not covered in the previous post. This time I carefully read those parts of the official documentation and fleshed out these features.
DRF’s design has a strong Django flavor (after all, it is a companion framework), wrapping a lot of functionality so that a little configuration is enough to get it working. This really deserves praise for rapid development.
Let’s get to the main topic.
Authentication and Authorization
No system can do without authentication and authorization. DRF comes with a powerful auth system. The framework provides several basic authentication and permission-control methods that are generally enough for small systems. You can also customize permission middleware, making it easy to implement features such as throttling.
API Authentication
DRF has four built-in API authentication methods. I put the basic information into a table:
| Authentication method | Description |
|---|---|
| BasicAuthentication | Attach username and password with every request for authentication |
| TokenAuthentication | Attach a Token in the HTTP headers with every request for authentication |
| SessionAuthentication | After the user logs in, the system stores a sessionid in cookies for authentication |
| RemoteUserAuthentication | Authenticate via the web server (Apache/Nginx, etc.) |
I chose Token-based authentication. After the client logs in it maintains a token and attaches it to the HTTP headers on every request, which is reasonably convenient.
DRF also allows custom authentication: just inherit the authentication.BaseAuthentication class and override the authenticate method. I’ll only briefly outline the steps here; see the official docs for details.
- Create an authentication class: inherit
BaseAuthenticationand override theauthenticatemethod - Return values of
authenticate()None: skip the current authentication and wait for the next one to runraise exceptions.AuthenticationFailed('用户认证失败')- A return value in tuple form: (element 1, element 2). Element 1 is assigned to
request.user, element 2 is assigned torequest.auth
You can configure the default authentication methods in settings.py. Here I added three:
REST_FRAMEWORK = {
    # 身份验证
    'DEFAULT_AUTHENTICATION_CLASSES': (
        'rest_framework.authentication.BasicAuthentication',
        'rest_framework.authentication.TokenAuthentication',
        'rest_framework.authentication.SessionAuthentication',
    )
}
Of course it also supports various third-party authentication frameworks, such as the following:
- Django OAuth Toolkit
- Django REST framework OAuth
- JSON Web Token Authentication
- And many more; see the official docs~
When using these authentication methods, after authentication succeeds, request.user in the views is a Django user object; if unauthenticated, it is an AnonymousUser object.
Next, let’s talk about permissions
API Authorization
DRF interface permissions include the following:
- AllowAny: allow everyone, whether logged in or not does not matter
- IsAuthenticated: only logged-in users can access
- IsAdminUser: only admins can access
- IsAuthenticatedOrReadOnly: as the name suggests, read-only without login, write only after login
- DjangoModelPermissions: based on Django Auth configuration (permissions refined down to each model)
- DjangoModelPermissionsOrAnonReadOnly
- DjangoObjectPermissions: used with third-party permission control, refined down to each object
Generally, for a small site, DjangoModelPermissions is enough, or even simpler, just use IsAuthenticated and queryset to limit the requested data.
With the basic concepts covered, let’s see how this is done in code.
Usage in a viewset
For the viewset that operates on user information, I only used the permissions.IsAuthenticated permission, then overrode ReadOnlyModelViewSet’s get_queryset method so that the queryset includes only the current user. This ensures that a user can only operate on their own information.
from rest_framework import authentication, permissions, viewsets

class UserViewSet(viewsets.ReadOnlyModelViewSet):
    permission_classes = [permissions.IsAuthenticated]
    serializer_class = UserSerializer

    def get_queryset(self):
        return User.objects.filter(pk=self.request.user.pk)
A viewset action can likewise use permissions, added as a parameter on the decorator:
@action(detail=True, methods=['GET'], permission_classes=[permissions.IsAuthenticated])
def some_actions(self, request, pk=None):
    dosomething
    return Response(SomeSerializer(some_data, many=True).data)
A note on the decorator’s detail parameter: it indicates whether the operation is on a list or on a single object. True means a single object.
This should be quite clear from the request URL.
- For a list:
http://hostname/viewset/some_action/ - For a single object:
http://hostname/viewset/1/some_action/
References for this section (prefer reading the official docs):
ApiView and ViewSet
DRF’s ApiView is equivalent to Django’s View. Each ViewSet is a set of RESTful endpoints. Looking at the viewset code, it defines 6 actions corresponding to HTTP methods such as get, post, put, and delete.
class UserViewSet(viewsets.ViewSet):
    def list(self, request):
        pass

    def create(self, request):
        pass

    def retrieve(self, request, pk=None):
        pass

    def update(self, request, pk=None):
        pass

    def partial_update(self, request, pk=None):
        pass

    def destroy(self, request, pk=None):
        pass
Besides these built-in ones, you can also define extra actions, which was already mentioned above.
As for ApiView, usage is similar to Django’s. One ApiView can only correspond to one URL. By overriding methods such as get and post you can implement responses for different HTTP methods.
ApiView and ViewSet likewise implement authentication and authorization by adding authentication_classes and permission_classes as class fields.
Pagination PAGINATION
Like Django, DRF comes with pagination, which is very convenient (of course it also supports third-party pagination).
First, configure it (if you don’t, the default configuration is used). Here I set it to display ten records per page:
REST_FRAMEWORK = {
    # 设置分页
    'DEFAULT_PAGINATION_CLASS': 'rest_framework.pagination.PageNumberPagination',
    'PAGE_SIZE': 10,
}
The most commonly used ModelViewSet already has pagination built in, so we don’t need to worry about that. However, if you define your own action to return list data, there is no pagination, and you then need to use the paginate_queryset method.
The code is as follows:
@action(detail=False)
def tag(self, request):
    queryset = SomeModel.objects.all().order_by('-add_time')
    page = self.paginate_queryset(queryset)
    if page is not None:
    	return self.get_paginated_response(self.get_serializer(page, many=True).data)
    return Response(self.get_serializer(queryset, many=True).data)
As you can see, DRF automatically handles requests for different pages. You don’t have to read the page from GET or POST data yourself as in Django. Pagination-related methods are right on the viewset object, which is very convenient.
API Documentation Setup
DRF supports many documentation plugins. Here I’ll use the more traditional coreapi docs. First, configure:
REST_FRAMEWORK = {
    # 文档
    'DEFAULT_SCHEMA_CLASS': 'rest_framework.schemas.coreapi.AutoSchema',
}
Before using it you also need to install coreapi with pip:
pip install coreapi
All ViewSets registered with a Router are added to the docs by default, but for ApiView you have to add them yourself.
from rest_framework.schemas.coreapi import AutoSchema

class SomeView(APIView):
    schema = AutoSchema()

    def post(self, request):
        data = dosomething()
        return Response(data)
That’s all. Don’t forget to register the routes; I’ll cover routing together below.
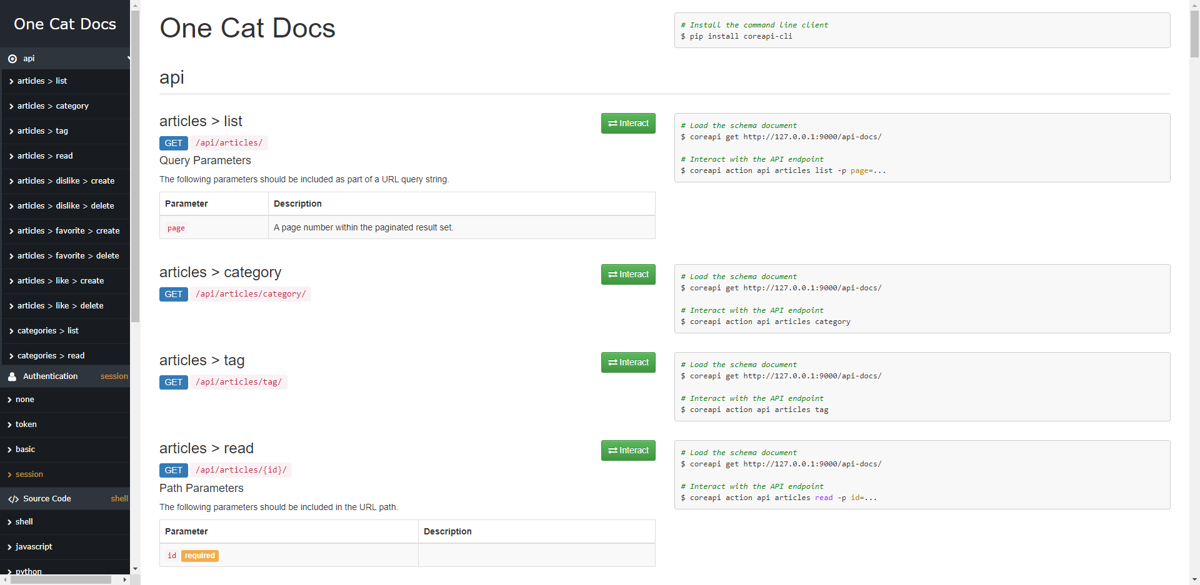
After configuration, the docs should look like the figure below. This page can test requests and also log in and authenticate in various ways, a bit richer than DRF’s default interface~
Routing
With the DRF framework there are two routing approaches: one is DRF’s routing, the other is Django’s routing, used together.
DRF’s Router
from rest_framework import routers

router = routers.DefaultRouter()
router.register('users', UserViewSet, basename='api-users')
router.register('user-profiles', UserProfileViewSet, basename='api-user-profiles')
router.register('tags', TagViewSet, basename='api-tags')
router.register('categories', CategoryViewSet, basename='api-categories')
router.register('articles', ArticleViewSet, basename='api-articles')
After defining them, add them to Django's urlpatterns.
urlpatterns = [
    path('api/', include(router.urls)),
]
For ApiView, routing is similar to Django's ClassBaseView:
urlpatterns = [
    path('login/', views.LoginView.as_view()),
    path('signup/', views.SignUpView.as_view()),
]
Configure authentication and documentation related URLs
from rest_framework.authtoken import views as authtoken_view
from rest_framework.documentation import include_docs_urls

urlpatterns = [
    path('api-auth/', include('rest_framework.urls', namespace='rest_framework')),
    path('api-token-auth/', authtoken_view.obtain_auth_token),
    path('api-docs/', include_docs_urls(title='One Cat Docs')),
]
Serializers
Serializers are also an important concept in DRF, quite similar to Django's Form. Their role is to convert Model object data into structured data such as JSON, XML, etc.
They're simple to use. I usually define them like this:
class CategorySerializer(serializers.ModelSerializer):
    class Meta:
        model = Category
        fields = '__all__'
Using __all__ includes all model fields directly. For relational fields such as foreign keys, we need to do some additional handling.
Here I'll briefly introduce a few ways I commonly handle relational fields:
StringRelatedField: Displays the relational field as a string, which depends on the model's__str__methodPrimaryKeyRelatedField: Displays as the primary key of the related field; this is also the default- Nested serialization: Define a serializer for the corresponding type of that field, and nest the serialization
You can find the specific usage on the official website~
Here are a few more commonly used parameters:
read_only: Generally used for fields you don't want to be modified, such as user idmany: Used for many-to-many or one-to-many relationships; it serializes all references into a list
Rate Limiting
It's actually a custom authentication process.
DRF has built-in BaseThrottle and SimpleRateThrottle; the latter is a subclass of the former.
BaseThrottlerequires you to write theallow_requestandwaitmethods yourself, giving finer-grained controlSimpleRateThrottleonly requires overridingget_cache_keyand setting ascopename, which is simpler
Implementing a rate limit of 3 visits per minute
SimpleRateThrottle code is as follows:
from rest_framework.throttling import SimpleRateThrottle

class VisitThrottle(SimpleRateThrottle):
    '''匿名用户60s只能访问三次(根据ip)'''
    scope = 'throttle'   #这里面的值,自己随便定义,settings里面根据这个值配置throttle

    def get_cache_key(self, request, view):
        #通过ip限制节流
        return self.get_ident(request)

class UserThrottle(SimpleRateThrottle):
    '''登录用户60s可以访问10次'''
    scope = 'userThrottle'    #这里面的值,自己随便定义,settings里面根据这个值配置userThrottle

    def get_cache_key(self, request, view):
        return request.user.user_id
BaseThrottle code is as follows:
from rest_framework.throttling import BaseThrottle
import time
VISIT_RECORD = {}   #保存访问记录

class VisitThrottle(BaseThrottle):
    '''60s内只能访问3次'''

    def __init__(self):
        self.history = None   #初始化访问记录

    def allow_request(self,request,view):
        #获取用户ip (get_ident)
        remote_addr = self.get_ident(request)
        ctime = time.time()
        #如果当前IP不在访问记录里面,就添加到记录
        if remote_addr not in VISIT_RECORD:
            VISIT_RECORD[remote_addr] = [ctime,]     #键值对的形式保存
            return True    #True表示可以访问
        #获取当前ip的历史访问记录
        history = VISIT_RECORD.get(remote_addr)
        #初始化访问记录
        self.history = history

        #如果有历史访问记录,并且最早一次的访问记录离当前时间超过60s,就删除最早的那个访问记录,
        #只要为True,就一直循环删除最早的一次访问记录
        while history and history[-1] < ctime - 60:
            history.pop()
        #如果访问记录不超过三次,就把当前的访问记录插到第一个位置(pop删除最后一个)
        if len(history) < 3:
            history.insert(0,ctime)
            return True

    def wait(self):
        '''还需要等多久才能访问'''
        ctime = time.time()
        return 60 - (ctime - self.history[-1])
Configuring throttling
#全局
REST_FRAMEWORK = {
    # 设置全局节流
    "DEFAULT_THROTTLE_CLASSES":['api.utils.throttle.UserThrottle'],   #全局配置,登录用户节流限制(10/m)
    # 设置访问频率
    "DEFAULT_THROTTLE_RATES":{
        'throttle':'3/m',         #没登录用户3/m,throttle就是scope定义的值,通过IP地址
        'userThrottle':'10/m',    #登录用户10/m,userThrottle就是scope定义的值, 通过user_id
    }
}

# 局部:在类视图中添加
throttle_classes = [VisitThrottle,]
That's about it. The official documentation is really detailed—reading the official docs can solve 95% of your questions. Combined with Django and Python's built-in rapid development productivity, writing this is so satisfying~
Welcome to Discuss
I've compiled a series of technical articles and materials. Reply with linux, flutter, c#, netcore, android, java, python, etc. in the backend of the WeChat official account 「程序设计实验室」 to get related technical articles and materials.
_EOF_
Complete Backend Development in One Hour: DjangoRestFramework Development Practice
- 本文作者:
- 程序设计实验室
- 版权声明:
- 本博客所有文章除特别声明外,均采用 BY-NC-SA 许可协议。转载请注明出处!
相关文章
不同Django服务器和部署方式的性能调研
WSGI 排名靠前?uWSGI 才是王道。ASGI 增加复杂度,性能还差一截。腾讯云服务器性能还掉线?真是够了。
2025-11-28 · Django · 约 1 分钟
分享一些2026年有意思的现代化Django生态组件
2026年了,若还在忍受石器时代的模板和冗余CRUD,趁早转行。Cotton和Inertia总算给Django这老古董续了命,Ninja这类工具已是开发及格线。看一眼这些现代化组件吧,别再用那些自我感动的低效代码来折磨审美了。
2026-01-21 · Django · 约 1 分钟
Django项目引入NPM和gulp管理前端资源
前言 之前写了一篇《Asp-Net-Core开发笔记:使用NPM和gulp管理前端静态文件》,现在又来用Django开发项目了,之前我搞了一个Django的快速开发脚手架「DjangoStarter」,正好给升级一下~ 关于npm和gulp我就不多重复了,之前那篇文章都写了,直接上操作 安装依赖 安装依赖的操作跟上一篇文章是一样的,不过我这里直接提供package.json文件,复制到项目根目录里
2022-04-02 · Django · 约 1 分钟
配置Django-TinyMCE组件支持上传图片功能
Django自带的Admin后台,好用,TinyMCE作为富文本编辑器,也蛮好用的,这两者结合起来在做博客的时候很方便(当然博客可能更适合用Markdown来写),但是Django-TinyMCE这个组件默认没有图片上传功能的,需要我们自己实现,本文将一步步带大家实现这个图片上传功能。 读者也可以举一反三实现其他需要和Django结合的功能。 编写上传图片逻辑 在任一views.py里添加代码:
2021-12-18 · Django · 约 1 分钟
讨论
共 0 条加载评论中…