Implementing WebSocket Communication with Django-Channels for Large Language Model Dialogue
This is just a simple demo. In actual production, many other issues need to be considered. This article merely opens up a discussion on the application of channels, and the blog will be continuously updated with new research findings in the future.
目录16 个章节
Foreword
I've been working on this large model project recently, and I chose Django as the framework (although many large model applications now use FastAPI, I'm already accustomed to Django).
Previously, when using AspNetCore as the backend, I tried various approaches such as Blazor Server and WebAPI SSE (Server Sent Event) to implement large model dialogues. Currently, it seems SSE is more widely used, and ChatGPT also employs this method.
Since entering the 3.x era, Django has started supporting asynchronous programming, making SSE implementation possible (though I found it a bit tricky in my testing). Ultimately, I decided to use WebSocket for implementation, which in the Django ecosystem relies on the Channels library. (It seems FastAPI can directly support SSE and WebSocket.)
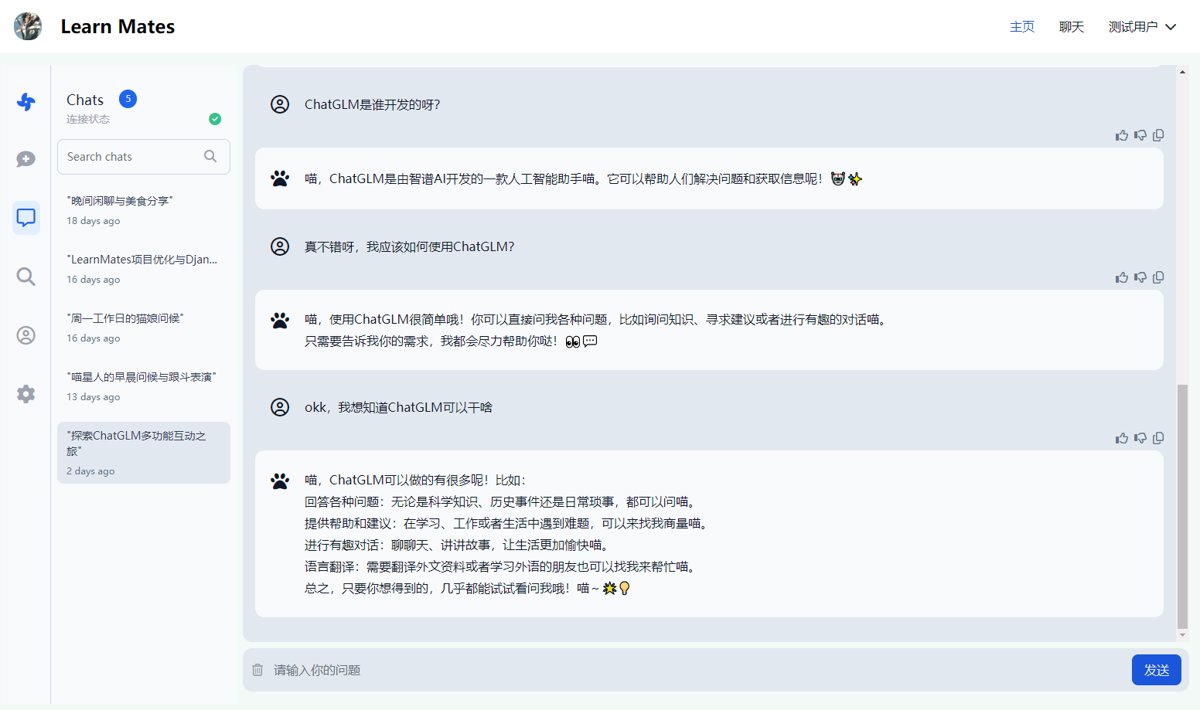
First, Look at the Effect
Display a chat interface
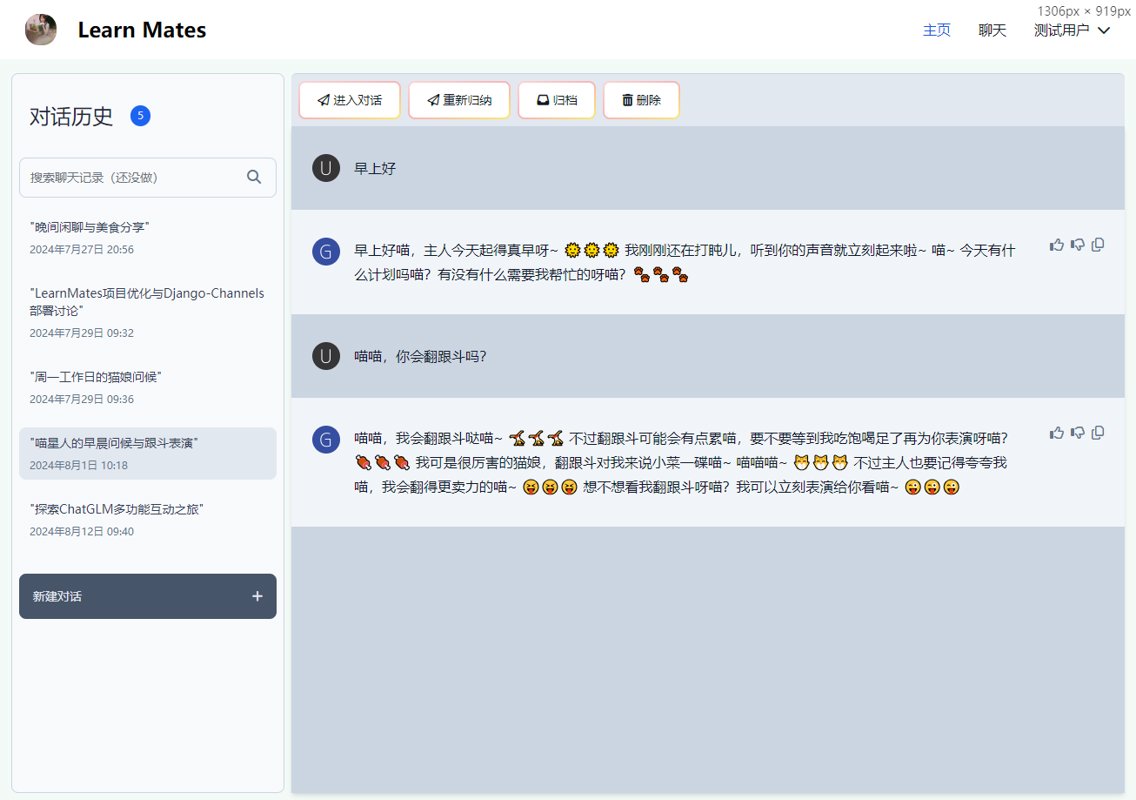
I also created a conversation history page.
About Django-Channels
Here is the introduction from the official website: https://channels.readthedocs.io/en/latest/introduction.html
Channels wraps Django’s native asynchronous view support, allowing Django projects to handle not only HTTP, but protocols that require long-running connections too - WebSockets, MQTT, chatbots, amateur radio, and more.
OK, Channels extends Django from a pure synchronous HTTP framework to handle asynchronous protocols like WebSocket. Originally, Django was based on WSGI. Channels uses the ASGI-based Daphne server, and not only can it use WebSocket, but it can also support newer technologies like HTTP/2.
Several related concepts:
- Channels: Persistent connections, such as WebSocket, used for real-time data transfer.
- Consumers: Asynchronous functions that handle incoming events, similar to Django views but designed specifically for asynchronous operations.
- Routing: Similar to Django's URL routing system, Channels uses routing to decide how to distribute a given WebSocket connection or message to the corresponding Consumer.
Compared to traditional Django request handling, Django Channels allows developers to use asynchronous programming patterns, which is particularly advantageous for handling long-running connections or applications requiring a large number of concurrent connections. This architectural change brings higher performance and a better user experience, enabling Django to better adapt to the needs of modern internet applications.
By introducing Channels, Django is no longer just a request/response web framework; it has become a truly full-featured framework capable of handling multiple network protocols and long-running connections. This allows Django developers to build richer and more dynamic applications without leaving the familiar environment.
Use Cases
First, let's introduce the usage scenario.
This demo project's backend uses StarAI and LangChain to call LLMs to obtain answers, then communicates with the frontend via WebSocket. For the frontend, I chose React + Tailwind.
Installation
Take the DjangoStarter project as an example (using pdm as the package manager)
pdm add channels[daphne]
Then modify src/config/settings/components/common.py
Add daphne to the registered apps, making sure to put it at the beginning.
# Application Definition
INSTALLED_APPS: Tuple[str, ...] = (
    'daphne',
)
When using runserver later, daphne will run in place of Django's built-in server.
Next, channels also requires a channel layer. This allows multiple consumer instances to communicate with each other and with other parts of Django. This layer can be set to Redis.
pdm add channels_redis
Configuration
ASGI
OK, next, I need to modify src/config/asgi.py
import os

from channels.auth import AuthMiddlewareStack
from channels.routing import ProtocolTypeRouter, URLRouter
from channels.security.websocket import AllowedHostsOriginValidator
from django.core.asgi import get_asgi_application

os.environ.setdefault('DJANGO_SETTINGS_MODULE', 'config.settings')

django_asgi_app = get_asgi_application()

from apps.chat.routing import websocket_urlpatterns

application = ProtocolTypeRouter({
    "http": django_asgi_app,
    # Just HTTP for now. (We can add other protocols later.)
    "websocket": AllowedHostsOriginValidator(
        AuthMiddlewareStack(URLRouter(websocket_urlpatterns))
    ),
})
In addition to the configuration mentioned in the official documentation, I have already included the routing for the chat application here.
Since this demo project only has this one app using WebSocket, I directly use the routing from the chat app as the root URLRouter here.
If there were multiple WebSocket apps, it could be modified as needed.
channel layer
Modify the src/config/settings/components/channels.py file
from config.settings.components.common import DOCKER

CHANNEL_LAYERS = {
    "default": {
        "BACKEND": "channels_redis.core.RedisChannelLayer",
        "CONFIG": {
            "hosts": [("redis" if DOCKER else "127.0.0.1", 6379)],
        },
    },
}
The other configurations need not be detailed further; everything is pre-configured in DjangoStarter.
Writing Backend Code
Using channels is straightforward. As mentioned earlier, we only need to implement the logic for the consumer and then configure the routing.
Let's get started.
consumer
Create the src/apps/chat/consumers.py file.
Identity authentication, using large language models to generate responses, and chat history management are all handled here.
Let's show the code first, with explanations to follow.
import asyncio
import json

from asgiref.sync import async_to_sync
from channels.db import database_sync_to_async
from channels.generic.websocket import WebsocketConsumer, AsyncWebsocketConsumer

from langchain_openai import ChatOpenAI
from langchain_core.messages import HumanMessage, AIMessage, SystemMessage

from .models import Conversation, Message

class LlmConsumer(AsyncWebsocketConsumer):
    def __init__(self, *args, **kwargs):
        super().__init__(args, kwargs)
        self.chat_id = None
        self.conversation = None

    @database_sync_to_async
    def get_conversation(self, pk, user):
        obj, _ = Conversation.objects.get_or_create(id=pk, user=user)
        return obj

    @database_sync_to_async
    def add_message(self, role: str, content: str):
        return Message.objects.create(
            conversation=self.conversation,
            role=role,
            content=content,
        )

    async def connect(self):
        self.chat_id = self.scope["url_route"]["kwargs"]["chat_id"]
        await self.accept()

        # Check if the user is logged in
        user = self.scope["user"]
        if not user.is_authenticated:
            await self.close(code=4001, reason='Authentication required. Please log in again.')
            return
        else:
            self.conversation = await self.get_conversation(self.chat_id, user)

    async def disconnect(self, close_code):
        ...

    async def receive(self, text_data=None, bytes_data=None):
        text_data_json: dict = json.loads(text_data)
        history: list = text_data_json.get("history")

        user = self.scope["user"]
        if not user.is_authenticated:
            reason = 'Authentication required. Please log in again.'
            await self.send(text_data=json.dumps({"message": reason}))
            await asyncio.sleep(0.1)
            await self.close(code=4001, reason=reason)
            return

        await self.add_message(**history[-1])

        llm = ChatOpenAI(model="gpt4")
        resp = llm.stream(
            [
                *[
                    HumanMessage(content=e['content']) if e['role'] == 'user' else AIMessage(content=e['content'])
                    for e in history
                ],
            ]
        )

        message_chunks = []
        for chunk in resp:
            message_chunks.append(chunk.content)
            await self.send(text_data=json.dumps({"message": ''.join(message_chunks)}))
            await asyncio.sleep(0.1)

        await self.add_message('ai', ''.join(message_chunks))
Workflow
- After the frontend initiates the WebSocket connection, the code in the
connectmethod is executed. If authentication is successful, it callsself.accept()to accept the connection. - When a message is received from the frontend, the
receivemethod is automatically executed. After processing, it callsself.sendto send information back.
Authentication
Although AuthMiddlewareStack is already configured in asgi.py, authentication logic still needs to be handled manually in the code.
The purpose of this middleware is to convert the authorization information from the header into self.scope["user"] within the consumer.
Key Points
- Consumers come in both synchronous and asynchronous versions. Here, I am using the asynchronous version
AsyncWebsocketConsumer. - To access the Django ORM within an async consumer, you must use the
database_sync_to_asyncdecorator. - In the
connectmethod, if authentication fails,self.closeis called to close the connection. Thecodeparameter cannot conflict with HTTP Status Codes. I initially used401, but the frontend received a different code. Using the custom code4001allowed it to be received correctly. However, thereasonparameter was never received, possibly due to the browser's WebSocket implementation? - In the
receivemethod, when streaming the content generated by the large language model to the client, you must includeawait asyncio.sleepinside theforloop to introduce a small delay. This allows time for the WebSocket to send the message to the client; otherwise, all generated content would be sent only after it is fully generated, losing the streaming effect. - In the
receivemethod, after receiving a message, it first checks if the user is currently logged in (or if the login session has expired, which is equivalent to being logged out). If the user is not logged in, it sends the message "Authentication required. Please log in again." to the client and then closes the connection.
Routing
After writing the consumer, configure the routing.
Edit the file src/apps/chat/routing.py
from django.urls import re_path

from . import consumers

websocket_urlpatterns = [
    re_path(r"ws/chat/demo/(?P<room_name>\w+)/$", consumers.ChatConsumer.as_asgi()),
    re_path(r"ws/chat/llm/(?P<chat_id>\w+)/$", consumers.LlmConsumer.as_asgi()),
]
Note here that you must use re_path and not path (as stated in the official documentation).
Client-Side Development
Alright, the backend part is done. Now let's write the client-side code.
I chose React to implement the client.
I'll skip the irrelevant code and just paste the key parts directly.
function App() {
  const [prompt, setPrompt] = useState('')
  const [messages, setMessages] = useState([])
  const [connectState, setConnectState] = useState(3)
  const [conversation, setConversation] = useState()

  const chatSocket = useRef(null)
  const messagesRef = useRef(null)
  const reLoginModalRef = useRef(null)

  React.useEffect(() => {
    openWebSocket()
    getConversation()

    return () => {
      chatSocket.current.close();
    }
  }, [])

  React.useEffect(() => {
    // Automatically scroll to the bottom of the message container
    messagesRef.current.scrollIntoView({behavior: 'smooth'})
  }, [messages]);

  const getConversation = () => {
    // ... Code for fetching chat history omitted
  }

  const openWebSocket = () => {
    setConnectState(0)
    chatSocket.current = new WebSocket(`ws://${window.location.host}/ws/chat/llm/${ConversationId}/`)
    chatSocket.current.onopen = function (e) {
      console.log('WebSocket connection established', e)
      setConnectState(chatSocket.current.readyState)
    };

    chatSocket.current.onmessage = function (e) {
      const data = JSON.parse(e.data)
      setMessages(prevMessages => {
        if (prevMessages[prevMessages.length - 1].role === 'ai')
          return [
            ...prevMessages.slice(0, -1), {role: 'ai', content: data.message}
          ]
        else
          return [
            ...prevMessages, {role: 'ai', content: data.message}
          ]
      })
    };

    chatSocket.current.onclose = function (e) {
      console.error('WebSocket connection lost. Chat socket closed unexpectedly.', e)
      setConnectState(chatSocket.current.readyState)
      if (e.code === 4001) {
        // Show re-login dialog
        new Modal(reLoginModalRef.current, options).show()
      }
    };
  }

  const sendMessage = () => {
    if (prompt.length === 0) return

    const newMessages = [...messages, {
      role: 'user', content: prompt
    }]
    setMessages(newMessages)
    setPrompt('')
    chatSocket.current.send(JSON.stringify({
      'history': newMessages
    }))
  }
}
The frontend code is pretty straightforward, nothing special to say.
I used messagesRef.current.scrollIntoView({behavior: 'smooth'}) to implement automatic scrolling to the bottom of the messages. When I was developing AIHub with Blazor before, I think I used a different implementation; I don't remember it being this one.
But this method is pretty smooth (丝滑).
Writing the WebSocket address directly in here doesn't feel very elegant, and having to change it to wss:// for deployment later is also a bit of a hassle. I should look into if there's a more elegant way to implement this.
Summary
This is just a simple demo; in practice, production environments require consideration of many more issues. This article aims to introduce the application of channels, and future blog posts will be updated as new research findings emerge~
_EOF_
Implementing WebSocket Communication with Django-Channels for Large Language Model Dialogue
- 本文作者:
- 程序设计实验室
- 版权声明:
- 本博客所有文章除特别声明外,均采用 BY-NC-SA 许可协议。转载请注明出处!
相关文章
Django-Filter介绍与刁钻需求的实现方法
Django-Filter是一个非常好用的第三方库,很好的利用了Django ORM的特性,可以使用很少的代码就扩展原有的接口,实现多种筛选功能~ 场景 Model定义的部分代码,可以看到需求模型包括了 关键词 keyword、区域 region、需求状态 require_status,这三个字段 class Require(models.Model): 需求 keyword =
2021-12-18 · Django · 约 1 分钟
Django项目引入NPM和gulp管理前端资源
前言 之前写了一篇《Asp-Net-Core开发笔记:使用NPM和gulp管理前端静态文件》,现在又来用Django开发项目了,之前我搞了一个Django的快速开发脚手架「DjangoStarter」,正好给升级一下~ 关于npm和gulp我就不多重复了,之前那篇文章都写了,直接上操作 安装依赖 安装依赖的操作跟上一篇文章是一样的,不过我这里直接提供package.json文件,复制到项目根目录里
2022-04-02 · Django · 约 1 分钟
实测 Django 6.0:模版片段、后台任务、CSP 安全,三大特性体验报告
呵,连WebSocket都没塞进去就敢叫大版本更新?不过模版片段和内置后台任务总算让Django像个现代框架了,至少写HTMX时不用再到处塞碎片文件。原生CSP?早该有了。至于抛弃Python 3.11——跟不上时代的版本留着也是累赘。
2026-01-20 · Django · 约 1 分钟
Django的单元测试和集成测试
测试,在以前确实是经常被忽略的话题,特别是对于 Python Web 这种快速开发框架
2024-03-06 · Django · 约 1 分钟
讨论
共 0 条加载评论中…