Personal Data Preservation Plan: Deploy Joplin Server Note Synchronization Service
In this era of data explosion, the value of personal data has become increasingly prominent, emerging as an irreplaceable and crucial asset in our lives and work. In my previous article, I introduced the process of migrating from Evernote to Joplin, a key step in my quest for greater control over my data. While exploring synchronization solutions, I tried OneDrive, initially expecting it to provide stable and efficient syncing services. However, during actual use, I found that it lacked optimization for small files, resulting in extremely slow synchronization speeds that significantly impacted the user experience. Although it remains uncertain whether data loss issues exist, such inefficiency is simply too difficult for me to accept.
目录15 个章节
Preface
In this era of data explosion, the value of personal data has become increasingly prominent, emerging as an irreplaceable asset in our lives and work. In my previous article, I detailed the migration process from Evernote to Joplin, a crucial step in my quest for data autonomy. While exploring synchronization solutions, I tried OneDrive, hoping it would provide stable and efficient sync services. However, during actual use, I discovered it lacked optimization for small files, resulting in extremely slow synchronization speeds that severely impacted the user experience. Although it's not yet certain whether data loss has occurred, such inefficiency is hard to meet my needs.
Consequently, I decided to delve deeper, eventually focusing on the Joplin Server note synchronization service. This is not just a technical exploration but a core initiative in building a personal data preservation plan. Deploying a dedicated Joplin Server means data security will be more reliably ensured, access will be more convenient, and I can completely bid farewell to the various risks brought by third-party cloud services, truly achieving autonomous management and comprehensive protection of personal data. In the following sections, I will share this process, hoping to provide some inspiration for those of you who may also be struggling with data synchronization.
Prepare docker-compose configuration
Official documentation: https://github.com/laurent22/joplin/blob/dev/packages/server/README.md
Based on the official documentation, I've organized the docker-compose configuration:
version: '3'

services:
    app:
        image: joplin/server:latest
        ports:
            - "22300:22300"
        restart: unless-stopped
        networks:
            - pgsql
        environment:
            - APP_PORT=22300
            - APP_BASE_URL=${APP_BASE_URL}
            - DB_CLIENT=${DB_CLIENT}
            - POSTGRES_PASSWORD=${POSTGRES_PASSWORD}
            - POSTGRES_DATABASE=${POSTGRES_DATABASE}
            - POSTGRES_USER=${POSTGRES_USER}
            - POSTGRES_PORT=${POSTGRES_PORT}
            - POSTGRES_HOST=${POSTGRES_HOST}

networks:
  pgsql:
    external: true
PS: I'm using a previously deployed PostgreSQL database here, so I'm bridging the network to the pgsql network.
You can see there are still some environment variables in this configuration.
You need to create a .env file in the same directory with the following content:
DB_CLIENT=pg
POSTGRES_PASSWORD=your_password
POSTGRES_DATABASE=joplin
POSTGRES_USER=joplin
POSTGRES_PORT=5432
POSTGRES_HOST=pgsql
Creating a Database
Create a database in PostgreSQL for Joplin to use.
Create the Joplin database:
At the psql prompt, execute:
CREATE DATABASE joplin;
Create the Joplin user:
Execute the following SQL statement. Replace 'your_password' with the actual password you wish to set:
CREATE USER joplin WITH ENCRYPTED PASSWORD 'your_password';
Note: If you want this user to have the permission to create databases, you can add the CREATEDB privilege. For example:
CREATE USER joplin WITH ENCRYPTED PASSWORD 'your_password' CREATEDB;
Grant the Joplin user access to the Joplin database:
Execute:
GRANT ALL PRIVILEGES ON DATABASE joplin TO joplin;
Configuring Docker Mirrors for QNAP
Due to force majeure factors, the previously usable domestic docker mirrors have mostly been shut down.
I have found a temporary alternative (https://docker.m.daocloud.io) that can be used for now. It's not known when it might stop working.
You need to configure this in Container Station (Path: Properties - Registry Server).
If it doesn't work, you can look for other available mirrors in this gist: https://gist.github.com/y0ngb1n/7e8f16af3242c7815e7ca2f0833d3ea6
Pulling an Image
Currently, searching for images is unavailable (because it cannot connect to Docker Hub).
You can only click the "Pull" button in the top right corner (equivalent to the docker pull command).
Then enter the image name joplin/server.
Remember to select the domestic mirror added earlier for the server.
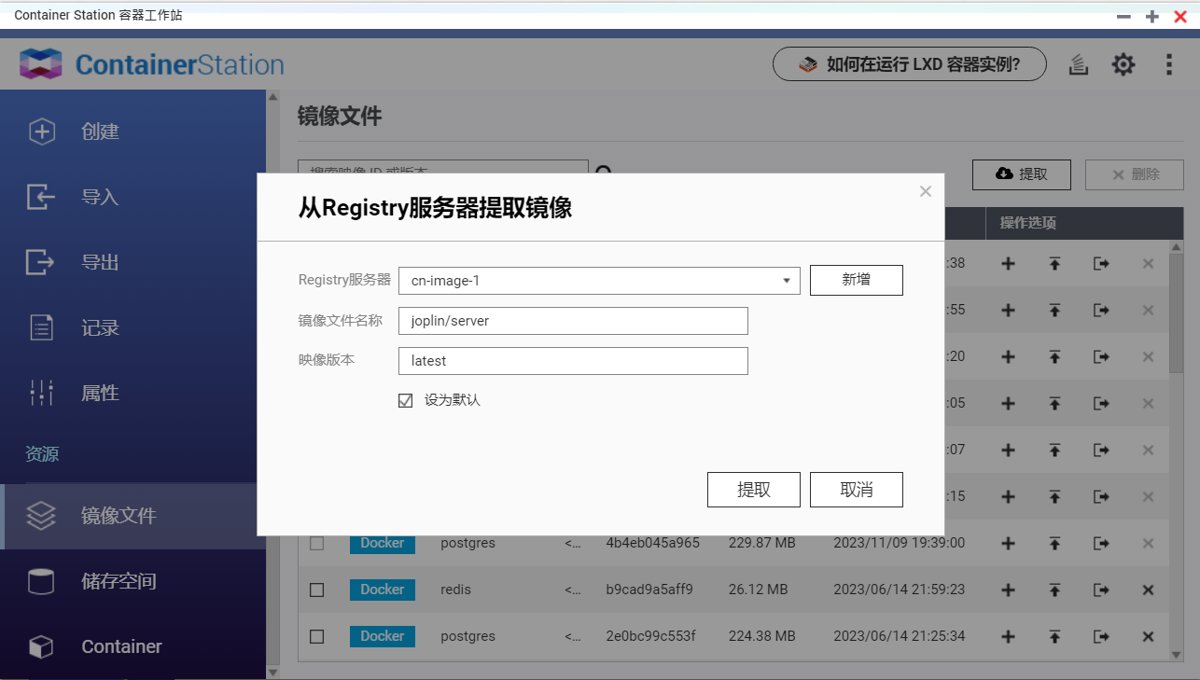
Click Pull, and you can see the progress in the top right corner.
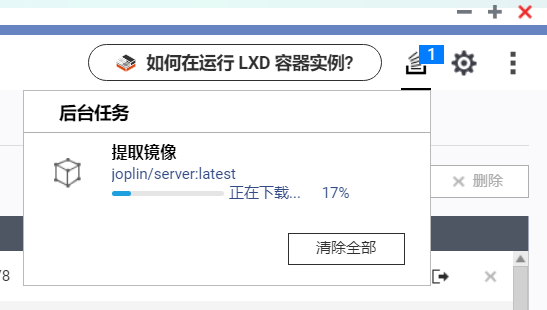
Storage Configuration (Optional)
By default, the project content (notes, tags, etc.) is stored in a database, requiring no extra steps for it to work.
However, since this content can be quite large, you have the option to store it outside the database by setting the STORAGE_DRIVER environment variable.
Continue editing the .env file above.
STORAGE_DRIVER=Type=Filesystem; Path=/joplin-storage
Then, map a volume in the docker-compose file.
volumes:
  - ./storage:/joplin-storage
Note: If you are using a QNAP NAS, please create this directory yourself. If you let Docker create it automatically, the directory will be owned by the admin user, and the Joplin container will not be able to access it.
Starting with the docker-compose Command
The docker version on QNAP is still quite old.
Execute docker-compose up in the directory containing the configuration files to start.
Oh, also, if it still shows that the image cannot be pulled, you can replace the image with docker.m.daocloud.io/joplin/server
Time Drift Issue
I encountered the following error when starting:
app_1  | 12:27:17 0|app    | Error: The device time drift is -32027ms (Max allowed: 2000ms) - cannot continue as it could cause data loss and conflicts on the sync clients. You may increase env var MAX_TIME_DRIFT to pass the check, or set to 0 to disabled the check.
app_1  | 12:27:17 0|app    |     at /home/joplin/packages/server/src/app.ts:292:11
app_1  | 12:27:17 0|app    |     at Generator.next (<anonymous>)
app_1  | 12:27:17 0|app    |     at fulfilled (/home/joplin/packages/server/dist/app.js:5:58)
app_1  | 12:27:17 0|app    |     at processTicksAndRejections (node:internal/process/task_queues:95:5)
This error message indicates that the Joplin Server detected a significant deviation between the system time and the expected time upon startup. The specific drift value is -32027 milliseconds (approximately 32 seconds), while the default allowed maximum drift is 2000 milliseconds. This kind of time drift could lead to data conflicts or data loss in the sync clients, so the service refuses to start as a safety precaution.
My solution was to synchronize the Docker time + adjust the time drift check parameters.
Add the following volume mapping:
volumes:
  - /etc/localtime:/etc/localtime:ro
Add the following environment variable:
environment:
  - MAX_TIME_DRIFT=40000  # Allow a time drift of 40 seconds
After restarting, it worked normally.
Invalid Origin Issue
After startup, when I accessed port 22300 on the NAS, I received an "Invalid origin" error message.
This problem isn't particularly difficult to solve. The main issue is that QNAP's reverse proxy needs to be configured in the control panel, but the available configuration parameters there are quite limited.
It appears QNAP's built-in HTTP server is Apache. I referred to the Request Header for the same issue in the GitHub issues, but still couldn't resolve it.
https://github.com/laurent22/joplin/issues/6008
Initially, I set the environment variable to APP_BASE_URL=http://localhost:22300.
This allowed the admin page to open, but the static resources couldn't be loaded.
SSH Tunnel
At this point, I thought of the ever-versatile SSH tunnel.
What if I just forward the port 22300 on the server to access it locally?
So I directly executed it locally.
ssh -L 22300:localhost:22300 username@NAS-address
The result prompted:
channel 3: open failed: administratively prohibited: open failed
Clearly, the server side rejected my port forwarding request.
I went to the NAS to check the configuration file /etc/ssh/sshd_config.
I found this line of configuration.
#AllowTcpForwarding yes
OK, now remove this comment and restart the SSH service.
However, I couldn't find the SSH service under /etc/init.d/.
It is said that using the following command can restart all services, but I haven't tried it.
Reference: https://neolee.com/2023/11/05/威联通:重启服务
/etc/init.d/services.sh restart
I tried operating through the QNAP management interface:
- Log in to the QNAP management console.
- Go to "Control Panel" -> "System Settings" -> "Network & File Services" in the "Telnet/SSH" settings page.
- First disable the SSH service, then re-enable it. In theory, this might achieve the effect of restarting the service?
But unfortunately, after trying it, it still didn't work. (Shrug)
Then, let's just make do without static resources... (So, this QNAP system is really trash.)
Attempting Nginx Forwarding
I tried adding an Nginx container for forwarding.
services:
  nginx:
    image: nginx:stable-alpine
    container_name: nginx
    restart: unless-stopped
    networks:
      - default
    volumes:
      - ./nginx.conf:/etc/nginx/conf.d/default.conf
    ports:
      - 22380:8000
    depends_on:
      - app
Nginx configuration
upstream joplin {
    # This should point to the internal address and port of the Joplin container
    server app:22300;
}

server {
    listen 8000;
    server_name joplin.dealiaxy.com;

    charset utf-8;
    client_max_body_size 100M;

    # Key CORS configuration
    add_header 'Access-Control-Allow-Origin' "$http_origin" always;
    add_header 'Access-Control-Allow-Methods' 'GET, POST, PUT, DELETE, OPTIONS' always;
    add_header 'Access-Control-Allow-Headers' 'Authorization, Content-Type, X-Requested-With' always;
    add_header 'Access-Control-Allow-Credentials' 'true' always;
    add_header Referrer-Policy "strict-origin-when-cross-origin" always;

    if ($request_method = OPTIONS) {
        return 204;
    }

    location / {
        proxy_pass http://joplin;
        proxy_set_header Host $host;
        proxy_set_header X-Real-IP $remote_addr;
        proxy_set_header X-Forwarded-For $proxy_add_x_forwarded_for;
        proxy_set_header X-Forwarded-Proto $scheme;
        proxy_set_header X-Forwarded-Port $server_port;
        proxy_set_header X-Forwarded-Host $host;

        # WebSocket support
        proxy_http_version 1.1;
        proxy_set_header Upgrade $http_upgrade;
        proxy_set_header Connection "upgrade";
    }
}

access_log /var/log/nginx/access.log;
error_log /var/log/nginx/error.log;
server_tokens off;
However, after extensive troubleshooting, it still didn't succeed.
Reference: https://github.com/laurent22/joplin/issues/6350
Reconfiguring QNAP's Reverse Proxy (反向代理)
In the end, I reconfigured the proxy within the QNAP console.
I changed the target from localhost:22300 to domain:22300, and that did the trick...
Logging into the Console
By default, Joplin Server will be setup with an admin user with email admin@localhost and password admin. For security purposes, the admin user's credentials should be changed. On the Admin Page, login as the admin user. In the upper right, select the Profile button update the admin password.
Enter the default email and password to log in.
After entering the backend, it is recommended to create a new user for synchronization, as per official advice.
While the admin user can be used for synchronisation, it is recommended to create a separate non-admin user for it. To do so, navigate to the Users page - from there you can create a new user. Once this is done, you can use the email and password you specified to sync this user account with your Joplin clients.
Although the admin user can be used for synchronization, it is recommended to create a separate non-admin user for it. To do this, navigate to the "Users" page - from there you can create a new user. Once this is done, you can use the email and password you specified to sync this user account with your Joplin clients.
Configuring Joplin
Configure the Joplin server we deployed in the sync menu.
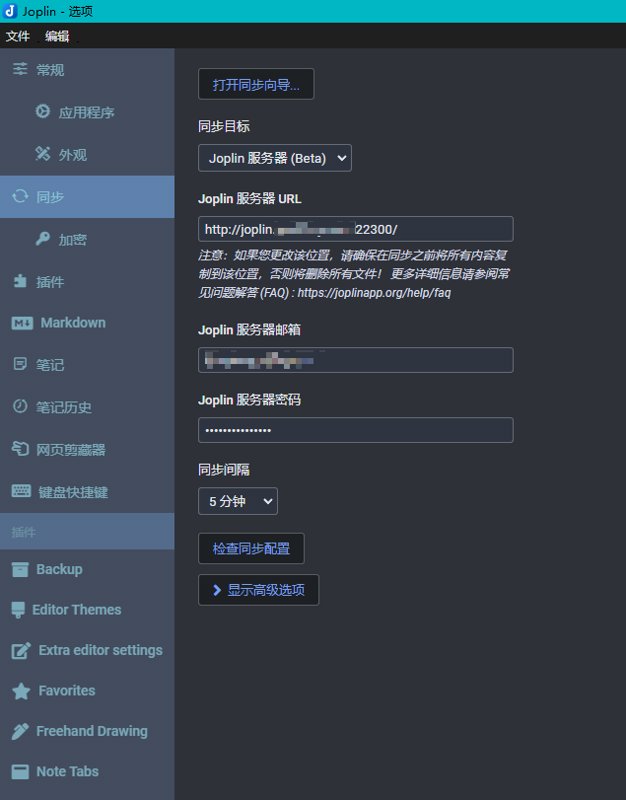
Return to the main interface, click the "Sync" button in the bottom left corner, done!
The sync speed this time is indeed much faster than OneDrive.
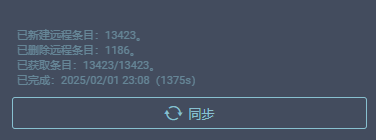
Sync Completed
It didn't take long (about ten minutes) to finish.
Going to the admin dashboard, you can see it has already used some space.
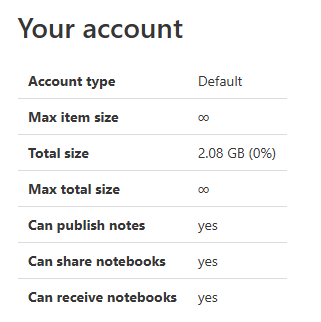
Checked and saw that over ten thousand notes occupy more than 2GB in the database. That's acceptable.
PS: If you mind, you can start a separate database to store Joplin's data.
_EOF_
Personal Data Preservation Plan: Deploy Joplin Server Note Synchronization Service
- 本文作者:
- 程序设计实验室
- 版权声明:
- 本博客所有文章除特别声明外,均采用 BY-NC-SA 许可协议。转载请注明出处!
相关文章
个人数据保全计划:(3)RAID与存储方案
iNode越小,可用空间也越小
2022-11-04 · 个人数据保全计划 · 约 1 分钟
个人数据保全计划:(4)基础环境配置
关闭swap 内存足够的话(8G以上),可以考虑关闭swap提高系统性能 查看开启了哪些swap cat /proc/swaps 输出 | Filename | Type | Size | Used | Priority | | ------------------------------------- | ----
2022-11-13 · 个人数据保全计划 · 约 1 分钟
个人数据保全计划:安装本地DNS
SmartDNS SmartDNS 是一个运行在本地的 DNS 服务器,它接受来自本地客户端的 DNS 查询请求,然后从多个上游 DNS 服务器获取 DNS 查询结果,并将访问速度最快的结果返回给客户端,以此提高网络访问速度。 SmartDNS 同时支持指定特定域名 IP 地址,并高性匹配,可达到过滤广告的效果。 与 DNSmasq 的 all-servers 不同,SmartDNS 返回的是访问
2022-11-12 · 个人数据保全计划 · 约 1 分钟
PVE折腾笔记 (3) 在原QNAP使用的硬盘上创建ZFS
QNAP硬盘换ZFS?自愈功能挺好用,但折腾Linux兼容性够闹心。LVM残留导致擦盘失败?内核对象得一个个干掉。Pool创建时参数选错?那可真是后患无穷。
2025-06-19 · 个人数据保全计划 · 约 1 分钟
讨论
共 0 条加载评论中…