

Asp-Net-Core Development Notes: Managing Frontend Static Files with NPM and Gulp
Introduction This article covers ASP.NET Core MVC projects. For frontend-backend separated projects like WebApi plus a standalone frontend, there's no need for this extra step~ Frontend folks are assumed to already know how to use the frontend toolchain. Why use MVC, a server-side rendering technology? Simple projects don't need to force a split that adds complexity (e.g., the blog project I'm currently developing) Server-side rendering is good for SEO and friendly to blog sites OK, although MVC is a bit dated, it can still be combined with a modern frontend toolchain to improve efficiency To follow this article, you need to have the Node.js environment installed first
目录8 个章节
Introduction
This article covers ASP.NET Core MVC projects. For frontend-backend separated projects like WebApi plus a standalone frontend, there's no need for this extra step~ Frontend folks are assumed to already know how to use the frontend toolchain.
Why use MVC, a server-side rendering technology?
- Simple projects don't need to force a split that adds complexity (e.g., the blog project I'm currently developing)
- Server-side rendering is good for SEO and friendly to blog sites
OK, although MVC is a bit dated, it can still be combined with a modern frontend toolchain to improve efficiency
To follow this article, you need to have the Node.js environment installed first. Download: https://nodejs.org/en/download
Before we start, let's take a look at our project file structure
- Blog/
- Blog.Web/
- Program.cs
- Blog.Web.csproj
- Blog.Data/
- Blog.sln
- Blog.Web/
Installing Dependencies with NPM
First, in the project root directory (that is, Blog/Blog.Web), run
npm init
This generates a package.json file
After that, the project structure should look something like this
- Blog/
- Blog.Web/
- Program.cs
- Blog.Web.csproj
- package.json (file created by the npm init command)
- Blog.Web/
Then edit package.json or use the command line npm install bootstrap to add the frontend libraries you need
Installed frontend libraries will be saved in the Blog/Blog.Web/node_modules directory, but our static files need to be placed in Blog/Blog.Web/wwwroot, which means we need to move the npm packages we use into the wwwroot folder.
How to do this? Manually moving or copying is out of the question—too much hassle.
This is where we turn to automation tools. Here I chose gulp.js, which is used to automatically move files, bundle and minify js, css, and images, delete files, and more. Boost productivity~
Installing gulp
First, install the gulp global tool
npm install --global gulp-cli
Then install gulp and several plugins in the project as development dependencies (devDependencies)
//gulp.js
npm install gulp --save-dev

//压缩 css
npm install gulp-clean-css --save-dev

//合并文件
npm install gulp-concat --save-dev

//压缩 js
npm install gulp-uglify --save-dev

//重命名
npm install gulp-rename --save-dev

//删除文件、文件夹
npm install rimraf --save-dev

//监听文件变化
npm install gulp-changed --save-dev
After installation, the project's package.json file should look something like this:
{
  "name": "star-blog",
  "devDependencies": {
    "gulp": "^4.0.2",
    "gulp-changed": "^4.0.3",
    "gulp-clean-css": "^4.3.0",
    "gulp-concat": "^2.6.1",
    "gulp-rename": "^2.0.0",
    "gulp-uglify": "^3.0.2",
    "rimraf": "^3.0.2"
  },
  "dependencies": {
      ...
  }
}
Configuring gulp
Continue by creating a gulpfile.js file in the root directory (the same directory as package.json)
/// <binding BeforeBuild='min' Clean='clean' ProjectOpened='auto' />
"use strict";

//加载使用到的 gulp 插件
const gulp = require("gulp"),
    rimraf = require("rimraf"),
    concat = require("gulp-concat"),
    cssmin = require("gulp-clean-css"),
    rename = require("gulp-rename"),
    uglify = require("gulp-uglify"),
    changed = require("gulp-changed");


//定义 wwwroot 下的各文件存放路径
const paths = {
    root: "./wwwroot/",
    css: './wwwroot/css/',
    js: './wwwroot/js/',
    lib: './wwwroot/lib/'
};

//css
paths.cssDist = paths.css + "**/*.css";//匹配所有 css 的文件所在路径
paths.minCssDist = paths.css + "**/*.min.css";//匹配所有 css 对应压缩后的文件所在路径
paths.concatCssDist = paths.css + "app.min.css";//将所有的 css 压缩到一个 css 文件后的路径

//js
paths.jsDist = paths.js + "**/*.js";//匹配所有 js 的文件所在路径
paths.minJsDist = paths.js + "**/*.min.js";//匹配所有 js 对应压缩后的文件所在路径
paths.concatJsDist = paths.js + "app.min.js";//将所有的 js 压缩到一个 js 文件后的路径


//使用 npm 下载的前端组件包
const libs = [
    {name: "jquery", dist: "./node_modules/jquery/dist/**/*.*"},
    {name: "popper", dist: "./node_modules/popper.js/dist/**/*.*"},
    {name: "bootstrap", dist: "./node_modules/bootstrap/dist/**/*.*"},
    {name:"bootswatch",dist: "./node_modules/bootswatch/dist/**/*.*"}
];

//清除压缩后的文件
gulp.task("clean:css", done => rimraf(paths.minCssDist, done));
gulp.task("clean:js", done => rimraf(paths.minJsDist, done));

gulp.task("clean", gulp.series(["clean:js", "clean:css"]));

//移动 npm 下载的前端组件包到 wwwroot 路径下
gulp.task("move", done => {
    libs.forEach(function (item) {
        gulp.src(item.dist)
            .pipe(gulp.dest(paths.lib + item.name + "/dist"));
    });
    done()
});

//每一个 css 文件压缩到对应的 min.css
gulp.task("min:css", () => {
    return gulp.src([paths.cssDist, "!" + paths.minCssDist], {base: "."})
        .pipe(rename({suffix: '.min'}))
        .pipe(changed('.'))
        .pipe(cssmin())
        .pipe(gulp.dest('.'));
});

//将所有的 css 文件合并打包压缩到 app.min.css 中
gulp.task("concatmin:css", () => {
    return gulp.src([paths.cssDist, "!" + paths.minCssDist], {base: "."})
        .pipe(concat(paths.concatCssDist))
        .pipe(changed('.'))
        .pipe(cssmin())
        .pipe(gulp.dest("."));
});

//每一个 js 文件压缩到对应的 min.js
gulp.task("min:js", () => {
    return gulp.src([paths.jsDist, "!" + paths.minJsDist], {base: "."})
        .pipe(rename({suffix: '.min'}))
        .pipe(changed('.'))
        .pipe(uglify())
        .pipe(gulp.dest('.'));
});

//将所有的 js 文件合并打包压缩到 app.min.js 中
gulp.task("concatmin:js", () => {
    return gulp.src([paths.jsDist, "!" + paths.minJsDist], {base: "."})
        .pipe(concat(paths.concatJsDist))
        .pipe(changed('.'))
        .pipe(uglify())
        .pipe(gulp.dest("."));
});

gulp.task("min", gulp.series(["min:js", "min:css"]));
gulp.task("concatmin", gulp.series(["concatmin:js", "concatmin:css"]));


//监听文件变化后自动执行
gulp.task("auto", () => {
    gulp.watch(paths.css, gulp.series(["min:css", "concatmin:css"]));
    gulp.watch(paths.js, gulp.series(["min:js", "concatmin:js"]));
});
Running Tasks
The tasks defined above are:
- move: Move the dist folders of the
node_modulespackages configured in thelibsconstant intowwwroot/lib - min: Minify each of the css and js files we wrote in
wwwroot/cssandwwwroot/jsintoxxx.min.css/xxx.min.js - concatmin: Combine all the css and js minified by
minabove into a singleapp.min.cssandapp.min.js - auto: Automatically watch for file changes and then automatically run the
minandconcatmintasks above
Enter gulp --tasks in the terminal to view the tasks we defined
> gulp --tasks
[17:37:44] Tasks for /home/da/Code/StarBlog/StarBlog.Web/gulpfile.js
[17:37:44] ├── clean:css
[17:37:44] ├── clean:js
[17:37:44] ├─┬ clean
[17:37:44] │ └─┬ <series>
[17:37:44] │   ├── clean:js
[17:37:44] │   └── clean:css
[17:37:44] ├── move
[17:37:44] ├── min:css
[17:37:44] ├── concatmin:css
[17:37:44] ├── min:js
[17:37:44] ├── concatmin:js
[17:37:44] ├─┬ min
[17:37:44] │ └─┬ <series>
[17:37:44] │   ├── min:js
[17:37:44] │   └── min:css
[17:37:44] ├─┬ concatmin
[17:37:44] │ └─┬ <series>
[17:37:44] │   ├── concatmin:js
[17:37:44] │   └── concatmin:css
[17:37:44] └── auto
Use the gulp task-name command to run a task, for example:
> gulp min
[17:41:41] Using gulpfile /home/da/Code/StarBlog/StarBlog.Web/gulpfile.js
[17:41:41] Starting 'min'...
[17:41:41] Starting 'min:js'...
[17:41:41] Finished 'min:js' after 19 ms
[17:41:41] Starting 'min:css'...
[17:41:41] Finished 'min:css' after 21 ms
[17:41:41] Finished 'min' after 44 ms
This completes the task of minifying each of the css and js files we wrote in wwwroot/css and wwwroot/js into xxx.min.css/xxx.min.js. Convenient!
Integrating with the IDE
I haven't used VS; I develop with Rider, so I'll only cover Rider
It's simple: open Run/Debug Configuration, and in add configuration, select Gulp.js under JavaScript Build Tools
Then select the GulpFile in the project. In the Tasks dropdown you can see the tasks we defined—just add them and you're done
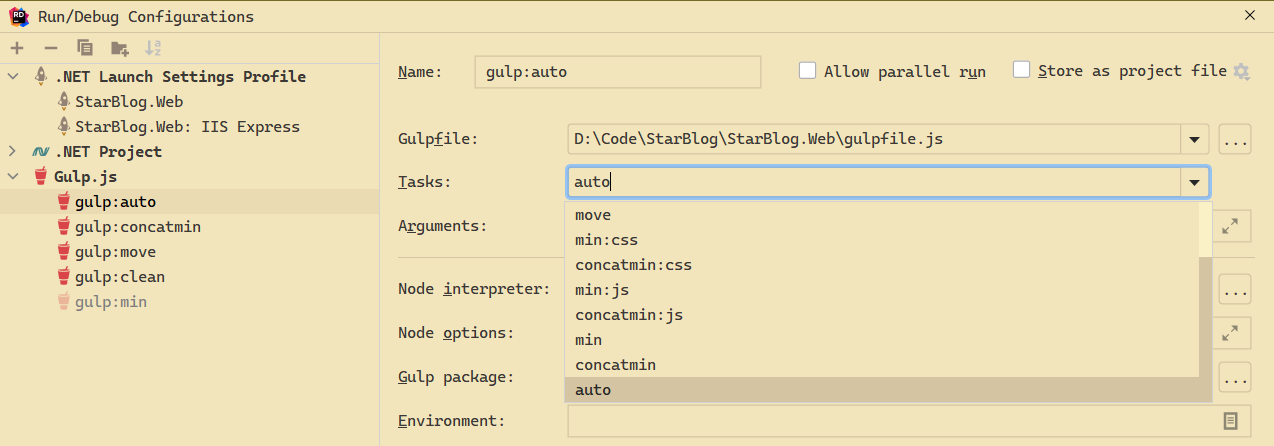
After adding, you can run them directly, just like a C# project
Using in Razor
After using Gulp.js to collect static files into the wwwroot directory, the references in Razor files need a small change, as follows:
Referencing CSS files
<link rel="stylesheet" href="~/lib/fontawesome-free-6.0.0-web/css/all.css">
<link rel="stylesheet" href="~/lib/bootstrap/dist/css/bootstrap.min.css">
<link rel="stylesheet" href="~/lib/bootswatch/dist/united/bootstrap.min.css">
<link rel="stylesheet" href="~/css/app.min.css">
Referencing JS files
<script src="~/lib/bootstrap/dist/js/bootstrap.bundle.min.js"></script>
<script src="~/js/app.min.js"></script>
All done!
References
_EOF_
Asp-Net-Core Development Notes: Managing Frontend Static Files with NPM and Gulp
- 本文作者:
- 程序设计实验室
- 版权声明:
- 本博客所有文章除特别声明外,均采用 BY-NC-SA 许可协议。转载请注明出处!
相关文章
Asp-Net-Core开发笔记:快速在已有项目中引入EFCore
很多项目一开始选型的时候没有选择EFCore,不过EFCore确实好用,也许由于种种原因后面还是需要用到,这时候引入EFCore也很方便。 本文以 StarBlog 为例,StarBlog 目前使用的 ORM 是 FreeSQL ,引入 EFCore 对我来说最大的好处是支持多个数据库,如果是 FreeSQL 的话,服务注册的时候是单例模式,只能连接一个数据库,如果需要使用 FreeSQL 同时
2023-10-08 · Asp-Net-Core开发笔记 · 约 1 分钟
Asp-Net-Core开发笔记:使用alpine镜像并加入健康检查
用alpine镜像?不过是把体积砍半,健康检查加个路径就完事。wget自带,何必装curl,真是多余。发布选linux-musl-x64,不然别想跑。
2024-04-19 · Asp-Net-Core开发笔记 · 约 1 分钟
Asp-Net-Core开发笔记:使用ActionFilterAttribute实现非侵入式的参数校验
用ActionFilterAttribute搞非侵入校验,省得重复写代码。支持Query、Body、Route、Header,HttpContext共享数据,但OAuth2.0边学边做,项目乱糟糟,功能凑合。
2024-05-17 · Asp-Net-Core开发笔记 · 约 1 分钟
Asp-Net-Core开发笔记:给SwaggerUI加上登录保护功能
既要在项目发布后访问 SwaggerUI ,又要保证一定的安全性,本文提供的思路或许是一种比较简单又有效的解决方案。
2024-05-21 · Asp-Net-Core开发笔记 · 约 1 分钟
讨论
共 0 条加载评论中…