

Asp-Net-Core Study Notes: Getting Started with Authentication
Preface Another update before Chinese New Year~ See, I told you I haven't been slacking off lately. I've actually accumulated some stuff during this time, just haven't organized it yet…… So I can only post some notes I didn't finish writing before Just think of it as a review PS: I still haven't made the red envelope covers I mentioned earlier, I need to hurry I've recently been preparing a collection of open-source project code I made before to do a sharing session Two common authentication methods Let's first look at the difference between two common authentication methods: token-based authentication and traditional session authentication. Session authentication We know that,
目录27 个章节
Preface
Another update before Chinese New Year~
See, I told you I haven't been slacking off lately. I've actually accumulated some stuff during this time, just haven't organized it yet……
So I can only post some notes I didn't finish writing before
Just think of it as a review
PS: I still haven't made the red envelope covers I mentioned earlier, I need to hurry
I've recently been preparing a collection of open-source project code I made before to do a sharing session
Two Common Authentication Methods
Let's first look at the difference between two common authentication methods: token-based authentication and traditional session authentication.
Session authentication
We know that the HTTP protocol itself is a stateless protocol, which means that if a user provides a username and password to our application for user authentication, then on the next request the user would have to authenticate again, because according to the HTTP protocol we cannot tell which user sent the request. So in order for our application to identify which user sent the request, we can only store a copy of the user's login information on the server. This login information is passed to the browser in the response, telling it to save it as a cookie so that it will be sent to our application on the next request. That way our application can identify which user the request came from. This is traditional session-based authentication.
But this kind of session-based authentication makes the application itself hard to scale. As the number of users from different clients grows, a standalone server can no longer handle more users, and at that point the problems of session-based authentication applications become apparent.
Drawbacks
Session: After each user is authenticated by our application, our application has to make a record on the server to facilitate identification on the user's next request. Typically sessions are stored in memory, and as the number of authenticated users grows, the server overhead increases significantly.
Scalability: After the user is authenticated, the server makes an authentication record. If the authentication record is stored in memory, this means the user's next request must also hit this same server in order to obtain authorized resources. In distributed applications, this correspondingly limits the capabilities of the load balancer. This also means the application's ability to scale is limited.
CSRF: Because user identification is based on cookies, if a cookie is intercepted, the user can easily become a victim of cross-site request forgery attacks.
Token-based authentication
Token-based authentication mechanisms, like the HTTP protocol, are also stateless. They do not need to retain the user's authentication information or session information on the server. This means applications using a token-based authentication mechanism do not need to consider which server the user logged in on, which makes it convenient to scale the application.
The flow is as follows:
- The user requests the server with a username and password
- The server verifies the user's information
- After verification, the server sends the user a token
- The client stores the token and attaches this token value on every request
- The server verifies the token value and returns data
This token must be passed to the server on every request; it should be kept in the request header. In addition, the server needs to support the CORS(跨来源资源共享) policy. Generally we can just do this on the server: Access-Control-Allow-Origin: *.
OAuth2.0 and OpenID
OAuth2.0 and OpenID Connect are standard authentication frameworks
OAuth (Open Authorization) is a standard protocol for delegated authorization. It allows an application to access a user's data without providing the user's password.
OpenID Connect is an identity layer on top of the OAuth2.0 protocol. It extends OAuth2.0 to standardize the authentication method.
OAuth does not immediately provide the user's identity; instead it provides an access token for authorization. OpenID Connect enables the client to identify the user through authentication, where authentication is performed on the authorization server. It is implemented like this: when initiating a request to the authorization server for user login and authorization, define a scope named openid. When informing the authorization server that OpenID Connect needs to be used, openid is a required scope.
Let's take a look at the architecture diagram of OpenID Connect. As you can see, JWT serves as its underlying implementation support. So understanding JWT is necessary.
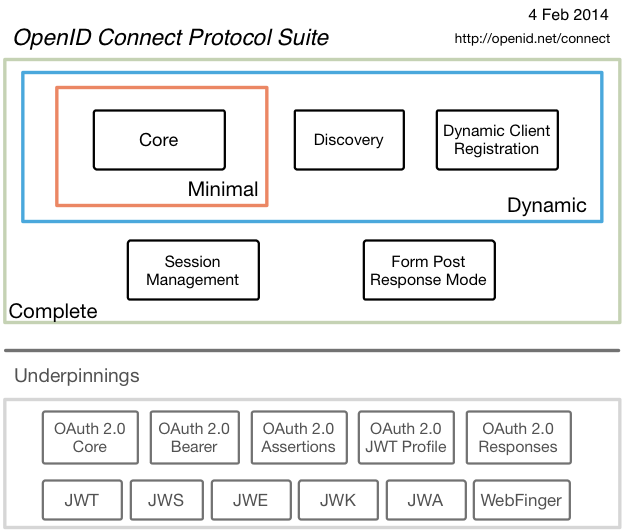
Then let's continue and learn about JWT next.
JWT
JSON Web Token (JWT) is a JSON-based open standard for passing claims between network application environments ((RFC 7519)). This token is designed to be compact and secure, and is especially suitable for single sign-on (SSO) scenarios on distributed sites. JWT claims are generally used to pass authenticated user identity information between the identity provider and the service provider, so as to obtain resources from the resource server. Additional claim information required by other business logic can also be added. The token can also be used directly for authentication, and can also be encrypted.
For the JWT we commonly use, a JWS signature-based encryption scheme is adopted. So the structure looks like "A.B.C". The Header describes the algorithm used for signature encryption; this description follows JWA. Playload is used to contain what we need; inside JWT, they are called the JWT Claims Set. JWT proposes many built-in Claim specifications, which we will see below. Finally there is the Signature, which is the content obtained based on JWS.
The JWT specification defines seven optional, registered claims (Claim), and allows public and private claims to be included in the token. These seven registered claims are:
| Claim | Description |
|---|---|
| iss (Issuer) | Identifies the principal that issued the JWT (the issuer). Generally a STRING or URI, for example "http://my.identityServer.com/5000" |
| sub (Subject) | The subject represented by the JWT. The subject value must be constrained to be locally unique in the issuer's context, or globally unique. So in some examples you will see it storing the user's ID, etc. Generally a STRING or URI |
| aud (Audience) | The audience of the JWT (I don't really know how this word should be translated most appropriately). Generally a STRING or URI, for example "http://my.clientiIp.com/5000" |
| exp (expire) | Expiration time of the JWT |
| nbf (not-before) | Time from which the JWT is valid |
| iat ((issued-at) | Issued-at time of the JWT |
| jti (expire) | Unique identifier of the JWT (JWT ID) |
Of course, we generally cannot handle complete business logic with just these values. For example, we often need to put information such as 用户邮箱 into the Token, so we can put some custom items in the 荷载, as long as we make sure they don't conflict with the built-in names.
As for how to write it specifically, there are code examples below~
Bearer Token
Bearer is HTTP Authorization的类型规范, while JWT is a 数据结构的规范.
In HTTP 1.0, the format Authorization: <type> <credentials> was proposed. If Basic-type authentication is Authorization : Basic, then the Bearer type is Authorization : Bearer <token>.
As for Bearer, it was proposed along with OAuth2.0. This specification only defines the format of Bearer Token (that is, the Bearer keyword needs to be included in the header), and does not say that the Token must use the JWT format.
Let's Go Over It Again
After introducing so many concepts, you folks might already be a bit dizzy. No worries, let's go over it again.
For user login, first the client requests the server's login endpoint, sending the username and password to the server;
Then the server takes the username and password and compares them against the database. If they are correct, it generates a JWT token according to the JWT standard and returns it to the client;
Once the client has the token, it can put the token in the HTTP request header in the form of a Bearer token to request those endpoints that require login to access~
It's that simple~
Authentication and Authorization in AspNetCore
Before we start writing code, we must understand the basic concepts of authentication and authorization in AspNetCore~
Authentication
The authentication handler is the core class that implements authentication operations. Authentication handlers derive from the IAuthenticationHandler interface. This interface defines the following three operations: authentication (AuthenticateAsync), challenge (ChallengeAsync), and forbid (ForbidAsync). Among these, authentication is the primary operation.
Authentication returns AuthenticateResult to indicate whether authentication of the request succeeded. AuthenticateResult can return three types of results: failure (Fail), no result (NoResult), and success (Success). If verification succeeds, an AuthenticationTicket will be returned via AuthenticateResult. AuthenticationTicket will encapsulate the user information so that it can be used in subsequent authorization.
A challenge means that the resource the current request is accessing requires authentication, but the current request has not passed authentication. Then in the subsequent authorization phase, the authentication handler in the specified authentication scheme needs to provide a challenge method in order to issue a challenge. If no authentication scheme is specified, the default authentication scheme is used. For example, if our system login session times out because we haven't operated for a long time, then when we operate on the system again, the system will generally redirect the page to the login page. This redirect operation is a kind of challenge.
Forbid refers to the operation to be executed when entering the authorization phase after an already authenticated user tries to access a resource they do not have permission to access. For example, if an ordinary user of a site wants to use VIP-user features: if the user is not logged in, then this request is anonymous access, and at this point the authorization phase needs to issue a challenge; if the user is already logged in, but the authorization phase finds that the user does not have permission to access the resource, then the system may return HTTP status code 403. This operation of returning HTTP status code 403 is a kind of forbid.
User information model
After authentication succeeds, the authentication handler returns an authentication ticket, namely AuthenticationTicket.
AuthenticationTicket is the class in ASP.NET Core that encapsulates authentication information.
AuthenticationTicket in turn contains ClaimsPrincipal. ClaimsPrincipal can be understood as the user principal, composed of a set of ClaimIdentity.
ClaimsIdentity can be understood as a proof of identity. A user principal can have multiple proofs of identity, just as an ID card and a driver's license can both represent a unique, specific person.
ClaimsIdentity contains a set of Claims. A Claim is like the name, gender, place of origin, and other information on an ID card. After a user passes authentication, the above classes are used to organize the user information. Subsequent authorization and other middleware can then use this information for feature design.
A structural example is as follows:
AuthenticationTicket(authentication ticket, which encapsulates authentication information)ClaimsPrincipal(user principal)ClaimIdentity(proof of identity)ClaimClaimClaim
ClaimIdentityClaimIdentity
Authorization
Authorization (Authorization) determines what a user can do in the system. For ASP.NET Core applications, authorization determines which resource paths a user can access. Authorization and the authentication discussed in section 7.1 have a depending-and-depended-on relationship. ASP.NETCore designs authentication and authorization as two relatively independent functional modules, with a very clear division of responsibilities: the former solves the problem of who the user is, and the latter solves the problem of what the user can do. Functionally, authorization is made based on the result of authentication; logically, only by knowing who the user is can you determine what the user can do.
ASP.NET Core provides simple authorization, role-based authorization, and policy-based authorization. These diverse authorization methods can satisfy most application scenarios through simple Attribute decorations. The two important Attributes in authorization are AuthorizeAttribute and AllowAnonymousAttribute; all authorization configuration is inseparable from these two Attributes. At the same time, extending authorization schemes in ASP.NET Core is also very convenient. At the end of this section we will introduce how to customize an authorization handler to implement custom authorization logic.
There are these three types of authorization
- Simple authorization: as long as you are logged in you can access; just add
[Authorize]on theControllerorAction - Role-based authorization: specific roles can access
- Policy-based authorization: as the name suggests
Role-based authorization
Role-based authorization, simply put, means a resource can only be accessed by users of specified roles. Role-based authorization must specify on the Controller or Action which roles can access the resource.
AuthorizeAttribute has a public string-type property Roles. Through this property you can specify which roles can access a particular resource. Whether an authenticated user belongs to a certain role can be verified through the IsInRole method of the ClaimsPrincipal class. ASP.NET Core role-based authorization uses this method to determine whether the current user belongs to a certain role. How is the property of which role the current user belongs to set? It's simple: the RoleClaimType property of ClaimsIdentity tells ASP.NET Core which Claim stores the user's role information.
For example, if a Controller requires the administrator role to access:
[Authorize(Roles="管理员")]
You can specify multiple roles that can all access, separated by commas:
[Authorize(Roles="人力经理,财务")]
If you decorate a Controller or Action with multiple [Authorize(Roles='SomeRole')], then the accessing user must be a member of all the specified roles. In the example below, the user must be both "Sales" and "Manager" to access
[Authorize(Roles="销售")]
[Authorize(Roles="经理")]
Policy-based authorization
Policy-based authorization is a more flexible authorization method. Let's first understand the authorization model of ASP.NET Core. Similar to authentication, ASP.NET Core consists of authorization handlers, authorization requirements, authorization schemes, and the authorization service. Among these, the authorization service, like the authentication service, provides authorization capabilities externally as an authorization service interface. An authorization scheme is a concept for organizing authorization mechanisms. An authorization scheme can contain multiple authorization requirements; only when all authorization requirements are satisfied is the authorization scheme considered passed. An authorization requirement can be associated with multiple authorization handlers; if any one authorization handler returns authorization success, it means the authorization requirement under that authorization scheme has been satisfied.
ASP.NET Core provides an authorization policy that implements the builder pattern. Through AuthorizationPolicyBuilder you can conveniently build an AuthorizationPolicy. Based on AuthorizationPolicyBuilder, you can conveniently set the authorization requirements of an authorization policy.
services.AddAuthorization(config => {
    config.AddPolicy("RequireAdmin", builder => builder.RequireRole("管理员"));
});
Besides roles that can be set on AuthorizeAttribute, you can also set Claim requirements.
This authorization policy requires the currently authenticated user's surname to be "Zhao":
services.AddAuthorization(config => {
    config.AddPolicy("RequireZhao", builder => builder.RequireClaim("姓", "赵"));
});
If the authorized surname rules are relatively complex and not convenient to enumerate, then it's recommended to use RequireAssertion to implement them. For example, the above functionality can also be implemented as follows:
services.AddAuthorization(config => {
    config.AddPolicy("RequireZhao", builder => builder.RequireAssertion(
        context => context.User.FindFirst("姓").Value=="赵"));
});
Additionally, you can implement more flexible authorization rule designs by associating custom authorization handlers with authorization requirements that implement IAuthorizationRequirement.
IdentityServer4
IdentityServer4 is an implementation of OAuth 2.0 and OpenID Connect on the ASP.NET Core platform. It conveniently provides identity authentication, authorization, and integration with third-party authentication services, and supports customization to meet developers' various needs in different scenarios. As a mature authentication and authorization framework, IdentityServer4 is an officially certified OpenID Connect server-side implementation. IdentityServer is open source and free; in today's world where intellectual property is highly valued, we can confidently build authentication platforms based on IdentityServer4 to develop commercial applications.
IdentityServer implements identity authentication and resource access control through concepts such as IdentityResource, ApiScope, ApiResource, and Client.
IdentityResource refers to user information such as user ID, name, and phone number. For example, the OpenID Connect specification defines a set of standard IdentityResources. In addition, we can also customize IdentityResources. These concepts are similar to Claims in ASP.NET Core authentication, defining the user information that the application can access.
ApiScope can be thought of as a kind of label for an API, while ApiResource is an abstraction of the API in an authorization scenario. If you need to control whether a client can access a certain API, you need to define ApiScope and ApiResource.
Client restricts which applications can access the corresponding API resources via Request Token. Each Client has a unique Client ID. Setting a secret can enhance the security of user information. The key is that by setting AllowedApiScopes, the framework can control which ApiResources this Client can access (Resources are associated with Scopes).
Let's Start Coding!
OK, we've finally reached the exciting coding part. Reading a book a hundred times is not as good as practicing once—let's get started!
First, according to the JWT standard, we need to define the following:
Issuer: The entity that issues the JWTAudience: The audience of the JWTKey: The secret key used for encryption
In this example we'll write the simplest single-site login authentication, so Audience can be hardcoded in the configuration file.
Define the Configuration Class
To conveniently map the appsettings.json configuration file, we define a class (oops, it's two)
public class SecuritySettings {
    public Token Token { get; set; }
}
public class Token {
    public string Issuer { get; set; }
    public string Audience { get; set; }
    public string Key { get; set; }
}
Then register the service
services.Configure<SecuritySettings>(configuration.GetSection(nameof(SecuritySettings)));
Add Authentication Services and Middleware
Add authentication services
services.AddAuthentication(options => {
    options.DefaultAuthenticateScheme = JwtBearerDefaults.AuthenticationScheme;
    options.DefaultChallengeScheme = JwtBearerDefaults.AuthenticationScheme;
})
    .AddJwtBearer(options => {
        // 这里用到我们之前定义好的配置类
        var secSettings = configuration.GetSection(nameof(SecuritySettings)).Get<SecuritySettings>();
        // 设置jwt token的各种信息用于验证
        options.TokenValidationParameters = new TokenValidationParameters {
            ValidateAudience = true,
            ValidateLifetime = true,
            ValidateIssuer = true,
            ValidateIssuerSigningKey = true,
            ValidIssuer = secSettings.Token.Issuer,
            ValidAudience = secSettings.Token.Audience,
            IssuerSigningKey = new SymmetricSecurityKey(Encoding.UTF8.GetBytes(secSettings.Token.Key)),
            ClockSkew = TimeSpan.Zero
        };
    });
Add middleware
Add these three lines of code before app.UseEndpoints
app.UseRouting();
app.UseAuthentication();
app.UseAuthorization();
User Entity Class
Very simple, no need to elaborate
public class LoginUser {
    public string Username { get; set; }
    public string Password { get; set; }
}
Login Endpoint
Write a user login endpoint in the Controller
[HttpPost]
public ActionResult<LoginToken> Login(LoginUser loginUser) {
    var user = _authService.GetUser(loginUser.Username);
    if (user == null) return NotFound();

    var md5Pwd = loginUser.Password.MDString();
    if (md5Pwd != user.Password) return Unauthorized();

    return _authService.GenerateLoginToken(user);
}
Here I've encapsulated an AuthService service, specifically for handling operations related to user authentication
The GetUser method doesn't need much introduction—it's just a database read operation.
We'll mainly look at the GenerateLoginToken method.
Key Code for Generating the Token
The code for the GenerateLoginToken method is as follows
public LoginToken GenerateLoginToken(User user) {
    // 构造JWT中的claims信息
    var claims = new List<Claim> {
        new("username", user.Name),
        new(JwtRegisteredClaimNames.Name, user.Id), // User.Identity.Name
        new(JwtRegisteredClaimNames.Jti, Guid.NewGuid().ToString()), // JWT ID
    };

    // 从配置文件里读取信息
    var key = new SymmetricSecurityKey(Encoding.UTF8.GetBytes(_secSettings.Token.Key));
    var signCredential = new SigningCredentials(key, SecurityAlgorithms.HmacSha256);
    var jwtToken = new JwtSecurityToken(
        issuer: _secSettings.Token.Issuer,		// 颁发者信息
        audience: _secSettings.Token.Audience,	// 接受者信息
        claims: claims,							// 要放进JWT中的claims信息
        expires: DateTime.Now.AddDays(7),		// 过期时间
        signingCredentials: signCredential);	// 签名

    // 最后返回一个 LoginToken 对象,其中包含JWT token和过期时间两个字段
    return new LoginToken {
        Token = new JwtSecurityTokenHandler().WriteToken(jwtToken),
        Expiration = TimeZoneInfo.ConvertTimeFromUtc(jwtToken.ValidTo, TimeZoneInfo.Local)
    };
}
I've explained the meaning of this code in the comments. The LoginToken at the end is a class I defined; the code is very simple:
public class LoginToken {
    public string? Token { get; set; }
    public DateTime Expiration { get; set; }
}
Result
Once that's done, visit the login endpoint, submit the correct username and password, and you'll get the JWT token the client needs, roughly in the following form
{
  "token": "eyJhbGciOiJIUzI1NiIsInR5cCI6IkpXVCJ9.eyJzdWIiOiJ5ZXpzIiwibmFtZSI6InllenMiLCJwaG9uZV9udW1iZXIiOiIxNTYwMjc3NzMwMCIsImV4cCI6MTY0MzMxMzc3OSwiaXNzIjoiZGVtb19pc3N1ZXIiLCJhdWQiOiJkZW1vX2F1ZGllbmNlIn0.7x8zfpcWWbCH6SwXOUnQKCfXRWsyUiWoB5jSxYSIq-Q",
  "expiration": "2022-01-28T04:02:59+08:00"
}
Add an [Authorize] attribute to the endpoint methods or Controller classes that require login, and you're good
If you access without including the HTTP header Authorization : Bearer <token>, you'll get a 401 Unauthorized error.
All done!
How to Use JWT Token in SignalR?
Next is a bit of extra content
Besides HTTP-based APIs like WebApi, AspNetCore can also implement real-time communication such as WebSocket, for example with SignalR
So can authentication also be added to SignalR requests? The answer is yes
Just like with controllers, you only need to add the [Authorize] attribute to the Hub class or to methods inside the Hub class to implement authentication.
But how does the client submit the token when accessing? This isn't HTTP—there's no header
Don't worry, let's look at the following two methods. Both need to be configured where we added the services earlier.
First, identify where to add the configuration:
services.AddAuthentication(...)
    .AddJwtBearer(options => {
        options.TokenValidationParameters = new TokenValidationParameters {...};
        options.Events = new JwtBearerEvents {
            // 等会要添加的配置代码放在这里...
        };
    });
The official documentation's method
OnMessageReceived = context => {
    var accessToken = context.Request.Query["access_token"];
    var path = context.HttpContext.Request.Path;
    // If the request is for our hub
    if (!string.IsNullOrEmpty(accessToken) && path.StartsWithSegments("/hub")) {
        // Read the token out of the query string
        context.Token = accessToken;
    }
    return Task.CompletedTask;
}
A Jianshu user's method
OnMessageReceived = context => {
    var accessToken = context.Request.Query["access_token"];
    if (!string.IsNullOrEmpty(accessToken) &&
        (context.HttpContext.WebSockets.IsWebSocketRequest || context.Request.Headers["Accept"] == "text/event-stream")){
        context.Token = context.Request.Query["access_token"];
    }
    return Task.CompletedTask;
}
A bit of commentary: the official documentation's method is a bit hardcoded—it judges based on the request path. But if our project has more than one hub, that's a hassle and we'd need to write extra code;
The Jianshu user's method judges based on the request type. We know SignalR is different from ordinary HTTP requests, so I feel the Jianshu user's method is a bit more elegant~
Client Usage
Almost forgot this
Here's the JavaScript code~
let loginToken = "xxx"
let connection = new signalR.HubConnectionBuilder()
    .withUrl("/hub/hub_name", {accessTokenFactory: () => loginToken})
    .build()
When establishing the connection, just include the accessTokenFactory parameter~
Afterword
Phew~
Finally got it done
Didn't expect this blog post to be this long and take this long
Authorization and authentication include a lot to learn. So far I've only done the most basic login verification, and haven't gotten into identity yet
So this post is a basic introduction; upcoming posts will continue to go deeper into this. Let's go!
References
- (Recommended) Come take a look at AspNetCore authentication: https://www.cnblogs.com/uoyo/p/13209685.html
- A Complete Guide to the OAuth 2.0 and OpenID Connect Protocols: https://www.infoq.cn/article/euvhttyf3jmfakmm8cmn
- Authentication and authorization ASP.NET CoreSignalR: https://docs.microsoft.com/zh-cn/aspnet/core/signalr/authn-and-authz?view=aspnetcore-6.0
- NET CORE SignalR JWT Authorization and Authentication: https://www.jianshu.com/p/19a0efdc01d1
- What is JWT -- JSON WEB TOKEN: https://www.jianshu.com/p/576dbf44b2ae
- JSON Web Token Introductory Tutorial: https://www.ruanyifeng.com/blog/2018/07/json_web_token-tutorial.html
- How to Use Token-based Authentication and Authorization (JWT) in ASP.NET Core 3: https://blog.miniasp.com/post/2019/12/16/How-to-use-JWT-token-based-auth-in-aspnet-core-31
_EOF_
Asp-Net-Core Study Notes: Getting Started with Authentication
- 本文作者:
- 程序设计实验室
- 版权声明:
- 本博客所有文章除特别声明外,均采用 BY-NC-SA 许可协议。转载请注明出处!
相关文章
Asp-Net-Core学习笔记:5.构建和部署
从上次开始学习Asp.Net Core以来,一直都是玩一玩,还没有什么机会用来实战,最近公司有个新的小项目,于是我用Asp.Net Core来尝尝新,结果也是非常OK,熟悉之后开发效率感觉和Django基本没差。 那么进入正题,本文简单说说Asp.Net Core应用的构建和部署。 构建 构建是使用build命令,不过一般我们都用vs或者rider之类的IDE,应该比较少会用到这个命令: dotn
2022-02-16 · Asp-Net-Core学习笔记 · 约 1 分钟
Asp-Net-Core学习笔记:部署,早知道,还是docker,以及一点碎碎念
前言 AspNetCore技术栈在我们团队里的使用也有一段时间了,之前的部署方式一直是本地编译之后上传可执行文件到服务器,使用supervisor来管理进程这种很原始的方式。 参考之前的文章: 对于小项目来说尚可,够用,但是存在几个问题: 每次更新花费的时间太长了,无论是Framework-Dependent还是Self-Contained,都要上传很大的文件~ 更新的时候需要在superviso
2022-02-16 · Asp-Net-Core学习笔记 · 约 1 分钟
Asp-Net-Core学习笔记:WebApi开发实践
前言 用AspNetCore做Api开发也有一段时间了,正好年底在做总结,做一个WebApi开发实践笔记。 暂时想到的一些技术关键词,同时也作为本文的大纲,现在对这套技术体系的了解还不够深入,以后会持续更新这个Api开发实践~ 身份认证:JwtBearer 分页:X.PagedList 缓存 ResponseCache Redis:StackExchange.Redis 数据持久化 / ORM F
2022-07-04 · Asp-Net-Core学习笔记 · 约 1 分钟
Asp-Net-Core学习笔记:3.使用SignalR实时通信框架开发聊天室
SignalR牛刀小试 在MVP杨老师的博客里看到这么个东西,我还以为是NetCore3才推出的新玩意,原来是已经有很多年的历史了,那看来还是比较成熟的一个技术了。 简介 SignalR是一个.NET Core/.NET Framework的开源实时框架,SignalR的可使用Web Socket, Server Sent Events 和 Long Polling作为底层传输方式。 Signal
2022-02-16 · Asp-Net-Core学习笔记 · 约 1 分钟
讨论
共 0 条加载评论中…