

Asp-Net-Core Study Notes: 5. Build and Deploy
Since I started learning Asp.Net Core last time, I've just been playing around with it and haven't had much chance to use it in a real project. Recently the company had a new small project, so I tried Asp.Net Core to get a taste of something new, and the result was very OK. After getting familiar with it, development efficiency felt basically no different from Django. Then let's get to the point. This article briefly talks about building and deploying Asp.Net Core applications. Build Building uses the build command, but generally we use IDEs like VS or Rider, so we probably rarely use this command: dotn
目录5 个章节
Since I started learning Asp.Net Core last time, I've just been playing around with it and haven't had much chance to use it in a real project. Recently the company had a new small project, so I tried Asp.Net Core to get a taste of something new, and the result was very OK. After getting familiar with it, development efficiency felt basically no different from Django.
Then let's get to the point. This article briefly talks about building and deploying Asp.Net Core applications.
Build
Building uses the build command, but generally we use IDEs like VS or Rider, so we probably rarely use this command:
dotnet build
Publish
This article will focus on the publishing part. As the name suggests, publishing means compiling the project into an executable file, so we can conveniently take it to other machines or deploy it to a server to run. For Java, that means packaging into a jar that depends on the JavaRuntime, or a war package that can run on Tomcat; for Go, it generates an executable file—just run it and you're done; for Python, sorry, there doesn't seem to be a great solution—you can package it as a wheel, or use pyinstaller to pack an exe, but for deploying web apps, people generally still use Docker.
As for our Asp.Net Core applications, just like Go, it's very convenient—you can pack it into a single executable file. One word: awesome!
Reference: https://docs.microsoft.com/zh-cn/dotnet/core/tools/dotnet-publish
The simplest publish command is:
dotnet publish
After using this command, a whole bunch of files will be generated in the publish directory, including dependencies, the app's core dll package, and the executable for the corresponding platform. Please note that this pile of generated files depends on the .NetCore Runtime on the machine to run.
For convenience, we definitely don't want to still need to install the .NetCore Runtime on the server when deploying, so see below.
To build an executable that does not depend on the DotNet Sdk, you need to specify the target platform:
dotnet publish -r <RID>
For
RID, see: https://docs.microsoft.com/zh-cn/dotnet/core/rid-catalog
Here are a few commonly used ones:
- Windows
- win-x86
- win-x64
- win-arm
- win-arm64
- Linux
- linux-x64
- linux-arm
- linux-arm64
For example, if I want to build an executable that can be used on a Linux server, use the following command:
dotnet publish -r linux-x64
The generated files look like this:
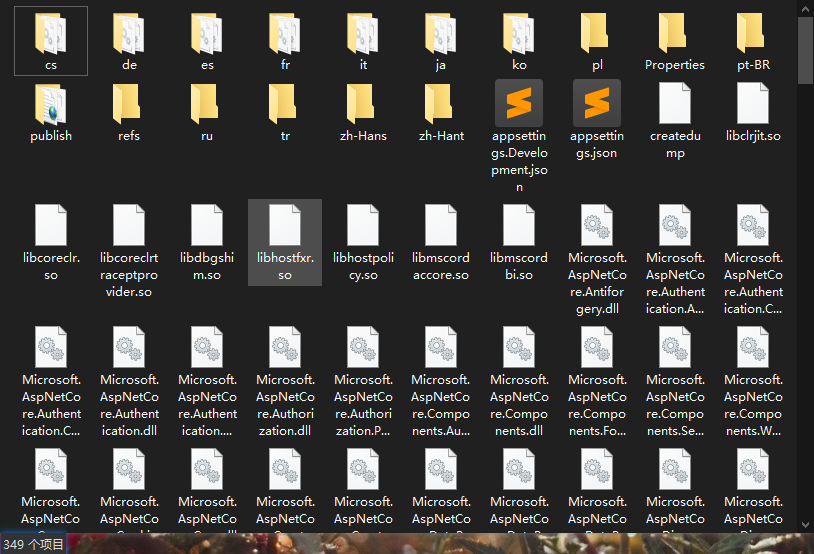
As you can see, this huge pile has more than three hundred folders and files. Putting this on a server is really a hassle—it takes up space and looks ugly. Let's also look at the size:
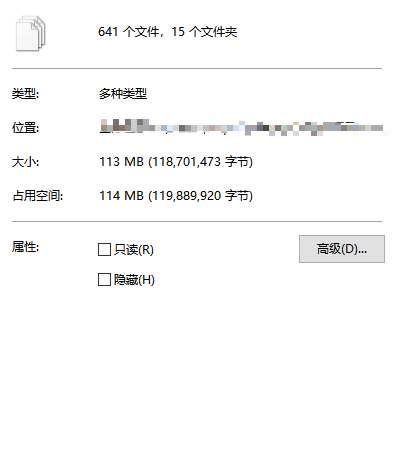
Over a hundred MB, that's way too much space. Uploading to the server would take forever. But don't worry, Microsoft's black magic is coming next~
Add these two options
dotnet publish -r linux-x64 -c Release -p:PublishSingleFile=true -p:PublishTrimmed=true
Run it, whoosh! Let's look at the generated files again—there's only one executable, a few config files, and the web static files directory! (Because I used the Debug build, there are pdb debug files.) Much cleaner than before!
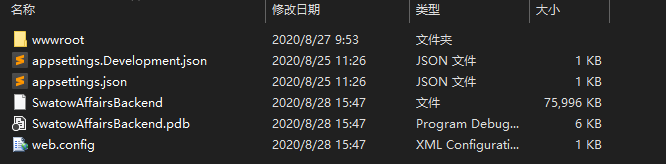
Let's look at the file size again:
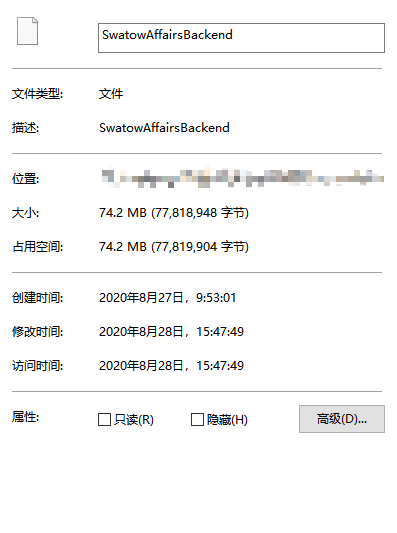
Dozens of MB smaller than before! That's much better now!
Next I'll introduce those extra two parameters. I feel like I don't even need to introduce them—everyone can guess~
-c Releasemeans generate with the Release configuration-p:PublishSingleFile=truemeans generate a single executable file, like Go-p:PublishTrimmed=truemeans trim the size of the executable, just as you saw, the size shrank by dozens of MB!
This way you can just drop this executable onto the server and run it. But once SSH disconnects, it's gone again~
So next I'll introduce using supervisor to monitor the web app's running.
Deploy
We choose supervisor, this simple tool, to manage and monitor the web app's running. It's written in Python, simple and easy to use.
First you need to install it, you can use pip:
pip install supervisor
Then create our config under the /etc/supervisord.d/ directory. Here's a template for reference.
[program:swatow_affairs]
# 脚本目录
directory = /path/dotnet/swatow_affairs
# 脚本执行命令
command = /path/to/swatow_affairs/SwatowAffairsBackend --urls "http://*:15001;"

# supervisor启动的时候是否随着同时启动,默认True
autostart = true
# 当程序exit的时候,这个program不会自动重启,默认unexpected,设置子进程挂掉后自动重启的情况,
# 有三个选项,false,unexpected和true。
# 如果为false的时候,无论什么情况下,都不会被重新启动,如果为unexpected,只有当进程的退出码不在下面的exitcodes里面定义的
autorestart = true
# 这个选项是子进程启动多少秒之后,此时状态如果是running,则我们认为启动成功了。默认值为1
startsecs = 1

# 脚本运行的用户身份
user = root

# 日志输出
stderr_logfile = /path/to/swatow_affairs/log/stderr.log
stdout_logfile = /path/to/swatow_affairs/log/stdout.log
# 把stderr重定向到stdout,默认 false
redirect_stderr = true
# stdout日志文件大小,默认 50MB
stdout_logfile_maxbytes = 20
# stdout日志文件备份数
stdout_logfile_backups = 20
After configuring this file, you can start supervisor. The command is as follows:
systemctl start supervisord.service
You can also use:
service supervisord start
Commands differ across Linux distros; you can look up the docs yourself.
After starting supervisor, our config file will be loaded automatically, and then our web app will start along with it.
For more configuration, see supervisor's official docs: https://github.com/Supervisor/supervisor
References
Welcome to Discuss
I've put together a series of technical articles and materials. Reply linux, flutter, c#, netcore, android, kotlin, java, python, etc. in the backend of the WeChat official account "Programming Lab" to get related technical articles and materials. If you have any questions, you can also leave a message in the official account backend~
_EOF_
Asp-Net-Core Study Notes: 5. Build and Deploy
- 本文作者:
- 程序设计实验室
- 版权声明:
- 本博客所有文章除特别声明外,均采用 BY-NC-SA 许可协议。转载请注明出处!
相关文章
Asp-Net-Core学习笔记:1.MVC入门篇
Asp.Net Core 学习 基于.Net Core 2.2版本的学习笔记。 常识 像Django那样自动检查代码更新,自动重载服务器(太方便了) dotnet watch run 托管设置 设置项目文件的AspNetCoreHostingModel属性。 PropertyGroup TargetFrameworknetcoreapp2.2/TargetFramework Asp
2022-02-16 · Asp-Net-Core学习笔记 · 约 1 分钟
Asp-Net-Core学习笔记:单元测试和集成测试
我在使用 AspNetCore 的这段时间内,看了很多开源项目和博客,发现各种 .Net 体系的新技术很多人都有关注和使用,但却很少有人关注测试。 测试是软件生命周期中的一个非常重要的阶段,对于保证软件的可靠性具有极其重要的意义。在应用程序的开发过程中,为了确保它的功能与预期一致,必须对其进行测试。这样做不仅能够确保功能正确执行,同时能够帮助开发人员尽早地发现并改正系统中所存在的缺陷(Bug),
2023-07-17 · Asp-Net-Core学习笔记 · 约 1 分钟
Asp-Net-Core学习笔记:部署,早知道,还是docker,以及一点碎碎念
前言 AspNetCore技术栈在我们团队里的使用也有一段时间了,之前的部署方式一直是本地编译之后上传可执行文件到服务器,使用supervisor来管理进程这种很原始的方式。 参考之前的文章: 对于小项目来说尚可,够用,但是存在几个问题: 每次更新花费的时间太长了,无论是Framework-Dependent还是Self-Contained,都要上传很大的文件~ 更新的时候需要在superviso
2022-02-16 · Asp-Net-Core学习笔记 · 约 1 分钟
Asp-Net-Core学习笔记:2.MVC视图、模型、持久化、文件、错误处理、日志
TagHelper 入门 优点:根据参数自动生成,不需要手写超链接,类似Django模板里面的url命令。 在ViewImport中添加TagHelper @addTagHelper *,Microsoft.AspNetCore.Mvc.TagHelpers 比如,链接TagHelper使用 a class=btn btn-outline-primary asp-controller=st
2022-08-12 · Asp-Net-Core学习笔记 · 约 1 分钟
讨论
共 0 条加载评论中…